Candy satin ribbon bows. Hair decoration for a girl in the form of a candy made of satin ribbons. Download video and cut mp3 - we make it easy
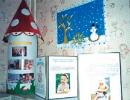
Under New Year There's no such thing as too much candy. The smell of tangerine zest, sweets and pine needles immediately brings everyone back to childhood and evokes a festive mood. Sweets should be everywhere: on festive table, on the Christmas tree and on the walls as decorations. You can also decorate girls’ hair and dresses with charming candies, or attach them to boys’ necks as a bow tie or to their arms. We offer you a master class that will allow you to create a real Christmas candy from ribbons with your own hands. This New Year's fantasy looks elegant and is suitable as a hair accessory with any main hair. This master class demonstrates how to make a Christmas tree toy and also shows what you need to make a hair accessory.
List of necessary materials and tools
One Christmas candy consists of satin and brocade ribbon. Its type, size of segments and their number are as follows:
- 11 pieces of green tape measuring 5 cm by 5 cm;
— 11 pieces of gold brocade measuring 5 cm by 5 cm;
- 8 pieces of white tape measuring 2.5 cm by 2.5 cm;
- 8 pieces of red ribbon measuring 2.5 cm by 2.5 cm;
- 4 pieces of green tape measuring 2.5 cm by 8 cm;
- 4 pieces of gold brocade measuring 0.5 cm by 8 cm;
- 2 pieces of red ribbon measuring 0.5 cm by 9 cm;
- scissors or a sharp stationery knife;
- lighter (can be replaced with a candle);
- hot glue gun;
- thread with a needle;
— a round bead hugger or in the form of a water lily with a diameter of 1.2 cm;
- 3 half beads white diameter 0.8 cm;
- a circle of felt or foamiran with a diameter of 1.5 cm;
A circle of felt or foamiran with a diameter of 4 cm for the base;
- gold cord, clip or elastic band (depending on the desired purpose of the kanzashi candy).

New Year's candy step by step
1. From square-shaped green and gold brocade, you need to form simple sharp petals, soldering the edges together with a flame.

2. Flame glue two opposite corners in squares.

3. Close two adjacent sharp corners in the resulting triangles in the same way.

4. And round off each small four-layer triangle.
5. The bottom of each petal obtained should be cut off. Step back from the attachment point by 0.2 mm, and then by 0.6 mm. Squeeze the parts on both sides and singe the bottom part.

6. Prepare 8 sharp petals of each color.

7. Glue the golden and green parts in pairs for ease of further work. Spread the ends slightly apart.

8. Start assembling the donut using glue. Fasten pairs of petals.

9. Assemble the striped ring - the central element of the candy.

10. 4 pieces of green ribbon (2.5 cm by 8 cm) and the same number of pieces of gold brocade (0.5 cm by 8 cm) will be used for the bow loops.

11. Place a thin gold stripe over a wider green stripe (centered along the segment). Glue the loops gathered at the ends.

12. Using red and white ribbon (2.5 cm by 2.5 cm), form double pointed petals. There will be 8 of them for the central flower. The opposite corners of the squares are soldered separately.

13. Then the triangles are folded again, the triangles are overlapped (the white one should be on the bottom) and rounded.

14. Make all the petals and trim the bottom by 0.2-0.5 mm.

15. Gather all the petals onto a thread and glue a white half-bead to the chosen hugger.

16. Glue a circle of felt or foamiran (1.5 cm) onto the golden-green donut.

17. Prepare 9 cm thin red strips.

18. Form loops from the strips, then bows. Attach white half beads on top.

19. Glue 4 green loops in the form of a bow under the bottom of the main part - a golden-green circle. Glue a red and white flower on top.

20. Glue red loops topped with half beads to the sides, completing the shape of a candy wrapper. If your plans included modeling Christmas decorations, then glue a loop of thin gold brocade or lace to the back.

21. Such a charming candy can equally well be used to decorate a children’s hoop. This decoration will be universal and appropriate for the New Year or any other party.

22. You can also attach a clip to the back of the candy to create an actual hair clip.

The resulting candy is quite large - 9 cm in length or more. One such hairpin is enough to decorate a girl’s hair.

Beautiful and unusual hair bands are a reality! You can make them yourself, having foamiran on hand. In this master class we will not show how to make this or that flower, but we will demonstrate the creation of cool elastic bands for hair in the form of candies - lollipops from foamiran.
Materials and tools:
- - foamiran in three colors (green, yellow, white);
- - red gel rod;
- - satin narrow yellow ribbon;
- - yellow rhinestones;
- - gold sparkles;
- — acrylic varnish;
- - thin brush;
- - scissors;
- - instant glue;
- - glue gun and a stick for it;
- - yellow felt;
- - hair elastic bands;
- - iron.
For one candy, cut three strips of foamiran 1 cm wide: yellow, green, white. The length of the strips depends on the size of the candy. For a large candy, you will need 30 cm long pieces. This candy is usually used to decorate a headband. For smaller candies, it is enough to cut strips 20 cm long.

Glue the white and yellow strips together, moving 0.5 cm from the edge.

Glue the green stripe, also moving away from the edge.

We roll it up and glue it at the same time.

We try to twist it more tightly.

For the tail of the candy, cut 2 rectangles measuring 2.5x4 cm. Make one side wavy using special scissors or by hand.

Heat the wavy edge on the iron and stretch it with your fingers. Fold the smooth edge like an accordion and glue it together.

It is better to attach such a large candy to the headband. Therefore, we will postpone it.

Small candies are more suitable for rubber bands. To make the candies more interesting, you can give them different tails. But first we’ll make a fastening for the elastic bands.
Cut a circle from the yellow felt, the diameter of which should match the diameter of the candy or be 0.3 cm smaller. Place the rolled candy on the felt, trace it, and cut it off.

We attach the rubber bands to the felt circles.

Glue the tails to the candy.

Using a gel rod, draw dots on the tails and barrel of the candy. Cut a ribbon about 10 cm long (you can always cut off the excess).

Take gold glitter, varnish and a thin brush. Cover the candies with varnish and add glitter. We put it away to dry.

While the candies are drying, let's make the bows. We fold a piece of ribbon into a bow and secure it with thread or glue.

Glue rhinestones to the bows. We attach the finished bows to the candies using glue.

We glue an elastic band with fastening to the small lollipops.

Without any special skills in working with foamiran, this is how you can quickly make cute lollipops for your daughter. Play with colors - choose your own range of candies.


Big candy from satin ribbons, made with your own hands according to this master class, is suitable for decorating hairstyles for a matinee or a home party.
A candy costume will make your little one stand out from the usual looks. An older girl can use the candy as a decoration for her purse, turning a typical accessory into a designer one. And if you reduce the size, you get an unusual brooch. Perhaps you have other ideas. Be sure to share them in the comments.
Materials for a creative lesson
Making candy is very easy, it will take no more than an hour to work. Prepare:
- 2 foam reels;
- 5 pieces of soft pink satin ribbon – 5*14 cm;
- 2 strips of grosgrain ribbon with a pattern – 2.5*14 cm;
- silver rhinestone tire;
- 2 pieces of white ribbon with silver lurex – 1.2*10 cm;
- 2 transparent half beads with a diameter of 8 cm.

The size and shape of the foam reels determines how the candy will turn out. In this MK, two bases from a 5 cm tape are glued together with hot glue.
Candy making technique
Measure the size of the bobbin in a circle, here 14 cm. Cut five pieces of ribbon to the obtained length. Glue the strips with Moment Crystal glue.

Glue the cut fabric onto the bobbin.

Decorate the candy with a silver splint and a grosgrain ribbon with cartoons. You can choose with a New Year's print. Will need 2 pieces of 14 cm. Cut the tire into strips. Since the length of the strips is 12 cm, you will need 5 pieces. Treat each piece of tire on both sides with fire to get rid of lint.

Glue cartoon ribbons in a mirrored form. Glue each piece to the joint of the pink material.

Place the silver tire on both sides of the cartoon ribbon. Use hot glue to secure.

Gather the ends onto the thread and pull it off. For greater strength, you can wrap it with thread several times. Do the same on the other side.


All that remains is to make bows for the candy. Cut two strips 1.2*10 cm with silver lurex. Fold as shown in the photo.

Glue it to the middle of each bow transparent half beads diameter 8 mm or 1 cm

Attach bows to the sides of the candy.

Any base for a large candy will do. If the girl is very small, then she can be glued to a bandage. If you’re older, use a hoop.

For greater effect, the hoop can be braided with a thin ribbon of the same color as in this one. And for shine, decorate with rhinestones.
The festive candy made from ribbons was invented and made for the website “Women’s Hobbies” by Svetlana Sorokina. Perhaps you will add your own ideas to the craft, we will be only too glad!
17. 02.2017

Catherine's blog
Bogdanova
Good afternoon to everyone who has visited my creative page on the “Family and Childhood” website. This lesson shows the process of creating a real caramel miracle - delicate pink hairpins made from kanzashi-style ribbons. If you give such beauty, made with your own hands, to a little girl, she will be incredibly happy.
And you can decorate ponytails with elastic bands decorated with candies on long curls even if the hairs are very short. Here are general recommendations using the example of pink candies with the popular “Peppa Pig” design. But you can repeat this master class on a satin ribbon of any other color, choosing accessories to match the girl’s dress. Kanzashi sweets are easy to make, do you want to make sure of this?
To make a set of hair clips, consisting of a pair of rubber bands, you need:
- wide pink satin ribbon (rectangles measuring 5 by 9 cm) - 4 pcs.;
- thin pink satin ribbon (strips measuring 0.5 by 10 cm) - 4 pcs.;
— grosgrain ribbon of medium width (pieces measuring 2.5 by 8 cm) – 2 pcs.;
- white or pink rhinestones - 4 pcs.;
- felt rectangles (size 1.5 by 2 cm) - 2 pcs.;
- weightless padding polyester - a piece the size of matchbox
— small rubber bands – 2 pcs.;
- scissors and a candle to cut and singe the ribbon;
- glue in a gun to securely fasten all the parts;
- a needle and white or pink thread.
Step-by-step description of the work
First, decide on the color of the fittings, then purchase a ribbon of the size indicated above. Cut out the number of pieces required for two candies. Since the rubber bands are intended for a little girl, an unusual cartoon design of the grosgrain ribbon will help enhance the doll effect. All children simply love to watch the cartoon about Peppa Pig, so her image is in demand and relevant. This is exactly the kind of hardware you can use.

To create the base of the candies, connect pairs of wide pieces of ribbon, connecting them along a side equal to 9 cm.

Hide the glued seam under a piece of grosgrain tape.

Form small bows from a thin pink ribbon, pressing the loop with your finger and securing with glue.

Glue a rhinestone to the center point of each bow.

Turn the candy sheet back towards you. Place some padding polyester in the central part, then glue the opposite ends of the tape together. The padding polyester will remain inside and give the workpiece the shape of a tube.


Make 2 candies.

Prepare bows with rhinestones for decoration.

Glue the bows where the thread knots are attached.

Cut out rectangles from felt. Apply glue strips to opposite edges and secure the rubber bands. The rubber bands must be glued from the back side.


Rubber candies made from satin ribbons are ready. Such products can be considered the easiest when it comes to the kanzashi technique. The master class is suitable for beginner craftswomen. I hope you, dear readers, will like this technique, and you will create many satin masterpieces with your own hands. I recommend subscribing to updates to learn a lot more new and useful information. Bye, bye everyone.
Hair accessories using the kanzashi technique are distinguished by their originality and attractiveness, ease of manufacture and low cost.
To make these beautiful elastic bands from satin ribbons with your own hands, you will spend one evening. Delicate candy flowers are suitable for girls with any hair color. You can also attach hairpins to the composition, or even more practical - make the mount removable and change it depending on the hairstyle you are creating.
What is needed for the master class
For one candy gum or hairpin, prepare tape different colors :
- 8 square pieces of mint 5*5 cm;
- 8 squares pink 5*5 cm;
- 6 white rectangles 2.5*7 cm;
- 2 pieces of narrow white 0.5*10 cm.
Also prepare the accessories:
- the middle in the form of a delicious candy;
- silver bell huggers – 2 pcs.;
- pink beads with a diameter of 0.8 cm – 4 pcs.;
- white beads with a diameter of 0.8 cm – 2 pcs.;
- 2 felt bases with a diameter of 3 cm;
- an elastic band or a hairpin clip.

To fix the edges, you will need to singe with the flame of a lighter or candle. Be careful and follow safety precautions! For more details about the reception, see another publication on our website.
Modeling flowers for elastic bands made of satin ribbons
The choice of hardware color is dictated appearance wonderful candy-shaped center. Ribbon in mint, pink and white colors is suitable. Cut out squares with a side of 5 cm from pink and mint, and rectangles of 2.5 cm by 7 cm from white. Also prepare the rest of the accessories, adhering to a delicate pink and light green color ensemble.
To model diamond-shaped white petals, take rectangular pieces. Turn the inside out towards you and bend the upper part to the right or left at a right angle.

After this, bend the beveled corner so as to align the two ends and get a house-shaped blank. Turn the piece with the right side facing you and make a fold at the bottom edge to create a diamond shape.

Prepare 6 white diamond-shaped petals with a fold in the center. Also cut out a felt circle for the base.

Use pink squares with a side of 5 cm to model petals of a different shape, bend them diagonally.

Bend the resulting isosceles triangle in height. Then make a fold down the center of the longest side in the triangle. Bend the remaining sides, join the corners to the fold obtained in the center, singe it in this position with a lighter, cut off the excess to get an oval petal with a triple fold in the center.

Make 8 identical pink petals and prepare a second felt circle to hold the flower for an elastic band made of satin ribbons, as in the photo.

Also bend menthol squares with a side of 5 cm diagonally and then vertically.

Make the petals the same shape as the pink ones. Form a fold in the center of the base of the square, attach two sharp corners to it and solder.

Collect 6 mint petals into a flower on a thread. Prepare an unusual candy center for decoration.

String beads, hugging bells onto thin satin cords and prepare one mint petal at a time. This way you will get brushes made in the same candy color scheme.

Glue the middle and bottom layers of the flower - pink and white petals - onto the felt circles. Glue the candy to the top flower, and also glue one mint petal to each tassel.

Assemble a decoration from satin ribbons for an elastic band or hairpin. Paste bright flower on the white layer, and attach a greenish blank with candy on top. Glue the tassels on the laces from the bottom. Immediately make a couple of charming hairpins for a girl; you are unlikely to get by with just one piece when it comes to such wonderful and necessary accessories.

Glue the gum with reverse side compositions made of satin ribbons with hot melt adhesive.

Many more step-by-step master classes on making your own hairpins, headbands and hair ties from satin ribbons and other materials are waiting for you on our website, and instructions on kanzashi have been collected. Don’t be afraid to create, even if the first time it doesn’t turn out like in the photo of the craftswomen, everything comes with experience!
Take a look at the “Women’s Hobbies” website and find yourself a new activity for your soul, relaxation and good mood!