Christmas tree made of matches on paper. Christmas tree made of matches. This will require
Yulia Malashenko
Hello, colleagues!
It’s winter outside…snowfall…and…lots and lots…snowflakes…
Snowflakes are the magical companions of winter, always different and unique,
they invariably accompany everyone New Year.
For last days site visitors were presented with countless snowflakes: large and small, white and colored. Snowflakes were cut out of fabric, paper, cardboard, candy wrappers, paper napkins etc.; made from various available materials. And, imagine, not one was the same.
I also want to offer you original idea for making snowflakes and other interesting crafts from matches.

Ordinary matches are a wonderful material for realizing a wide variety of creative ideas. It is enough to show only your imagination.
My first works were quite simple and not entirely flawless, but later they got better.
So, let's start making a snowflake.
For work we will need: cardboard, scissors, universal glue, glitter, decor and ordinary matches that we use at home, with brown sulfur heads. If you have the opportunity to purchase matches with colored sulfur heads, it will be even better. The main requirement is that the matches be even and smooth.

Option 1: Cut out a regular octagon or hexagon from cardboard. Next, draw diagonals with a pencil. Along the marked lines we glue toothpicks or matches without sulfur heads, or kebab sticks.

Then we place matches in each formed triangular sector, placing the sulfur heads up and down, the same amount to the right and left. We fill the remaining gaps in the cardboard with short matches, and trim the ends of the toothpicks.

Next step: grind the rain to get glitter, or you can use ready-made ones.

Then the snowflake made from matches can be decorated with decor (a white snowflake).


Snowflakes can be made in different sizes, depending on the size of the cardboard template.

Option 2: You can connect two snowflakes of different sizes from matches together, placing them on top of each other and securing them with double bulk tape. The snowflake will turn out voluminous.

All that remains is to attach a string for hanging on the back side and the snowflake is ready. These crafts can be used as decorations or gifts.
Option 3. If you don’t use any decor, you’ll get a wonderful hot stand in the shape of a snowflake. The surface of which can be varnished. It will fit perfectly into the interior of any kitchen.

And by adding a little creativity and imagination, you can decorate a picture - a panel - with a blank of matches.

Option 4: I made a painting - a panel: “Floral Kaleidoscope”.
The background is linen burgundy fabric. The compositional center of the panel is a flower made of matches (with crimson sulfur heads). The principle of its manufacture is similar to a snowflake: diagonals are drawn on a cardboard base (regular octagon), then matches are glued along the marked lines. Each resulting triangular sector is filled with matches with colored sulfur heads. The matches are laid out in a certain sequence - 3 on the right and 3 on the left. The flower was varnished. Then I wove flowers and leaves from beads and attached them to the center of the flower. I glued the finished matchstick flower to the fabric in the center. In the corners of the picture there are also flowers and leaves made using the beadwork technique. For decoration, I used liquid pearls and voluminous butterfly stickers.


These are the kind of works I made from matches.
Simple crafts using the appliqué technique can be done with children. I think that working with matches will be no less entertaining and interesting for them.
I will be glad if my master class will be useful to someone and come in handy in their work.
Thank you for your attention! (To be continued).
We will need:
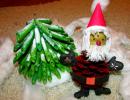
Christmas tree from matches? Some may find this idea funny and not serious enough, but don’t forget about creativity with children, which is very important for their development. A Christmas tree made of matches is just what you need to attract children) After all, matches are the most affordable material, they are in every home, and candles in the form of tablets are also not a problem to find. The created Christmas tree can also be decorated using beads, sparkles and New Year's tinsel
1. Using a utility knife, carefully cut the matches as shown in the photo below. To create a Christmas tree you will need only 15 matches

2. Let’s start assembling the Christmas tree, gluing the matches together

3. First we assemble and glue the barrel

4. Add branches from matches to the trunk


5. Paint with glitter spray paint or use silver acrylic with glitter

6. Take a tablet-shaped candle


8. We insert our match tree into the candle. That's the whole master class) Happy New Year!

Source: http://handmade-paradise.ru
Matchstick house
We will need:
- cardboard
- simple pencil
- ruler
- scissors
- PVA glue
- simple pencil
- threads
- needle
- watercolor paints
- nail polish
- glitter for manicure, artificial snow
1. Make a drawing on back side cardboard according to the specified dimensions. It's better to take brown cardboard.

2. Cut out the blank.
Fold all fold lines inward. Apply PVA glue first to one side of the house and lay matches horizontally. Then stick the matches on the other three sides in the same way.

3. Using a needle, thread a thick thread through the center of the roof. Fasten its ends to inside roofs with PVA glue and paper.

4. Apply glue to one side of the roof and lay out matches.

5. Do the same with the other side.

6. Glue the window to the front side of the house. The window can be cut out of colored paper measuring 1.5 cm by 2 cm. Fold the workpiece again along all fold lines.

7. Glue the house together with PVA glue.

8. Paint the house with watercolor paint. Can be painted with gouache or acrylic paint. Paint the roof a different color.

9. Glue the roof to the house.

10. Cover the house with nail polish or any other. Sprinkle sparkles and artificial snow onto the wet varnish.

11. New Year's toy - the house is ready!

To make this miniature suitcase in retro style, you need thick brown paper (two shades), empty matchbox and funny pictures (these will be “icons”). We cover the boxes with paper, make a handle, “straps” and decorate with retro “badges” - the suitcase is ready.
Miniature photo album

Do you want to surprise and please your loved ones? Then give them this miniature photo album as a gift. For this you will need: a matchbox, glue, paints, postcards or scrap paper, scissors, brushes and, of course, tiny photographs. Decorate the box and put a miniature screen of photographs inside it. You can always carry such an album close to your heart - in your breast pocket.
Screen book

Using the same principle, you can make a baby book. Print out short fairy tales, come up with illustrations, make a screen and stick it in a box. Perhaps such an unusual form will awaken an interest in reading in the child.

You can use 7 empty matchboxes to make this cute giraffe. You just need to make a frame, cover it with paper and decorate it. This is a great idea for joint creativity with children.
Mini zoo

You can make not only a giraffe from matchboxes, but also an entire zoo. Take four boxes, paint them gray (hippo), orange (lion), light and dark brown colors(bear and donkey). Glue the corresponding faces on top. You will get a bright and original gift for your baby.

You can (and should!) confess your love not only on February 14, but all year round. Moreover, it’s so simple: take a matchbox, cover it with beautiful paper, attach a couple of hearts - and you’re done. You can (and should!) put something tasty inside - it will be a very sweet confession.
Garland surprise

For the New Year, as well as any other holiday, you can make such a bright garland with surprises. Cut out stars from glossy paper and glue matchboxes with sweets, nuts and other goodies to them.
Advent calendar

In America and Europe in anticipation New Year's holidays It is customary to make so-called Advent calendars. This is a kind of postcard consisting of 24 “pockets” (according to the number of days before Christmas). Inside these cases are sweets, small gifts, notes with biblical quotes or just kind words. One surprise is opened per day, thus recharging the pre-holiday mood. You too can make such a calendar. Simple but very beautiful way– mosaic from matchboxes.
Christmas toys

Christmas decorations in the form of Christmas deer and Santa Claus are matchboxes covered with paper, with faces made of felt. If you show your imagination, the Snow Maiden, Snowman and other New Year's characters may also appear on your Christmas tree.
Gift wrapping

In such an original box you can give a ring, earrings or other “little things”. And it is still unknown what will be more valuable - the box or its contents. After all, as you know, the most best gift– made with your own hands. To turn a matchbox into original packaging, you need scrap paper and other decorative elements, as well as your imagination.

The boys will probably love the idea of making a plane with their own hands. For this you will need a matchbox and colored cardboard. You need to cut out blanks from cardboard: two wide strips, one long narrow strip and two narrow small ones. And then, as they say, it’s a matter of technique.
Robot

Another “male” toy is matchbox robots. In this case, the boxes are used as construction parts. To make a real Iron Man, the main thing is to glue and paint it correctly.

You can make chic doll furniture for girls. A little imagination, and gray matchboxes turn into exquisite bedside tables and desks. Detailed master class you will find by following the link below.

Not a single modern lady can do without a computer, so dollhouse your daughter just needs a computer desk. Matchboxes will come to the rescue again. Glue them together to create a table with drawers and decorate it to your liking. A “computer,” by the way, can also be made from a box.

From matchboxes you can make not only doll furniture, but also the dolls themselves. To do this, you need to draw a little girl on the label or use scrapbooking technique, with matches sticking out from open box, will play the role of her legs.
Confetti boxes

Throwing a party is easy. One of the recipes for a great party is matchboxes + confetti. Decorate the boxes brighter and fill them with confetti - it will be convenient to store and use.

If you glue matchboxes (or rather their “pull-out” part) together, make cells of different sizes, paint them or decoupage them, stick photographs inside, decorate them with flowers and other decorative elements, you will get a very original and beautiful panel. You will find a detailed master class below. But remember: the point of any tutorial is not to repeat it, but to inspire your own creativity.

Print beautiful picture, stick it onto a “canvas” of matchboxes, and then carefully cut along the contour of each box to create puzzle pieces. This way you can also make a photo puzzle - a great gift for loved ones.

Matchboxes can serve not only entertainment, but also educational purposes. So, if instead of labels you paste images of various animals with their names, you will get a kind of “cubes”. Of course, the theme can be anything - fruits, colors, professions, etc.

Another useful game for a child’s development is called “Who Lives Where?” And it can also be made at home using matchboxes. To do this, you need to stick a picture on the label with the habitat of a particular animal (for example, an aquarium), and inside the box - with the animal itself (a fish). Thanks to this, the baby will quickly and easily remember who lives where.

To help your child quickly learn numbers and the alphabet, try offering him the following “abacus” and “alphabet”. Write 1, 2, 3, 4, etc. on the matchboxes, and put as many matches inside as written on the box; or write the letters and stick pictures inside with words starting with these letters.

Dutch designer-illustrator Kim Velling is sure that one thing is enough to lift a person’s mood. kind words or smiles. But what if no one is around? Make a “box of inspiration,” says Kim. This is an ordinary matchbox with an encouraging or parting note and a cute picture inside. You can carry it with you and at any time, take it out of your pocket, and improve your mood.

Using matchboxes and beautiful paper You can make original place cards for wedding guests. All you need to do is print out the names of the invitees and tape the boxes. Guests will be able to take the matches with them; such a souvenir will remind them of your celebration for a long time.

Bonbonniere is something like this beautiful box, in which souvenirs and small surprises are placed for guests at weddings, anniversaries, name days or other celebrations. Initially, candies were used to fill such boxes (even the word “bonbonniere” comes from the French “bonbon” - “candy”). But now they put anything inside: from key rings to aromatic oils. Making a bonbonniere, as you can see, is simple; you can just decorate an ordinary matchbox.
Box for storing small items

You can’t immediately tell that these elegant chest of drawers are made from banal matchboxes. Nevertheless, it is true. The technology for their creation, on the one hand, is simple, but on the other hand, it will require a lot of imagination and perseverance. But, you see, the result is worth it - beautiful and functional. In such boxes you can store jewelry, paper clips and other small items.
It is worth noting that working with matches is not only develops imagination, but also perseverance, tolerance, accuracy and attention.
Crafts from matches can be done with or without glue. If you use glue, you can attract children, since such work is easier than making crafts from matches without glue.
The matches stick together very quickly and well, so you won’t have any big problems during the assembly process.
You can also use whole matches, or carefully separate them into smaller pieces.
Using matches you can make both 2D and 3D images, including animal figurines, furniture and houses.
For beginners, it is best to make crafts using glue., and when you gain experience, you will be able to create crafts from matches without glue.
Helpful Tips:
* The place where you will work with matches needs to be prepared. First you need to cover the table with oilcloth.
* Prepare glue and a saucer into which you will pour it.
* For convenience, it is advisable to take the glue with a sharpened match or toothpick.
* For the front side of the craft, it is better to select matches with a smooth edge surface.
* If desired, you can cut off the match heads (with scissors or a stationery knife) - this way you will get a more even craft. Such work should be done by adults and children should not be allowed near sharp objects.
How to make a house from matches

To make such a house you do not need to have any special talent, you just need to know the stages of assembly, be careful and have patience.

You will need:
7 boxes of matches
2-3 large diameter coins
Disc box.
1. Prepare a base for the craft - it could be, for example, a CD box - and place 2 matches parallel to each other on it.

2. Place 8 matches perpendicularly on the lying matches (the foundation of the house) - this must be done so that there are gaps of the same size between the matches.

3. Place 8 more matches perpendicular to the previous ones (using the same principle).

4. Now start laying matches around the perimeter as shown in the image. You need to make 7 rows (the heads of the matches should go in a circle).


5. Place 8 matches on the last row so that their heads face in the direction opposite to the first row of 8 matches (the foundation of the house).

6. Perpendicular to the top 8 matches, place 6 more matches in the middle, and place a coin on top of them.

7. Between the last two rows, holes have formed in the corners; you need to insert 1 match into them. While you insert matches, hold the structure.

8. Now stick one match into each gap along the walls and cover the perimeter (see picture).

9. Adjust the structure with your fingers so that all the matches fit snugly against each other.


10. Try to complete the walls of the house by sticking matches along the perimeter of the walls with their heads up.


11. We make a horizontal layer of walls. Insert matches around the perimeter so that their heads alternate with the ends. After this, press in all the matches that start from the head.


12. Let's start making the roof of the house. To do this, you need to insert matches along opposite walls (see picture).

13. Alternate the direction of the matches and insert them perpendicular to the ceiling of the house.

14. First you need to put 2 matches, then 4, then 6 matches in the two central ones, eight each.


Video lesson
How to make a well out of matches

You will need:
Stationery knife
Scissors
Rope
A cloth to wipe off the glue


1. First. What needs to be done is to glue the base of the future match well. It consists of 4 matches (you can cut off the heads of the matches).
2. On top of the base of the well you need to stick another row of matches, and the matches need to be moved in the opposite direction. All subsequent rows should be done in the same style until the desired height is achieved.
3. Now glue racks of three rods to the inner opposite walls of the well (see picture) - two rods at the same level and one in the middle - a few millimeters lower.


4. Glue two rods to the back of each of the rods made in step 3. You will attach the roof of the well to them. Now you can insert the toothpick gate post.
5. Prepare a thread and wind it onto a toothpick, having previously coated it (the toothpick) with glue. If desired, you can break the end of the toothpick to make a handle.
6. Glue 2 supports to the posts so you can attach the roof to them. Also insert a beam on top.
7. Before you start gluing the matches on top to form the roof, glue 4 beams to the end of each support and then attach the roof matches to them.
8. You need to spread glue on all the inclined beams and make a well roof, into which you can then lower the thread as a final touch.
Wheels made of matches (schemes)

In this example, NO glue is used, and the strength of the product is provided by internal tension and friction.
There are several options for the wheel: with laying through 1 support match (it has 15 vertices, and 105 parts are used for it), through 2, 3 and 4 support matches, respectively.


Laying through 2 support matches.
The product consists of 95 parts, has 19 vertices and a small diameter that allows it to fit inside a wheel with a larger diameter.
Laying through 3 support matches
The diameter of this design is even smaller. The wheel has 21 points and is made of 84 matches.
Laying through 4 support matches
This design is the most difficult to assemble. The wheel has the smallest diameter and can fit inside the old match wheels. The design has 22 vertices and contains 66 parts.
Matchstick wheels (instructions)

1. First you need to do auxiliary tool. To prepare it, arm yourself with a notebook, with a simple pencil, ruler and compass. You can use a protractor, but this is not necessary.
2. Draw a template for the machine. In this example, the drawing will help you create a wheel of 15 links. Draw a circle whose radius is 42 mm. Next, divide this circle into 15 equal sectors (each sector has an angle of 24 degrees).

* If you do not have a protractor, make the distance between the legs of the compass 34 millimeters and draw notches on the circle.
3. Once you have drawn the assembly panel drawing, start making the actual panel itself. A hard cover from an unnecessary book or thick cardboard will help you. In the places indicated in the picture, you need to punch holes in the cardboard using a hammer and nail.

Cut out the drawing and glue it to the cardboard. Choose a nail whose diameter is slightly larger than the thickness of the match. Place an unnecessary book or several sheets of cardboard under the cardboard (so as not to spoil the floor with a penetrating nail).

4. Once you have the assembly panel ready, start assembling the wheel - if it has 15 links, you will need 90 matches.

* It is advisable to choose matches without defects.
Insert support matches into the panel.
4.1 Now fill the gaps with matches one by one. It is worth noting that each subsequent match in each ring must be placed overlapping the previous one.


4.2 Raise the first match in the ring in advance so that it overlaps the penultimate and last supporting matches.