Toys made from socks and gloves. DIY glove toys For work you will need
Sewn toys from socks are very popular, and this is not surprising, since the toy is of high quality, and most importantly, it is sewn very quickly. This type of needlework can be done even with children! And in this workshop we will tell you how to sew a toy from a bright children's glove.
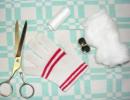
Materials required for sewing toys:
- bright glove;
- padding polyester or batting;
- needle;
- thread in the color of the glove;
- buttons;
- felt;
- spoke.
The process of creating a toy
We take our glove and hide our thumb inside. We sew the hole with a hidden seam and secure the thread. Next, we wrap the cuff inward and also sew it with a hidden seam so that a small hole remains. We fill the toy with batting through a small hole, helping ourselves with a knitting needle. The more material there is in the toy, the denser our octopus will be. We sew up the hole with a hidden seam. Now we need to sew buttons on the “face” of the octopus. Next, cut out a mouth from felt and either sew it on or glue it with super glue.
Now you can decorate the octopus with rhinestones, sew on beads or sequins, paint contours on the fabric or glue satin ribbon bows. You can create a whole composition of octopuses, for example, make a couple for Valentine's Day: for this we make two octopuses - a boy and a girl, and also sew a small red heart stuffed with batting. To do this, take the fabric, draw a heart on the wrong side using a stencil, and then cut out the blanks a little further than the intended line. Now fold them in half so that the front part is inside and sew, leaving a small hole. Turn the product inside out and stuff it with filling, then sew the hole with a hidden seam. We take the boy octopus, sew a heart to his left tentacle, and now sew the right tentacle of the girl octopus to the other side of the heart.
In any wardrobe there is a glove that is lost. Don't throw it away, let's give this thing a second life, to the delight of our kids.You will need:
Glove;
- Sintepon for stuffing;
- A pair of black buttons;
- Thread, needle, scissors.

We fill the glove evenly with padding polyester, leaving no voids or making lumps, pay special attention to your fingers, they must be stuffed tightly and tightly. Below the elastic, we baste the glove around the entire circumference, tucking the elastic inside, tighten the thread and make a couple of stitches for strength.


We tighten the space between the little finger and the thumb with a hidden seam, now our octopus will stand steadily on five fingers.
We begin to design the face of our sea hero. We tightly sew on the buttons - the eyes, if you have an infant, embroider the eyes by hand, “draw” the mouth with a back seam, or also embroider, whoever knows what.
It remains to decide who our baby will be, if it’s a boy, we make a bow from a thin black ribbon and sew it at the base of the fingers, if it’s a girl, we make hairs from yarn and braid it.
This toy will take the best place on the shelf and will be your child’s favorite, not only because no one else has such a toy, but because it was made by your own hands.
- You definitely won’t find such an angel with an incredibly lively face on earth, but you can sew it with your own hands. Such a toy can be a great gift for the birth of a child or the Holy Day.
- What to do when one glove or mitten is lost? You can throw away the remaining item and quickly forget about the loss. You can put a lonely glove in a visible place and grieve for a long time about what happened. A
- This charming doll can be made from the most ordinary plastic bottle. You will need: a liter plastic bottle, caps from the same bottles, leftover yarn (for hair), fabric for
- Our kitchens are often furnished with fashionable furniture, household appliances, pots that don't get cold, pans that don't burn, kettles that boil in an instant. But the comfort and warmth of the kitchen
- To make such a colorful Cossack, you will need scraps of black gabardine, red and yellow velor, a small piece of drape or other non-flowing material of bright colors, knitwear
Despite the diversity of companies producing children's products, the doll industry has recently become noticeably impoverished - for some reason the toys in all stores are the same. Their quality also leaves much to be desired.
Here the thought involuntarily appears that the best toy for a child will be the one that you make for him yourself from scrap materials. For example, old gloves.
DIY glove toys are a completely new type of needlework, which stands alongside crafts made from socks, nylon tights and other things. Their beauty is that now you don’t need to throw away your old favorite thing - you can make something useful out of it for you and your child.
To make, for example, a funny little hare from a glove, you will need the following materials:
- A pair of bright children's gloves;
- Threads;
- Filler;
- Comfortable needle;
- Scissors;
- Doll eyes and other toy decoration items.
For the product, it is better to choose fluffy gloves made of mohair or other fleecy material. Then the toy will be soft, and uneven seams will be hidden by pile.
- Place the gloves in front of you, fingers down, pinkies facing out.
- Cut out the middle and ring fingers on both gloves, along with a piece of adjacent fabric to form a protruding wedge - you won't need these parts.
- Cut the remaining parts of the glove in half so that you are left with one piece with the thumb, index finger and part of the fabric up to the wrist, and the other with the little finger and part of the fabric up to the wrist.
- Cut off the excess fabric and sew the bases of the little fingers to each other - this is the head with the ears.
- Now sew together the parts with the thumb and forefinger - these are parts of the hare’s body with the neck, arms and legs.
- Stuff the body tightly with filler, also stuff the ears and sew the parts to each other.
Now your bunny is ready! Add doll eyes or button eyes to it, decorate its ears or neck with an elegant bow made of ribbon, attach antennae made of wire - give free rein to your imagination to make your glove toy look better than any store-bought one!

Using a creative approach to the method outlined above, you can make not only a hare, but also other funny animals from gloves.
Cat
Since mittens are most often made gray or striped, it would be a shame not to use them to make a toy cat! To do this, cut off the middle finger and little finger of the glove at the base. The hole from the middle finger is sewn up, and the finger itself needs to be sewn to the place of the little finger.
Now, where the tail joins on the cat’s back, you need to make a vertical cut and sew the little finger there.
The body of the future cat is tightly stuffed with filler and pulled tightly together in the neck area.
The cat's head needs to be stuffed only to the middle, after which the glove sleeve is sewn up from the edges - this is how the ears are formed.
The finished Murzik can also be decorated with buttons, beads and ribbons.

Chanterelle
To make a fox, you need to choose a bright glove - red or orange. In extreme cases, yellow and red will do. The body is made according to the cat principle.

The cuff of the glove is cut off for the head. The upper part is sewn up according to the cat stitch principle. After this, the head is stuffed halfway, and the remaining hole is gathered with a thread to create a sharp nose. The head is sewn to the body.
The red glove toy is ready! By the way, such toys can also be used for home puppet theater.

Octopus


An octopus made from a glove is even easier to create than other toys! Just fill it with stuffing, sew up the sleeve and decorate it with button eyes. An ugly sewn-up area can be disguised with a homemade wig, hat or hairpin - the toy will turn out to be flirty with such decoration. Or, another option for making an octopus from gloves - watch the video:
Even a child of five to eight years old can make this toy with his own hands, if, of course, you show him how to do it and give him the material. Moreover, a soft toy octopus is recognizable in any form, if it has a head with eyes and as many legs as desired.
Octopus
We will need:
- a square piece of plain fabric, preferably one so that its raw edges do not fray: fleece, thin felt, drape, and so on;
- a small ball, a ball, a ball of unnecessary thread or a piece of foam rubber to fill the head;
- scissors;
- beautiful thin braid;
- "eyes";
- small scarf made of colored fabric.
Sequence of work
- Determine the middle of the square flap and place a ball or a skein of waste thread in this place (the “brain” or what will become the insides of the head). Pinch the ends and mark the “neck” line with chalk or a felt-tip pen.
- Unfold the fabric, straighten it and with your own hands cut the fringe on all four sides, 6 strips on each side, without crossing the “neck” line. Try to make them the same width. You should end up with a small square with brushes.

- Put the “brains” back into the octopus and tighten the “neck” with a strong thread. You can tie a scarf or bow tie.
- Use scissors to straighten the fringe.

- Make tight braids, tying them with a bow at the end.

- Glue or sew on the “eyes”, draw a smile with a felt-tip pen and tie a scarf.

From threads
You can make the same charming octopus with pigtails with your own hands from thick threads. It is better to use synthetic yarn or cotton with synthetics. It holds its shape and volume perfectly. The technique for making the toy is shown in the video.
A few additional tips
- Instead of a lump of newspaper, you can use a plasticine ball or Kinder Surprise packaging.
- To prevent the threads from coming apart on the octopus’s head, you can lightly grease the filler with PVA glue.
- To accurately calculate the number of legs, you can do a simple multiplication of 15 cm (length of the octopus) x 3 (number of threads in a strand) x 3 (number of strands in a braid) x 8 (number of braids) = 1080 cm. This means we take a bundle of 9 threads 120 cm and fold it in half THREE times.
Very simple
Even the smallest craftsman can easily make this toy with his own hands. Give your baby a handkerchief or a square piece of fabric, slightly cut on the sides (as in the photo), and a small ball made of anything: fabric, foam rubber, crumpled newspaper, ball, etc. Let the child throw a rag over the ball and tie a ribbon around the octopus’ “neck”. Draw the eyes with your own hands or glue them together.

Sock octopus
You will need:
- two old socks, maybe different ones;
- any filler;
- wooden knitting needle;
- scissors;
- threads, needle;
- felt-tip pen.
Master class on making an octopus from socks
- Take two socks and draw lines for future cuts on them. From the toe to the middle of the foot, one of the socks will represent the head of the toy. From the heel to the elastic, we divide each sock into 4 parts lengthwise. These will be the tentacles.

- We cut out the details of the toy.

- We sew the legs, leaving them unstitched on one side, and turn them inside out.

- Using a wooden knitting needle, fill all the parts with padding polyester. Carefully sew up all the holes with your own hands.

- We sew the tentacles to the head and tighten the “neck”. Let's draw a face. The toy is ready.

From a glove
This version of the sea mollusk involves both 4 legs and 8. It all depends on how many gloves you don’t mind using in your work. Moreover, the gloves do not have to be the same.
- Hide one thumb inside and carefully sew up the mark from it. Wrap the elastic band inside. Fill the remaining 4 fingers and the glove with filler and sew the top closed. To be more convincing, you can pull the glove a little at the base of the fingers. Sew button eyes and mark a mouth. The four-legged octopus is ready.

- A toy made from two gloves is a little more complicated to make with your own hands. We also remove one thumb inside and disguise its presence. We make an incision at the base of the fingers in a fingerless glove and insert another one inside it, leaving 4 fingers “outside”. We fill all 8 fingers with padding polyester, stitch them at the base, while simultaneously closing the slot. We fill the double glove with filler, first tucking the elastic. We sew up and shape the face.

Doctor Octopus
Doctor Otto Gunther Octavius, a super-villain, star of comics, cartoons and television series, has recently become our children's favorite toy. The doctor has his own biography, his personal and public life. Making it yourself is difficult, but possible. We offer several options.


