How to properly treat your nails at home. Manicure mistakes at home How to properly do a hardware manicure at home
Beautiful nails give self-confidence, lift your spirits, and increase the status of their owner.
But not everyone can afford to visit a salon all the time. For many, the topic of manicure at home is relevant.
To properly make a beautiful manicure, preliminary preparation is necessary.
It includes the purchase of manicure tools, disinfectants and related items that you cannot do without.
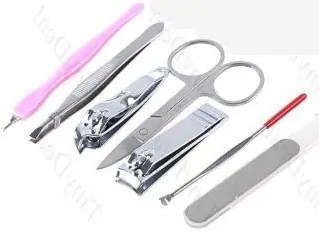
Necessary tools for manicure at home
Good, solid tools– this is the key to high-quality cuticle care, prevention of nail splitting and high speed of the procedure.
For a classic edged manicure you will need the following tools:
| Tool | Description |
| 1. Cuticle tweezers. | It is best to purchase a Solinger brand tool, this is an old German brand of cutting tools. Tweezers have their own sizes. They determine the length of the blade. It’s good to take 0.5 cm. |
| Double-sided cuticle spatula: on one side it resembles an oar, on the other it resembles a hatchet. Must be metal. | |
 3. Knipser 3. Knipser
|
Tool for cutting the length of the nail. It looks like a small guillotine, it can be used for fingernails and toenails. |
 4.File 180 grit 4.File 180 grit
|
The grid should be imprinted on the file itself. |
 5. Polisher 2000 grit 5. Polisher 2000 grit
|
There are double and triple polishers, then the grit for each side must be printed. |
| Related Items: | |
 1. A large bowl, preferably ceramic - it holds the temperature well; 1. A large bowl, preferably ceramic - it holds the temperature well; |
|
 2. Towel or napkin; 2. Towel or napkin; |
|
 3. Cotton pads; 3. Cotton pads; |
|
 4. Orange sticks; 4. Orange sticks; |
|
 5. Nail polish remover. 5. Nail polish remover. |
|
| Disinfectants: | |
| 1. Chlorhexidine; | |
| 2. Alcohol solution 70%. | |
| 3. You can purchase a professional product for treating hands and metal tools at the pharmacy. | |
Which manicure tools should you use and which should you not?
If you still have little experience in nail care, orange sticks will come in handy. They can move the skin near the cuticle and clean the eponychium.
Some people use it to trim cuticles. manicure scissors. This is acceptable, but the best quality manicure will be if you use tweezers. Scissors have straight blades, while tweezers have beveled blades. That's why It is the tweezer that cuts the skin more and deeper and after them the manicure lasts longer.
 Nail fork
 Since we are talking about the cuticle area, No blade pressure is allowed. This can damage the matrix - the growth cells of the nail under the hole. As a result, the nail will grow crooked for the rest of its life.
Choosing a nail file, which one is used for what
Files vary depending on the grit. Grits measure the amount of abrasive applied to 1 square centimeter of a file:
The coarsest file is 80 grit. It is used to reduce the length of artificial nails;
Technique for performing European unedged manicure at home:
Step 1: Wash your hands with soap;
 Hand washing
 Step 2: Apply cuticle remover;
 Applying cuticle softener
Step 3: Starting from the little finger, use the rounded tip of a file or an orange stick to push the roller away;
 moving away and grinding the roller
 Step 4: Remove the softened thin skin from the surface of the nail;
 Cuticle removal
 Step 5: Process the rollers with a 180 grit file;
 processing rough rollers with a file
 Step 6: Wash your hands with soap;
Step 7: Degrease nails with an alcohol solution;
 Degreasing nails
 Step 8: Apply varnish coating.
 Varnish coating
 How to paint your nails evenly and beautifully
There is no difficulty in painting your nails easily and quickly and doing it exactly at home, without using a brush on the roller.
First of all, the varnish must have a certain consistency. The new varnish applies well and dries quickly, because the solvents have not yet evaporated from it. If the varnish has thickened, add 3-5 drops of varnish solvent to it.
Do not try to thin the varnish with acetone. or nail polish remover. These products will cause the varnish to curl.
Technique for applying varnish in bright or dark tones:
Step 1: Dip the brush into the varnish, squeeze out the excess with the back of the brush onto the bottle in a “pull away” motion.
Step 2: Place the brush in the middle of the nail at an angle of 45 degrees and move towards the cuticle. Before reaching the roller, stop the brush and move towards the free edge of the nail. This entire double movement must be done without lifting the brush from the nail or stopping it.
 Positioning the brush
  Smooth movement towards the cuticle
  Moving the brush towards the free edge
 Step 3: Place the brush on the nail in the cuticle area so that the brush lies in the hand perpendicular to the finger. Make a stroke with the brush along the cuticle to the side roller, round the stroke along the contour of the nail (the brush changes position - now it lies in the hand parallel to the finger) and bring it to a free edges of the nail.
 Movement to the side roller
 Step 4: Repeat this movement on the other side of the nail. If you run out of varnish on the brush during the process, turn it over and continue.

Step 5: With a well-wrung out brush, run along the end of the nail, sealing it.
 Result
 Technique for applying varnish in nude and dense pastel colors:
 Nude polish
 Step 1: Dip the brush into the varnish, squeeze out the excess with the back of the brush onto the bottle in a “pull away” motion.
Step 2: Place the brush in the middle of the nail at an angle of 5 degrees and move towards the cuticle, holding it almost suspended. The brush does not put pressure on the nail, only the polish touches the nail. Before reaching the roller, stop the brush and move towards the free edge of the nail.
Step 3: Bring the brush to the cuticle area. Keep the hand parallel to the finger. Barely touching the nail, move the brush towards the side roller and down to the free edge. The brush should go along the side of the nail without touching the roller.
Step 4: Repeat this movement on the other side of the nail. If you run out of varnish on the brush during the process, turn it over and continue.
Step 5: With a well-wrung out brush, run along the end of the nail, sealing it.
Nail designs at home
There are beautiful design options for which you don’t have to go to the salon. They can be done at home: rhinestones, glitter, gel pen painting, stickers, bouillons, varnish painting, craquelure, velvet, cat's eye.
 Cat's eye - stripes
  Cat eye-waves
 1. Cat's Eye Design. For it you will need to purchase magnetic polish and a Cat's Eye nail magnet. Still releasing options “Wave”, “Stripes”" and others. But the most spectacular is “Cat's Eye”.
 Cat's eye - made with gel polish
 It is done on the newly applied layer of varnish. The magnet is brought to the nail so that the strip is along the nail. Hold for 1 second.
If you hold the magnet closer to the nail, there will be a clear line, further away it will be blurry.
If you bring a magnet first vertically and then horizontally, there will be a bright point.
 Gel polish - made with ordinary varnish
 2. Craquelure design. A new product, hard varnish, has appeared on the product market. This is a special cracking varnish that is applied to the dried previous layer.
Substrates made of gold, white, and black varnish look good. Crack polish dries quickly. It can be thinned like regular varnish.
If you apply it in a thick layer, it will crack into large pieces. If in a thin layer - into small ones. You can combine it: make one side of the nail with large fragments, and the other with small ones.
 Craquelure - large, medium, small.
 3. Velvet design. The varnish for this effect is called “Satin”. After drying it becomes matte, hiding all the unevenness of the nail.
If you apply a top coat on it, it becomes shiny, like regular varnish. You can make two nails shiny and leave the rest matte. This design looks good in dark or bright colors. On pastel colors it is almost invisible.
4. Leopard design. On a dried substrate (for example, coffee-au-lait color), uneven spots are applied with a brush with a slightly darker (beige) varnish and, without waiting for them to dry, a black dot is added to each spot. Using an orange stick, each dot is given the appearance of a comma.
 Leopard design
 This design is classic. It can be performed not only in natural tones, but also in avant-garde ones. A turquoise backing with blue spots and black commas looks good.
5. Zebra design.
 Zebra design
 Black lines are applied to a dry white substrate with a thin brush. There are varnishes for design, they have just such brushes.
The lines are drawn diagonally on the nail. The first line is drawn simple. The second, parallel to it, with a thickening coming from the middle of the line. It looks like a very narrow triangle. The third line is drawn simple along the previous one. The fourth is drawn with a thickening on the other side. The fifth is simple.
You can draw with a regular black gel pen. When the drawing is dry, simply seal it with topcoat. One zebra nail looks good, the rest are white.
 Nails with rhinestones and bouillons
 6. Design with stickers, bouillons and rhinestones. It is used on special occasions (weddings, graduations) and requires a beautiful dress.
Decorate two nails, tightly covering them with rhinestones of different sizes.. Swarovski rhinestones are suitable; they can be purchased in a set. The largest stone is placed in the center, closer to the cuticle. Near it on both sides there are smaller stones.
The smallest stones are placed on the edge of the nail. The space between large stones can be filled with golden broths. On the remaining nails, place one small stone in the center near the cuticle.
 Pencil for rhinestones
 Place stones on wet varnish. The stone is taken by simply bringing an orange stick moistened with water or a special pencil for rhinestones to it and it sticks to it (there are special pencils for attaching rhinestones on sale). It is placed on fresh varnish, corrected, trimmed, it sticks to the varnish and releases the stick.
Sterilizing instruments at home
In nail salons, instruments are sterilized in a dry-heat oven.
 Manicure tools
 At home, you can use the oven for these purposes. Place metal tools in a specially designated bowl, turn on the oven at 250 degrees and heat for 15 minutes.
If during the procedure a wound was caused and blood came out, the instrument is soaked in the solution before sterilization chlorhexidine or wiped three times with 70% alcohol(in the presence of special pharmaceutical products, it is better to carry out processing with them, according to the instructions).
Files and orange sticks can also be soaked in a disinfectant solution. But if there was no blood while working with them, it is enough to wipe them.
Below you can watch a detailed video about sterilizing manicure instruments; some information will be useful to you at home.
What pharmaceutical products may be useful?
In addition to chlorhexidine, you can buy hawthorn tincture 70% in the pharmacy. This alcohol solution can be used as a disinfectant.
The professional line of pharmaceutical products for sterilization is very diverse. Disinfectants are divided into two types: for hands and for metal tools. The pharmacist at the pharmacy will always tell you what products are available.
You may also need it glue BF-6. This is a medical glue for treating wounds. It is convenient for cuts, disinfects and seals the wound instead of a band-aid.
Good to have on hand for warts "Mountain celandine", brown herbal balm. If a wart is discovered during the manicure procedure, you can immediately cauterize it with this balm.
Baths and oils for strengthening and growing nails after manicure
To keep nails healthy, they need to be nourished and treated. The aggressive environment makes them thin and brittle, appear on them. To avoid this, it is good to do it with sea salt.
You don’t have to buy expensive sea salt; the kind sold in grocery stores will do. You can add it during manicure to steam your nails.
In the process of saturating the nails with such water, a phenomenon called osmosis. This is an exchange of salts between two environments. Nails, like appendages of the skin, are an excretory organ. Nail effusion emerges through microscopic holes on the surface of the nail.
After taking a course of antibiotics, it forms very actively, preventing artificial nails from sticking to the nail bed. That is why after taking antibiotics, two weeks must pass before nail extensions.
Those who spent a lot of time in sea water on vacation notice improvements in the condition of their nails. Baths do not have to be done for a long time. 15 minutes is enough. This procedure can be carried out in the evening while watching TV.
After the bath, hands are lubricated with nourishing cream. The best creams are with fruit oils. This could be avocado, aloe, or apricot oil. Just do not confuse them with essential oils. This is a completely different product.
If the cream says that it contains mineral oil, it is better not to buy such a cream. This is a product of chemical distillation of petroleum. It won't be good for your nails.
You can always look beautiful, you just need to get used to it.
 Modern society creates its own canons and unspoken rules, establishes standards of communication and appearance, when everything is taken into account - from costume design to well-groomed hands and neatness of nails. According to existing principles, manicure should always be present. This rule applies to both men and women.
The appearance of your nails plays a big role in any situation. But still, it has a special meaning, of course, for lovely ladies who spend a lot of time and effort doing manicures at home or in salons, trying to give their nails hardness, beauty and shine.
To create and maintain a flawless manicure, some of us prefer to visit professional beauty salons or beauty salons, using the services of qualified specialists who have a whole host of additional devices and tools, while others perform manicures on their own at home. Contrary to the popular belief that “a professional knows best,” sometimes a manicure done at home cannot be distinguished from a professional manicure.
Let's try to understand the existing nuances, because the dream of long nails, healthy and beautiful, does not have to be just a dream, it is quite capable of becoming a reality. To perform it, you only need a little attention, time and knowledge of some tricks that will allow you to get the desired effect from a manicure at home.
Necessary tools and products for manicure at home.
If you have ever visited a professional nail salon, you were probably surprised by the variety and volume of various tools (scissors, tweezers, spatulas), bowls and all kinds of products used to treat nails. Looking at such an “assortment” it’s easy to get confused, waving your hand and exposing this very hand to a specialist.
Meanwhile, to perform a good manicure at home, you actually don’t need that many devices, which, as a rule, are present in any standard manicure set.
So, when planning to do a manicure at home, make sure you have the following on hand:
- A file for natural nails and (optional) a polishing file.
- Scissors for removing cuticles.
- Pusher or trimmer for manicure.
- Leather nippers.
- Ceramic file or pumice
You will also need for manicure at home:
- nail polish remover and cotton pads or swabs;
- napkins or soft towel;
- a bowl of hot water;
- special product for nail bath or liquid soap + bath salt;
- cuticle remover (preferably);
- softening or moisturizing hand cream.
Having prepared the above list of items and means, you can begin to perform a manicure. On average, this procedure will take from 30 minutes to 1 hour, depending on the condition of the hands, skills and individual “difficulty” of obtaining the desired result.
Performing a manicure at home
The word “manicure” comes from a combination of the Latin manus (hand) and cura (care), thus implying cosmetic procedures for treating not only the nails on the fingers, but also the hands themselves. Contrary to popular belief, when performing a manicure procedure at home, a certain sequence, accuracy and adherence to a number of rules are important, since the nail, despite its relative rigidity, is susceptible to external influences and can be injured as a result of incorrect or untimely execution of actions. The skin around the nail plates is also tender and susceptible to the treatment method. Therefore, try to follow the following sequence when performing a manicure at home.
Removing varnish
The first thing you need to do when starting a manicure is to remove the varnish and other decorative decorations (rhinestones, sparkles, etc.). The nail plate must be completely clean. To do this, use nail polish remover and a cotton pad or swab. When choosing a nail polish remover, make sure it does not contain acetone, as it dries out your nails, making them dull, brittle and prone to brittleness.
Adding shape and shine
Then, using appropriate files, the nails should be given the desired shape and shine, which will become the basis for the future manicure.
 Remember: you can only file and polish dry nails. Treating wet and, especially, soaked nails, which are the most vulnerable, can lead to disruption of their structure and delamination.
It is important that the file moves along the edge of the nail in one direction. The ideal option is to file the nail from the side edges of the nail plate to its tip (center).
You can give your nails any shape - from the classic oval to square or, on the contrary, sharp. The main thing in this matter is to be guided not only by personal taste, but also by the shape of the fingers and the condition of the nails themselves. It is known that the square shape is considered the most resistant to external influences, which allows you to save weak and brittle nails through transverse grinding. But, as a rule, it is acceptable only for hands with thin and long fingers. In other cases, it can visually “shorten” the nails and fingers themselves. Therefore, for chubby hands and hands with miniature fingers, various variants of the classic oval shape, which can be close to rectangular or, conversely, be more pointed, are more suitable.
A mirror-like shine is given to nails using a special file - polisher. It differs from a regular file in that it has four working surfaces. It is more convenient when the edges of the polisher are numbered in accordance with the sequence of their use.
Cuticle treatment
Preparing the cuticle for treatment begins with applying a special cuticle remover. It not only softens the delicate skin over the top of the nail plate, but also prevents its further growth. The product must be allowed to absorb for 2-3 minutes.
After this, you can put your hands in a bowl of hot water, where it is advisable to add a soap composition for a nail bath. If there is none, use simple means at hand - liquid soap and bath salts. Proportion: for 1 glass of water, about 1 tablespoon of salt (without a slide) and a couple of drops of liquid soap.
After holding your hands in this bath for 5-10 minutes, you can begin the main action - processing the cuticle. To do this, you will need a pusher or trimmer for manicure at home.
After removing your fingers from the water, pat them dry with a napkin (or soft towel) and gently push the cuticle up using the rounded end of the pusher (trimmer) where the spatula is located. Then, use the sharp side of the tool to remove any remaining cuticle from the surface of the nail plate. These manipulations must be done very carefully, without pressure, trying not to damage or scratch the nail and soft tissues located around it. It is advisable to perform movements from the center to the edge of the nail.
If the cuticle has been neglected and the result obtained is not completely satisfactory, the remaining part of the cuticle can be carefully cut off using appropriate scissors. The movements should be small, which will prevent the formation of hangnails.
Removing hangnails
Nail clippers are used to remove hangnails. They may have a rounded or pointed edge.
Remember: hangnails should never be pulled, as this can lead to the formation of wounds and other related consequences. They are easily removed if you pinch them a little with pliers. The edges of the hangnails are smoothed with similar precise movements.
Treatment of fingertips and corners
Rough pads, calluses on the palms and sides of the finger are treated with a ceramic file or a small piece of pumice. It is better to avoid cutting rough areas of skin, since it is difficult to perform such actions carefully, making the traces of circumcision invisible.
Completing a manicure at home
At the end of the manicure at home, apply a cream to your hands that will soften and moisturize the skin of your hands. Let it soak in for a few minutes. After this, degrease your nails with nail polish remover and, if desired, apply polish.
Your manicure is ready!
Practical tips for manicure at home
As an addition, I would like to give some practical tips that may be useful for those who do their own manicure at home.
Choosing a nail file
Remember that the right choice of file is of utmost importance and is the key to beautiful and healthy nails. Thus, for fragile, weakened nail plates, a fine-grained semicircular tool with a buffer zone is preferable, which will allow you to file and polish the nail well, preserving its structure. If there are no problems with fragility, and you can safely classify your nails as healthy and strong, then a sapphire or sand file would be an excellent choice.
It is advisable to use files that have a flawless rubbing surface. When buying a tool, run your fingertips over its surface - a high-quality product does not scratch and does not have protruding “grains of sand” or areas.
Rough files with a rough, scratching surface are originally intended for filing and processing artificial nails.
The use of iron tools is unacceptable.
Try to give preference to files with a cardboard or rubber base.
Trim or file
Some experts recommend not cutting your nails, but rather filing them with a good nail file. This measure prevents nail splitting and brittleness. This recommendation may be effective, but it requires a lot of time. For me, another option is more acceptable: cutting the nails to the desired length, and then filing the free edge of the nail plate until the desired shape is obtained.
Tools
Tools for manicure at home, such as clippers and scissors, must be sharp. If their cutting surfaces are dull, they are more likely to cut themselves and develop hangnails due to incomplete (uneven) cutting of skin areas.
It is recommended to do a manicure at home once every two weeks. After each procedure, instruments must be disinfected. To do this, just wipe them with a 70° solution of medical alcohol, which can be purchased at the pharmacy.
As you can see, doing a manicure at home is not that difficult. It's enough to know a few tricks and get a little practical experience. Then you will always have your own “personal specialist” for manicure, and you will be able to save time on trips to the salon. In conclusion, I want to give one more important piece of advice: do not forget to properly care for your nails, use home baths, nail masks, and also monitor your health and nutrition. Be beautiful in everything - from your hair to the tips of your nails.
Sincerely, Tatyana Raduga.
Every girl should be able to do a manicure at home. The exclusive rights to a good manicure do not belong only to well-groomed women. Taking care of your hands is useful for all people from the point of view of hygiene and neatness: timely processing of fresh cuticles will prevent inflammation of the resulting hangnails.
Nail treatment requires accuracy and patience: if you are ready for painstaking actions, then you can professionally handle a manicure at home, and we will show and tell you about everything step by step using photos and videos.
For those who recently had a manicure done by a master and followed his work, it will be a little easier, but the rest will achieve ideal results over time. There is nothing particularly complicated here, you just need to be patient and follow the procedures accurately.
We will share with you the important secrets of true manicure mastery at home - from professional techniques to giving your hands visual appeal and softness. By following our advice, you will give your nails beauty, neatness and health.
Treating nails with a file at home
First of all, if necessary, you need to clean the surface of the nail from old varnish. It is better to remove the coating with a product that does not include drying nails and harmful acetone.
The correct way to remove nail polish is:
- Moistening the coating with cotton wool or a cotton pad soaked in liquid;
- Removing nail polish by pressing on the cotton wool in one motion from the cuticle to the edge of the nail plate;
- Cleaning off residues is easy, without pressure, using a match with cotton wool or a cotton pad.
Photo. Manicure at home
The old polish has been removed and the nails are now ready for filing. To begin, choose a tool that matches your nail structure.
Important: actions with a file must be carried out only with dry and hard plates, no baths, otherwise the nails will peel. It is also undesirable to use scissors to trim and shape the plate; cracks may appear.
So what choice do you have:
- sand and sapphire devices - suitable for hard, non-brittle and non-flaking nail plates;
- with fine abrasive, rounded - use if your nails are weak.
Important: metal tools are undesirable, they lead to delamination of the nail structure.
How to hold a file? Maintain a slight angle between it and the edge of the plate, avoid contact with the skin to avoid damaging it.
In what direction should you move the file? File the plate from the outer edges to the center to avoid rough edges and nail breakage.
Important: do not get too far into the corners, otherwise you will injure the rollers and get inflammation.
Movements should be soft and confident, without sudden pressure. After finishing filing, remove dust with a manicure brush or a smooth (lint-free) cloth.
After watching a video about manicure at home, you should not have any questions.
Now let’s choose the future outlines of the nails, which depend on many factors:
- size of fingers in length and width;
- hand outlines;
- quality of the nail plate;
- your own wishes.
There is a universal option for the shape - oval: it can be combined with any shape of hands and fingers. A wide-angle nail outline will suit thin and long brushes. If your nails are round and wide, the best treatment option would be to leave a sufficient (but not excessive) length and taper.
Please note that very long plates require additional (bio)gel, acrylic or shellac care, otherwise they will constantly break. Extremely short plates make the hands “heavier”, distorting their natural shape. The ideal length of the edge of the plate is from three to five millimeters: it is both convenient and aesthetically pleasing.
Important: for the free edge of the plate it is necessary to use a tool less rough than for the main filing. A fine abrasive will remove roughness and protect against snags and breakages: make sure the edge is smooth by running your fingertip along it - barely touching it.
Do not remove subungual dirt with metal tools so as not to scratch the delicate film: to clean, use a manicure brush or a bone stick.
If you don’t want to coat the plates with varnish, polish them: a special polisher will allow you to achieve perfect smoothness. There is an excellent device with four active planes, marked with numbers, by which you can track the order of their use.
Important: You can use the polisher monthly, but not more often if you do not want excessive thinning of the nail plates.

Photo.. Working with a nail file
How to treat cuticles at home
There are two ways to tidy up the cuticle: using trimming, and not using it. The first option, trimming, stimulates the cuticle to grow faster over time (similar to frequent hair cutting), so the second method is more gentle if the cuticle does not bother you much.
For the non-edging method, a special removal compound is used. Its consistency can be liquid, gel-like, in the form of a cream or as a lotion - this is not the main thing: the essence is in the composition containing softening fruit acids. After application, there will be a feeling of dryness - do not worry, this is normal, since the product tends to degrease living tissue:

"Lubricate the cuticle and side ridges from the inside
..."
- coat the cuticles and side ridges from the inside using an orange wood stick (an ideal tool due to its softness and ability to kill germs);
- wait a minute or two;
- Remove the dead top layer from the nail carefully, starting from the side edge. Move the softened film with a stick and, moving in an arc, walk along it and the rollers. The pellets formed in this case consist of dead cells, which indicates the readiness of nail treatment;
- rinse off the remaining composition;
- polish the rough surface of the rollers (if necessary) with a diamond file or get rid of dead bodies with a cutter, but be careful not to injure living tissue.

"Remove the dead top layer from the nail carefully...
"

"Sand the rough surface of the rollers with a diamond file
..."
This composition inhibits the growth of the cuticle, so further processing will not occur soon.
The trimming method for getting rid of cuticles starts with a finger bath. The dosage of the solution for steaming is in the following proportions:

Do as in the photo
- water: 1 glass;
- sea salt (helps strengthen the nail plate, but is not used if there is damage or inflammation on the skin; in this case, it is replaced with chamomile infusion): 1 teaspoon;
- lemon juice (accelerates cuticle separation): up to five drops;
- iodine (added for peeling nails): three to four drops.
Steps to remove cuticles using the trimming method:
- disinfect the necessary tools (tweezers, nippers) with an alcohol-containing solution and check them for sharpness - with blunt utensils you will not be able to achieve the desired effect and may damage the tissue;
- make a bath in accordance with the recommendations for the composition of the solution;
- After steaming your hands for five to seven minutes, take them out and dry them with a napkin or towel, completely removing moisture;
- move the cuticle away from the edge using an orange stick;
- cut the cuticle carefully using sharp nail clippers or tongs: move the tool smoothly, without interruption, “drawing” a rounded line and leaving a smooth edge. Cut moderately to avoid injury to the skin and the formation of burrs;
- treat the cut areas with an alcohol-containing solution.

"Cut the cuticles carefully using sharp nail clippers or tongs.
..."
It is imperative to get rid of painful hangnails: they cause discomfort and, when inflamed, spoil the appearance of the fingers. To carry out the procedure, you will also need tools (disinfected and sharp) and warm water with glycerin (one teaspoon is enough for a bath):
- steam your fingers;
- dry your hands;
- carefully cut off the burr with tweezers (nippers), holding them perpendicular to the burr;
- Treat skin lesions with an alcohol-containing liquid.


"carefully cut off the hangnail with tweezers..."
Having dealt with the cuticles and hangnails, soften the nail plates and surrounding tissues with a special cuticle oil by lightly massaging and kneading your fingers. This should not be neglected: massage with oil is not only pleasant, but also useful - it strengthens the nail, regenerates the water-fat protection and softens the cuticle. If there is no special composition, take regular but real oil (for example, olive oil). Carrying out this procedure every day will give you beautiful nails after a while.

"soften your nail plates with a special cuticle oil...
"
Important: if you paint your nails, such a procedure should be postponed and performed after the coating has completely dried: if the plates are greasy, the varnish will lie unsightly on a slippery surface and will quickly peel off.
Again, if coating with varnish is not expected soon, you can smear your nails instead of oil with a special strengthening agent: this is especially important for those who cannot boast of strong and fresh nails.
The choice of funds is yours, today there are quite a lot of them: when choosing, read the instructions, it will tell you whether it is for you or not. The IBX System complex, which acts deeply inside the nail and gives it elasticity, strength and a healthy appearance, has received excellent reviews. After applying it, you can immediately decorate your nails with any coating - it will create a protective layer and protect your delicate nails.
Nail painting
For a longer-lasting coating, the nail surface should be degreased, this is done in one of the following ways:
- treat the plate with a nail polish remover that does not include acetone;
- coat your nails with a degreaser;
- wash your hands with soapy water.
To protect the nail from harmful inclusions of colored varnish and from the appearance of yellowish spots on it, coat the plate once with colorless varnish. This transparent substance is an excellent base for further layers that will lie smoothly, without gaps or thickening. The service life of your coating will also increase.
To obtain a high-quality surface, be sure to wait until the base dries - it won’t take long, about five minutes.
How to do colored manicure at home:
- Before opening the bottle, many people shake it, but this is wrong: the consistency of the varnish may not so much mix as change - air bubbles will appear in it, interfering with painting. To ensure uniformity of the varnish, it is enough to roll the bottle between your palms several times;
- after applying the varnish to the brush, be sure to touch the inside of the bottle neck, removing excess;
- move the stroke from the middle of the plate to the tip in one motion, pressing lightly;
- use the remaining varnish on the brush for the edges - two light strokes;
- Remove “overkill” of varnish with a brush;
- dry thoroughly;
- if a second layer is needed, cover the plate in the same way as with the first layer;
- dry again (different varnishes have different drying times, it’s worth knowing which one you’re using). If you are in a hurry, you can add a layer of a special drying solution, or run your hands under cold running water.

While painting, sit comfortably, make sure that your hands do not shake - rest your elbows on the tabletop. To remove excess strokes along the edges of the plate, take a special pen (corrector) containing nail polish remover - your manicure at home will be perfect.
If there is no handle, you can use a cotton swab with solvent, but lint may separate from the cotton wool and ruin the beauty.
It happens that you are not sure about the choice of coating shade, and your eyes run wild. Here are some tips on how to make your decision.
If your appearance is classified as a summer or winter type (in terms of color), a coolish color with a blue tint will look great on your fingers. Autumn-spring skin color (with a yellowish tint) requires a warm tone of coverage, the ideal options are red and pink.

On elongated almond-shaped nail plates, a continuous layer of deep matte shade looks great. Shortened and wide nails visually become longer and thinner if they are painted with a soft pearlescent color only in the center of the nail.
Important: do not apply the pearlescent composition to a damaged plate, riddled with grooves - it “shows” all the irregularities more strongly.
Don’t ignore what you will be wearing, especially if the manicure should highlight the color and style of the dress or accessories; The color of lipstick is also important.
When decorating your fingers with jewelry, pay attention to the combination of tones of the nail coating and the shade of the stones:
- pinkish shades of varnish (actually pink, with a lilac or crimson tint) are suitable for ruby, alexandrite, as well as rings with amethyst, sapphire and aquamarine inserts;
- the color of carrots, brown-pink and scarlet is emphasized by emerald, turquoise and inclusions of coral;
- any manicure matches artificial and natural diamonds (cubic zirconia - but only white or transparent, and diamond), as well as rock crystal and pearl inserts;
- mother-of-pearl, white, pale pink – these shades of varnish can be paired with jewelry with stones and clothes of almost any spectrum.
If you are one of those who love nail decorations, go for it! You can create thread and ribbon patterns, use rhinestones, stamps, bouillons and dried flowers, as well as various techniques such as nail art and lace. Of course, the drawing should first appear as a sample (a table or paper will do - you can sketch it): you should not immediately start working on your nails so that you don’t have to wash away your painstaking work.
Well, now the final touch is the fixer. From the name, everything is clear, it protects beauty from external “aggressors” - heat, cold, touching sharp and hard objects. Additional advantages are the delightful shine and longer service life of the lovingly made coating.

Important– don’t forget about massage with oil!
Daily manicure care at home
It won't be difficult if you have mastered manicure at home. So, the main part of the work is finished, all that remains is to take care of your hands after the manicure so that the coating always looks fresh and your hands look well-groomed and rested.
Use the cream three times a day if your skin is prone to roughness and redness:
- morning – moisturizer;
- day – nourishing cream;
- evening – protective cream.
Twice (excluding the last point) will be enough for those who do not have serious problems. When applying the cream, do not forget about the nail plates and massage your fingertips.
Baths will help your hands relax. They can be made in three types:
- with the addition of aroma oils;
- using beneficial herbs;
- paraffin (especially recommended in case of problems with hands). Paraffin enhances the effect of the beneficial elements of a cream or lotion many times over.
In conclusion, we will share a number of recipes for maintaining healthy nails.
White spots on the plate indicate a vitamin and mineral deficiency, but most often the problem goes away after taking calcium-containing medications.
Too much fragility (brittleness and peeling) can be reduced with baths: two tablespoons of sea salt per liter of water. Place your hands in a warm solution for a quarter of an hour, repeat every day for half a month - three weeks.

To prevent brittle nails due to frequent manicures with colored coating and removing it with acetone, use a greasy medium:
- cream - rub it in manually, or make compresses with it;
- baths - with the obligatory inclusion of oil, pleasant warmth.
So, watch the video and try a manicure at home - we tried to present everything in an accessible way and not miss a single detail so that your hands are always well-groomed and fresh.
Manicure is a very important procedure that many women do to make their hands especially beautiful and complete their look. But a manicure is necessary not only for aesthetic, but also for hygienic purposes, since during a manicure, dirt and dust that accumulate under the regrown nail are removed, and the regrown cuticle is also processed.
For a manicure at home you will need:
- nail polish remover;
- nail brush;
- cotton swabs;
- thin wooden stick;
- a bath with warm soapy water with the addition of vegetable oil;
- special nail cream;
- cream or lotion for removing nail skin;
- hand cream;
- soft towel.
How to properly do a manicure at home
Wash your hands thoroughly, it is advisable to clean your nails with a special brush, remove any remnants of old varnish from them. To remove nail polish, it is recommended to use special products containing oil. This prevents your nails from drying out. It is advisable that the nail polish remover does not contain acetone and toluene, as they damage the nails. And one more thing: it is better to remove nail polish with cotton swabs rather than synthetic cotton.
After removing the old polish, give your nails the desired shape. You should not leave long nails: they break easily. But if you like long nails, it’s worth considering that they require impeccable care.
It’s beautiful when the free edge of the nail protrudes 3-4 millimeters. If you cut your nails shorter, their shape changes, they look wider, and your fingers appear shorter and thicker. After trimming your nails, be sure to smooth the sharp (scratching) edges with a special file. Move it lightly, without pressure, only towards the middle, trying not to grind down the smooth surface of the nail.
If your nails are not very long, it is better to do without the help of scissors. It's enough to just file them down. You should not use metal nail files; it is better to purchase more delicate and more modern ones - gentle files with a rubberized base or springy soft plastic and a special coating on top. Depending on the density of the nail plate, you need to select a file with a certain coating.
The length of the nails on both hands should be the same: discrepancy gives the impression of untidiness.
Beautiful nail shape is, of course, a relative concept. A lot depends on what impression you want to make. It's one thing if you are a respectable lady with a hint of elegance, another thing if you are a young maiden with extravagant tastes.
Not too long oval nails are considered classic and really look great at all times. Rectangular nails have been very popular in recent years. So there is a lot of choice. The shape of your nails should be chosen according to the length of your fingers, the natural shape of your nails, your taste and appearance. Most importantly, remember that it is dangerous to file the corners of the nails deeply, because this can cause an inflammatory process.
There are little tricks to create the effect of longer and narrower nails. For example, with short square nails, the nails are cut straight, slightly rounded at the edges, but not reaching the point of contact of the nail with the skin, and then painted not with colored varnish (it visually shortens the nail), but with transparent, and a strip of white is first applied to the free edge of the nail varnish - the so-called “French manicure”.
Rules for performing a manicure
- The skin around the nails is lubricated with a moisturizing or special cream, rubbing it in with light circular movements of the thumb. Then the fingers of one hand are placed in a bath of soapy water for about three minutes to soften the skin. The hand is dried with a soft towel.
- Apply cuticle remover cream to the skin around the nails and rub it in with your thumb. Then the lotion is applied using a pipette.
- Using a stick wrapped in cotton wool, carefully scrape off the skin around the entire circumference. Try to remove all its remnants from the surface of the nail.
- Using a special wooden spatula, gently push the remaining skin towards the base.
- Rub nourishing cream into the nail bed.
- Wrap the sharp tip of the stick in cotton wool and gently clean the inside of the tip of the nail. Do not try to get as deep as possible: this may damage the base of the nail. And under no circumstances use scissors or other sharp objects for this purpose: you will scratch the nail from the inside, and it will be less protected from fungal infections.
- The tips of the nails should be lightened from the inside with a white pencil.
- After this, wet and treat your other hand. You should not process two hands at once, since during the process of processing the first, the second will have time to dry and the skin will no longer be so soft. If you have noticed, we do not recommend using traditional nail clippers: it is too easy to injure yourself with them, and your fingers do not look particularly neat after home treatment. As for hairdressers, we especially do not advise you to allow your hands to be treated with cutting instruments: in addition to the danger of being wounded, there is a much more serious danger of contracting AIDS or hepatitis through a wound. Especially if this is a random hairdresser and you are not sure about the sterility of the instruments.
- Cut off the burrs with scissors and lubricate with hydrogen peroxide. To give your nails a healthy shine, buff them with a soft piece of leather. In addition to improving the appearance, this procedure causes a rush of blood to the nails, which strengthens them and promotes better growth.
- Rub the nourishing cream into your hands. Massage your fingers especially carefully, rubbing the cream in as if you were removing a tight ring from your finger. This will improve blood circulation. Remove the remaining cream with a sanitary napkin.
- If your nails are uneven, you can polish them with a special polishing device. Gels are also produced specifically for polishing nails, some of them with medicinal properties.
Nowadays many different nail files are sold, including those for grinding and polishing. A coarser file intended for sanding can only be used in two cases. Firstly, if the nail plate is not smooth, but has longitudinal and transverse grooves. Secondly, if pigmentation appears after poor-quality varnish. However, even with this, the procedure is done no more often than once every six months, when the plate is completely replaced. Otherwise the nail will become thinner.
How then to achieve shine? If you are not satisfied with the result that can be achieved with a polishing file, you can use a special polishing gel or oil. The product is evenly applied to the nail before polishing. The shine increases several times. You can afford this procedure once every 7-10 days.
Nail treatment is the initial stage of performing a manicure both at home and at home. The procedure differs depending on the type of manicure: edged or unedged, hardware, preparation for applying gel polish or working with nails affected by fungus.
Tools and materials: list
How to properly treat your nails at home? First you need to prepare all the tools and materials that may be useful during the manicure process. Stores today offer a huge selection of hand care products. To perform a manicure yourself you may need:
- nail files;
- wooden sticks for pushing back cuticles;
- nail scissors or tweezers;
- cuticle oil;
- softening agent;
- cotton pads;
- steam bath;
- hand skin care cream;
- hand scrub;
- hydrogen peroxide;
- brush with natural bristles;
- nail polish;
- base coat (base);
- varnish fixer (finish);
- waffle towel or cotton napkin.
Secrets of choosing: nail polish remover
It is better to choose a nail polish remover that does not contain acetone, which has a negative effect on the nail plate, although it quickly washes off the old coating. With frequent use of acetone, nails begin to flake and become dull. To minimize harm, various nourishing and moisturizing components are added to the liquid (in fact, it may not be a liquid at all, but a gel or cream). Some products contain vitamins A, E, group B, essential oils, extracts of medicinal herbs, mineral ingredients (calcium) that protect the nail plate from brittleness and delamination.
File, wooden sticks and scissors
It is better to buy a glass file. The tool does not act so aggressively on the nails and does not provoke separation. Polishing files may come in handy. These are made in the form of a parallelepiped. The finish and number on each side is different. You need to polish your nails one by one (depending on the edge number). The procedure should be carried out no more than once a month.
Often, disposable orange sticks are used for manicure to push back the cuticles. Orange wood is distinguished by antiseptic properties; the wood has a dense, but at the same time very soft texture, and absorbs moisture well. The length of the stick varies from 9 to 18 cm, the thickness on average is 3-5 mm. There are options with rubber tips, but the usefulness of such a tool for nails is much lower.
Wooden sticks can be replaced with metal instruments made of high-quality medical steel. They are reusable, easy to disinfect and can perform all the functions of an orange stick. But you need to use the tool very carefully, because a metal spatula can seriously damage the nail plate. Therefore, it is better to use models with rubber tips.
The size or special tweezers are chosen based on the convenience of the woman herself. It is advisable to purchase tools made of high-quality steel from well-known manufacturers. Such scissors will have to be sharpened very rarely, and there will be no problems with manicure.
Cuticle remover, oils and scrubs
Oil, scrub, cream and cotton pads can be purchased at any cosmetic store. You can use home remedies: salt and oil baths or oil massage. Oils are used cosmetic or essential. The most useful are coconut, almond, avocado or tea tree oil. Fruit acids, which are sold in pharmacies, will do an excellent job of softening the cuticle.

Processing instruments in the salon
How to properly treat your nails at home? Any high-quality and safe manicure begins with the processing of tools, and not with the preparation of the nails themselves (steaming, etc.).
In beauty salons there are several stages. First, an antiseptic is rubbed into the skin of the hands to destroy pathogenic or suppress temporary microflora. How to properly handle nail trimming tools? All instruments (except for disposable ones, which must be individually packaged) are immersed in a disinfectant solution when opened or disassembled.
After disinfection, the instruments are placed in a craft bag and placed in a sterilizer. The instrument should be stored in a UV sterilizer with bactericidal lamps. Before use, manicure tools are once again sprayed with a disinfectant solution from a spray bottle.
Disinfection at home
At home, processing of nail files, tweezers and scissors is carried out before the start of the procedure and after the end of the manicure. If this is a personal manicure set, then it is enough to wipe the tools with a cotton pad generously moistened with hydrogen peroxide or alcohol. If you do manicures at home for several clients, then to comply with all the rules of disinfection and sterilization, you should purchase a compact sterilizer.
The procedures, of course, can be performed the old-fashioned way: the instruments are boiled and then calcined in the oven in sealed bags. Low-quality scissors and tweezers may become dull or bend when handled in this manner, but products made from medical steel will easily withstand all procedures.

Additionally, you need to treat the hands of the master and client with an antiseptic solution. This treatment is provided only in the process of preparing healthy nail plates for manicure. If fungus is present, instruments are disinfected differently.
General safety rules
How to properly treat fingernails, hands and tools so that the manicure process is safe? The process of sterilizing instruments is described in detail above, but there are several more rules that should be followed for your own good.
All actions must be performed very carefully and slowly, because you can cut yourself or the client. It is worth asking the client in advance whether his capillaries are located close to the surface of the skin. If this is the case, then it is worth recommending an unedged manicure to avoid injury.
If you receive a “wound” in the fight for the beauty of your nails, the cut must be treated immediately. This is not a tragedy. If all manicure instruments are disinfected according to SES rules, and the wound is immediately treated, then you don’t have to be afraid of becoming infected with something dangerous.
Products for treating cuts
Usually treated with alcohol or hydrogen peroxide, but such antiseptics thin the blood. Professionals use hemostatic fluids that quickly stop bleeding and do not interfere with the quality application of varnish. You just need to moisten a cotton swab in the solution and apply it to the wound for a few seconds.
“Vagotil”, “Gemostab”, “Capramin” and “Enoji” have successfully migrated from surgery, gynecology and dentistry to the nail industry. You can use medical glue, which stops bleeding well.
“Vagotil” gives an immediate effect, but can turn the skin jaundiced. “Hemostab” not only stops bleeding, but also relieves pain. “Capramin” does not cause allergies, does not stain the skin and has no specific odor, and the box contains a very convenient pipette for dosing.

Nail treatment during trim manicure
How to properly treat your nails? First you need to prepare and disinfect all the tools that may be needed. Then you should remove the remnants of the old polish using a cotton pad and liquid (this can be a gel or cream) for removal.
The next stage is the bath. Warm water and a special filler are poured into a plastic bowl. This can be shower gel or liquid soap, essential oils, lemon juice (softens the cuticle and makes it easier to remove) or sea salt (helps strengthen nails and disinfects). If there are scratches or peeling, you should not use sea salt; it is better to replace it with chamomile decoction.
The bath should be taken for five to ten minutes. Afterwards, wipe your hands with a soft towel or blot with a paper napkin.
Next, remove the cuticle. How to properly treat your nails at home? To do this you will need an orange stick and wire cutters. Using the tip of a wooden stick, carefully push the cuticle to the edge of the nail plate, and then use pliers to trim it so that the cut is without burrs. At this stage you need to do everything very carefully. Inaccuracy can lead to infection. Any cosmetic oil or emollient is applied to the site of the removed cuticle.
How to properly treat your nails at home further? The next stage is the form. It is best to avoid using scissors and limit yourself to just a nail file. Nails should only be filed in one direction to avoid damaging the plates. The file is held at a slight angle. The treatment is carried out from the edge to the center of the nail plate.
The shape can be absolutely any. You should focus on personal preferences and fashion, which changes every season. Oval-shaped nails that protrude 3-4 mm beyond the edge of the finger always look aesthetically pleasing. Short nails make your fingers look shorter and thicker, while too long nails are simply inconvenient.

You should choose a file 15-20 cm long and 1.5-2 cm wide. This is the most convenient tool. It is better to use a soft one, because metal ones lead to For home manicure, it is enough to purchase one universal file.
Technique for unedged manicure
How to properly treat your nails during an untrimmed manicure, and what does such a procedure entail? Unedged is suitable for those whose blood vessels are located close to the surface of the skin, and whose cuticle is thin and delicate. The main difference from a trim manicure is that the cuticle is not trimmed. It is removed using a special product.
There is no need to steam the skin of your hands before an unedged manicure, but no one has canceled the treatment of tools. How to properly treat your fingernails? You need to give your nails the desired shape with a nail file, and then begin removing the cuticle. To do this, a special composition is applied to the skin, which dissolves dead cells. After a few minutes, all that remains is to push the cuticle back and carefully remove dead skin using an orange stick. The remaining product is removed with a towel or paper napkin.
How to properly treat the skin around the nail further? You should use nourishing oil. The product should be rubbed with massage movements over the entire nail surface and into the skin around the nails. Before applying varnish, the surface must be degreased. There should be no traces of oil left at all, because otherwise the varnish will lie unevenly. A colorless base will protect your nails from pigmentation and allow the polish to last as long as possible.
Applying colored nail polish
Colored varnish is applied in a thin layer. The procedure must be repeated after a few minutes so that the first layer has time to dry. The final stage is applying a topcoat or adding additional shine. This will keep your manicure in good condition longer. It is best to buy a product from the “two in one” category, that is, one that is both a fixer and a base, and adds shine.
Many professional nail polishers recommend applying polish not immediately after a manicure, but the next day. The fact is that the steamed nail plate takes on its normal shape over time, and the varnish sets earlier. This creates an air gap between the nail and the varnish. Because of this, all the beauty breaks off literally the next day. And if you paint your nails a little later, the polish will last the required 5 days.

Hardware manicure: tools
How to properly treat your nails with a manicure machine? This is a device that looks like a small milling machine on which you can install different attachments. The manicure technique differs only in that dead skin is removed not with hand tools, but with a mechanical device.
The machine for hardware manicure can be equipped with diamond, ceramic or silicon carbide cutters. Diamond ones are the most effective and expensive, they perfectly solve the problem of unevenness and ensure its prevention. Ceramic ones are used for problem areas and are good for pedicures. Silicon carbide cutters are the cheapest and most available, but are considered disposable and must be disposed of after the procedure.
There are different options for nozzles. A reverse cone is used to treat nails before a French manicure, a spherical bur is needed to remove small growths and cracks. A cylindrical tool is used to shorten nails, remove gel polish, create designs and other procedures.
Using a drum, rough areas are removed, thick nails are trimmed, or the growth line is straightened. Polishers are made of plastic or silicone in the form of a rounded cone. According to reviews, even for a home manicure you need to purchase four types of attachments.
Nail treatment with a machine
How to properly treat your nails with a manicure machine? There is no need to steam them, because the procedure is carried out only on a dry nail plate. The rpm is set to a speed of up to 10,000. The machine must not be pressed or put pressure on it during processing. First, it is advisable to practice on silicone tips.
So, how to properly treat your nails with the device? The cuticle is first pushed back to the nail hole with an orange stick. In this area you can use medium-hard drums. Removal of dead cells on the palms and fingers is performed using ball-shaped burs. Trapezoidal or cylindrical cutters can be used to give the nail plate the desired shape.

Next, how to process it correctly Now you can start polishing. This is quite difficult for beginners: you cannot bring the edge of the polisher to the nail to avoid scratches, you cannot hold the tool in one place for more than one second. Next, all that remains is to remove dust and nail residues, lubricate the skin around it with oil and apply varnish.
Gel polish application technology
Many women choose gel because this coating lasts longer and prevents nails from breaking. But how to properly treat your nails before applying gel polish? First you need to give the desired shape, align the free edge of the plate and thoroughly clean it from dust. If your nails are peeling, you need to treat them with a fine abrasive nail file. Before coating, you can do a manicure, but the surface of the nail should be dry and grease-free.
How to properly treat your nails before gel polish? The top layer of the nail plate is removed with a coarse-grained buff. The surface should remain matte. Do not press too hard on the tool to avoid damaging the nail. The dehydrator further removes nail residues, dust, grease and moisture. After treatment, do not touch your nails with your fingers.
Before applying the base, it is worth covering the nail with a primer so that the adhesion of the gel polish to the nail plate is stronger. Be sure to use a primer if the plates are thin or brittle or if there are delaminations. Then a base gel is applied, which creates a bond between the natural nail and the artificial material at the molecular level, and also protects the plate from coloring pigments.
The layer should be made as thin as possible. The base is dried under an ultraviolet lamp for one minute; when using an LED lamp, only ten seconds is enough. The colored gel is applied in one layer for translucency. If you apply two or three layers, the color will be saturated. But in any case, you need to try to make the layers very thin. After each layer, the marigolds are dried under a lamp.
A finishing gel is required to secure the coating. If the finish coat is not dried properly, the shine may be lost. At the final stage, all that remains is to remove the dispersion layer from the surface of the nail plate using a special liquid.

Pedicure
How to properly treat your toenails? During a pedicure, the nail plate is processed in the same sequence as during a manicure. First, the skin is steamed, then you need to trim your nails and cuticles. Pedicure requires treatment: care for the skin of the feet, cracked heels and calluses. How to treat toenails is clear, but what to do with rough skin?
Dead skin is removed with a pumice stone, but first you need to steam your feet in a warm bath for 10 minutes. Scrubs and peelings are great for getting rid of rough particles.
But a neglected situation cannot be corrected with a regular pedicure. To remove cracks and hardening, you need to apply a nourishing mask, wrap your feet in cellophane and put on warm socks. It is recommended to leave the mask on overnight, and in the morning wash your feet and lubricate them with nourishing cream. The result will appear only after several procedures.
Nail fungus: treatment rules
How to properly treat nails with fungus? This disease requires long-term and systemic treatment. Fungal infections remain viable after washing or cleaning with conventional means; a person becomes dangerous to others and even to himself, because without proper treatment, relapses are guaranteed.
To remove the fungus, you need to regularly apply compresses, baths, use tablets and medicated varnishes. How to properly treat fungal nails? Using a sterile instrument, the nail plate is first treated with a file, and then with antifungal ointments.

For procedures, you can use “Chlogexidine” in the form of a ready-made solution (1%). Use a cotton pad to thoroughly wipe the inside of the shoes, the insole, and all tools for manicure and pedicure. Socks need to be boiled in a special solution or treated with a pharmaceutical antifungal drug.
Treatment agents for mycosis
How to properly treat toenails if you have fungus? You can use pharmacy “Miko-stop”, “Miramistin”, “Dezavid”, “Laina” and the already mentioned “Chlorhexidine”. Myko-stop spray is suitable for emergency disinfection. “Miramistin” - this drug is used in a large number of cases, including for treating shoes. “Dezavid” is available in the form of a solution and spray. Can be used after nail removal. “Laina” is used on household items, but shoes must be dried after treatment.