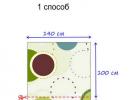
How to take measurements so that clothes fit well. How to find out your wrist size Take basic measurements of your figure
Assessing the deviation of a patient’s body weight with its progressive loss over a certain period of time characterizes the severity of trophic insufficiency and allows one to monitor the effectiveness of its targeted correction using diet or artificial nutrition. The criteria for assessing MT deviation are presented in Table 3.
Table 3.
The severity of weight loss (in% of the initial value) for a certain period before the examination
You can also use a more extensive assessment of somatometric indicators, relying on studies that are more common in the practice of nutritionists when giving advice on nutritional support. To do this, it is recommended to determine (using a caliper, adipometer or caliper) the thickness of the skin-fat fold over the left triceps for right-handed people (SFST).
Its value is considered an integral indicator of the condition of the body’s fat depots, and also allows one to calculate the value of the upper arm muscle circumference (AMC), which characterizes the condition muscle mass(somatic protein pool). This indicator is calculated using the formula:
OMP (cm) = OP (cm) - 0.314 x CLST (mm).
Methods for determining the thickness of the skin-fat fold over the triceps (SFST) and upper arm circumference (AC)
Skin fold thickness
1. Find the desired area of the arm (the midpoint between the acromial process of the scapula and the olecranon process of the ulna. The patient’s arm hangs down freely).
2. Pull back the skin with subcutaneous fat, holding the tissue between the thumb and index fingers.
3. A caliper is placed 1 cm distal to the fingers, midway between the base and apex of the skin fold.
4. The skin is not released during measurement.
5. After 2-3 seconds, measure the thickness of the fold with an accuracy of 0.5 mm.
6. Repeat the measurements up to three times so that the results do not differ by more than 1.0 mm, and then determine the average value.
Shoulder circumference (OU)
1. Place the measuring tape horizontally. It should cover the hand, touching the skin, but without squeezing the underlying tissue.
2. Measurements should be taken three times with an accuracy of 1 mm, as when measuring skinfold thickness.
The obtained indicators are compared with standard ones and the degree of malnutrition is determined (Table 4).
Table 4.
Somatometric criteria for diagnosing malnutrition
What to measure?
To clearly imagine the features of the figure, you need to have the following measurements.
- Breast volume.
- Volume under the bust.
- Waist size.
- Volume at the navel.
- Hip volume.
- Hip (leg) volume.
- Volume above the knee.
- Volume of the calf muscle.
- Hand volume.
- Wrist size.
- Ankle volume.
These parameters will help you fully evaluate your figure. If you measure laziness everywhere, then the list can be reduced to the following parameters.
- Breast volume.
- Waist size.
- Hip volume.
- Hip (leg) volume.
How to measure?
Bust volume
Measured at the most protruding point of the chest. The tape measure is parallel to the floor! Measured as you exhale.
Measuring body circumference
(Exhaled, measured).
Volume under bust
Measured at the point where the mammary gland ends. The conditions are the same. Exhale, the band is parallel to the floor.
Waist size
 Measured at the narrowest point!
It depends on the characteristics of your figure whether your waist will be closer to the level of the chest or to the level of the hips. And again we measure as we exhale. There is no need to pull your stomach in or stick out too much. The tape should fit snugly, parallel to the floor. But don't delay.
Volume at the navel
The same as with the waist, but at the level of the navel.
Hip volume
This is where things get a little more complicated. The volume of the hips is measured at the most protruding point of the buttocks! No riding breeches, underwires, etc. The tape fits snugly, but do not tighten it.
If the stomach is still included in the volume of the hips)), then we measure it together.
Thigh (leg) volume
Place your foot on a raised platform (i.e., on a chair) so that the angle under the knee is approximately 90 degrees. Measurements should be taken approximately 5-7 cm from the groin area. Don't strain your leg.
Volume above the knee
Either by analogy with the hip, or standing. Measurements are taken directly above the kneecap. In the “standing” case, the tape is parallel to the floor.
Measured while standing. The leg is relaxed. Along the widest part in the area from the knee to the ankle. The tape is parallel to the floor.
Hand volume
Hand freely along the body. Measure approximately 10 cm from the armpit! It's better if someone helps you. The tape is parallel to the floor.
Wrist size
Measured directly after the brush. Very tight! If there is objectively a layer of fat, then the tape needs to be tightened even more. (Must dig in).
Ankle volume
Standing on a flat floor. Measure directly above the two protruding bones. The tape fits tightly and is parallel to the floor.
 If you want to read all the most interesting things about beauty and health, subscribe to the newsletter!
How to measure shoulder circumference?
Taking measurements is an important step in obtaining a design drawing, so it is necessary to carefully monitor compliance rules and conditions of measurement:
— it is advisable to carry out all measurements (regardless of the type of clothing) in underwear;
— the waist should be belted with an elastic band;
— the person being measured must stand straight, without lowering his head, without tension, maintaining his usual posture;
- arms should be lowered along the body, with fingers extended and should touch the lateral surfaces of the thigh;
— the soles of the feet should touch the heels, the distance between the toes is 15-20 cm;
- breathing should be calm, and girth measurements should be taken during the breathing pause;
- the measuring tape should fit snugly to the body, but without excessive looseness or pressure;
— paired measurements are taken on the right side of the figure, since it is the more developed part of the human body.
Correctly measure the volume of your hand
Measure the length sleeves. It is much more convenient to do this with an assistant. Raise your elbow so that the line of your forearm is as parallel to the floor as possible. Bend your elbow so that your arm points up and is perpendicular to your forearm.
Have an assistant measure from the middle of your back to your wrist. The tape measure should go through the middle of the shoulder blade, the back of the arm and the elbow to where the cuff ends.
To create a pattern you need to know a few more measurements. Stand exactly as in the first case and measure the distance from the end point of your shoulder through the back of your arm and elbow to your wrist.
Put your hand down. Move it slightly away from your body. Measure the distance from the armpit to the wrist along the lower part of the arm.
Measure the width of the top sleeves. To do this, wrap a measuring tape around the most convex part of your forearm. The measuring tape should be parallel to the floor.
Measure your elbow circumference. To do this, lower your hand and wrap a centimeter around your elbow joint. Make sure that the measuring tape does not wrap around the joint too loosely, but is not too tight.
Measure the circumference of your wrist at the narrowest part. To make knitted products, you sometimes need to know a few more measurements. For example, for knitting sleeves-raglan you need to know the height of the shoulder in order to calculate the number of loops that need to be reduced. Measure it from the base of your neck to the line connecting your armpits. The measuring tape should be perpendicular to this line.
The markings on the centimeter must be clear and understandable.
If the sleeve is short or medium, measure its length from the end of the shoulder to the expected lower cut. Add a hem allowance to the resulting measurement.
To avoid confusion, write down all the measurements in a notepad or enter them into your computer. They will be useful to you in the future.
How to measure biceps correctly. Method for measuring biceps volume.
The growth of muscle mass, including biceps, can tell not only how successful an athlete is in training, but also about his athletic potential in general. Measuring the volume of your biceps is not difficult. Measuring muscle volume must be done using a centimeter.
1) The size of your biceps should not be measured immediately after an intense workout, but in a “cold” state - at least a couple of hours after exercise. Only under such conditions is it possible to determine its true size, and immediately after sports activities the muscles temporarily increase, but this volume subsides after some time.
2) Measurements should be taken in two positions. First you need to bend your arm at the elbow and place a tape measure directly around the biceps along its most protruding areas. On the outside of your arm, the tape measure should be on your triceps. The result should be recorded. Next, you need to straighten your arm and then completely relax it. Measure the muscle again using the same points as before. Record the result again. If you are working on increasing your muscles, then you need to write down each measurement so that it will be easier to monitor your own progress.
3) Pay attention to the difference between the volume of the biceps, both in a bent and relaxed state. This difference is called excursion and, as a rule, reaches no more than six centimeters. The greater the difference, the greater your athletic potential. Initially, it does not exceed a couple of centimeters.
4) If your excursion turns out to be more than six centimeters, then most likely this means that you made an error in the measurements.
5) During measurements, you should remember that the centimeter should not dig into your hand, but it should not dangle. It is recommended to measure the volume of your biceps once a month, at the same time of day and best on an empty stomach. Take measurements several times at once to be sure of the accuracy of the data obtained.
What is a biceps? Muscle structure.
The biceps is a muscle of the arm. Typically, such a muscle consists of:
long head(placed on the outer area of the arm).
short head(located on the inner area of the arm).
The two heads are connected into one biceps tendon next to the elbow joint. But since this tendon is attached slightly inward, the biceps is distinguished not only by the ability to bend the arm, but also to turn the palm to the side thumb(supination).
(c) Muskuly.com - a sports portal for everyone
Our group Our channel Feedback
How to correctly measure volumes using a measuring tape.
Most often, three main parameters are measured: chest size, waist size and hip size.
It is also useful to measure the volume of the arms and the volume of the legs (at the top), especially if you want to reduce the volume of these particular parts of the body. (For men, measuring the volume of biceps and triceps is relevant if they want to increase muscle size).
Additional measurements can be taken if you wish.
Breast volume. Measured at the most protruding point of the chest. The tape measure is parallel to the floor! Measured as you exhale. (Exhaled, measured).
Volume under the bust. It is actually measured at the point where the mammary gland ends. The conditions are the same. Exhale, the band is parallel to the floor.
Waist size. Measured at the narrowest point!
It depends on the characteristics of your figure whether your waist will be closer to chest level or to hip level. And again we measure as we exhale. There is no need to pull your stomach in or stick out too much. The tape should fit snugly, parallel to the floor. But don't delay.
Abdominal volume (3 cm below the navel).
Measuring girths or circumferences.
Same as with the waist, but 3 cm below the navel.
Hip volume. This is where things get a little more complicated. The volume of the hips is measured at the most protruding point of the buttocks! No riding breeches, bones, etc. The tape fits snugly, but do not tighten it. If the stomach is still included in the volume of the hips, then we measure it together.
You can accurately obtain this measurement using whatman paper, which should be wrapped around the hips and made notches where the sides meet.
Top thigh volume (legs). Place your leg on a raised platform (chair) so that the angle under your knee is approximately 90 degrees. Measurements should be taken approximately 5-7 cm from the groin area. Don't strain your leg.
Volume under the knee. Either by analogy with the hip, or standing. Measurements are taken directly under the kneecap. In the “standing” case, the tape is parallel to the floor.
Volume of the calf muscle (lower leg). Measured while standing. The leg is relaxed. Along the widest part in the area from the knee to the ankle. The tape is parallel to the floor.
Forearm volume. Hand freely along the body. Measure approximately 10 cm from the armpit! It's better if someone helps you. The tape is parallel to the floor.
Wrist size. Measured directly after the brush. Very tight! If there is objectively a layer of fat, then the tape needs to be tightened even more. (Must dig in).
Ankle volume. Standing on a flat floor. Measure directly above the 2 protruding bones. The tape fits tightly and is parallel to the floor.
Neck volume. Measure around the base of the neck.
____________________________________________________________________________
*Descriptions of measurements are taken from here: http://www.nadietah.ru/node/113312 There is also a picture illustrating where and how to measure.
Women's measurements
1. Neck circumference
2. Bust

3. Waist

4. Hip circumference

5. Girth at the length of the product
Mark the position of the length of the blouse horizontally on the body with tape, braid, or a belt. Place the measuring tape around your torso at the length of your blouse. When measuring, the tape should fit snugly (but without tension) to the body.

6. Bicep circumference

7. Forearm circumference at 3/4 sleeve length
The tape runs 3-5 cm below the bend of the elbow (elbow), perpendicular to the forearm. When measuring, the tape should fit snugly (but without tension) to the body.

8. Wrist circumference

9. Length of the shoulder slope
Measure the distance from the point at the base of the neck to the point where the shoulder slope meets the shoulder (you can use the location of the shirt sleeve seam as a rough guide).

10. Sleeve length

11. Chest height
Measure the distance from the base of your neck to the fullest point of your chest.

12. Center of the chest
Place the tape horizontally, measure the distance between the two most protruding points of the chest.

13. Chest width
Place the tape horizontally 2-3 cm above the front corners of the armpits and measure this distance. When measuring, the tape should fit snugly (but without tension) to the body.

14. Back width

15. Back length to waist
Mark the waist line horizontally on the torso. Place the tape at the back of the neck (spinous process of the 7th cervical vertebra) and measure along the spine to the waist.

Men's measurements
1. Neck circumference
Measured at the base of the neck. Wrap the ribbon around your neck so that the lower edge of the ribbon passes through the base of the neck at the back and closes above the jugular cavity at the front. When measuring, the tape should fit snugly (but without tension) to the body.

2. Bust
Wrap the tape around your chest so that the tape runs horizontally across the most protruding points of your chest. On the back, the tape is applied to the shoulder blades. When measuring, the tape should fit snugly (but without tension) to the body.

3. Shoulder shape

4. Waist circumference
Place the tape horizontally around your torso at waist level. When measuring, the tape should fit snugly (but without tension) to the body.

5. Hip circumference
When measuring the hips, the tape should run horizontally at the widest part of the hips, across the most protruding points of the abdomen in front and the buttocks in the back. When measuring, the tape should fit snugly (but without tension) to the body.

6. Bicep circumference
Wrap the tape around your bicep at its widest point. When measuring, the tape should fit snugly (but without tension) to the body. The hand should be in a relaxed state.

7. Wrist circumference
Wrap the tape around your wrist at the wrist joint. When measuring, the tape should fit snugly (but without tension) to the body.

8. Sleeve length
A) With your arm slightly bent, measure the distance from where your shoulder slopes into your shoulder to where you think the long sleeve of your shirt should end.
b) Measure the distance from the point where the shoulder slope transitions into the shoulder to the place where, in your opinion, it should end short sleeve shirts.

9. Chest width
Measure the distance between the front corners of the armpits. When measuring, the tape should fit snugly (but without tension) to the body.

10.Back width
Place the tape horizontally across your back and measure the distance between the back corners of your armpits. When measuring, the tape should fit snugly (but without tension) to the body.

11. Back length
Place the tape at the back of your neck and measure the desired length.

This section was created with the support of the online store
Before you start sewing any product, you need to take measurements. A professional dressmaker knows that if you take your measurements correctly female figure– this is already half the success. And even if you have never done this, strictly following the instructions below, you can do it quickly enough.
Important: Before you start taking measurements, put on the underwear that you intend to wear under this product, since modern tights can have a “tightening” effect and remove from 1 to 3 cm in volume, while bras, on the contrary, can add volume.
Tie a thin fabric trim around your waist; this simple technique is used by all professional dressmakers. It makes it easier to take measurements related to the waist line. We recommend reading about
Stand straight, without tension, do not slouch, do not bend your knee. After you take your measurements, you can compare them with standard ones to better understand and analyze the features of your figure.
1. Chest circumference. This measurement is taken at the most protruding points of the chest. The tape measure should not be tightened or loosened too much. It should fit snugly, but without tension, to the body. The girth above the chest is measured over the mammary glands.
2. Waist circumference. Measured at the narrowest point, the measuring tape should fit snugly around the waist.
3. Hip circumference. Measured at the fullest point of the buttocks. For women who have the “breeches effect”, it is also recommended to duplicate the measurement (measure the volume just below the buttocks along the protruding parts of the “breeches”.
If the first measurement is significantly smaller than the second, use the second, especially in items that involve narrow silhouettes, such as a sheath skirt. In this case, the product will have to be adjusted directly when trying on the sour cream product.
4. Chest height. Measured from the point where the neck meets the shoulder to the most protruding point of the chest.
5. Front length to waist. Front to waist length (FTL) is measured from the point where the neck meets the shoulder (base of the neck) through the fullest point of the chest to the waist.
6-6a. Product length. For shoulder products, it is measured along the back from the seventh cervical vertebra to the desired length of the product (6), for waist products - along the back from the waist to the desired length of the product (6a).
7. Back length to waist. Measured from the seventh cervical vertebra to the waist line (DST).
8. Back width. Measured horizontally along a straightened back through the center of the shoulder blades.
9. Shoulder width. Measured horizontally at the most prominent points from one shoulder to the other.
10. Shoulder length. Measured from the base of the neck to the extreme point of the shoulder (the point of articulation of the shoulder with the arm).
11. Sleeve length. Measured from the end of the shoulder to the wrist with the arm slightly bent at the elbow. 3/4 sleeve length is measured in the same way, but to the elbow.
12. Shoulder circumference (Arm circumference at the top). Measured across the widest part of the upper arm.
13. Neck circumference. This measurement is around the base of the neck.
14. Armhole depth. The depth of the armhole can be measured as follows: hold a strip of paper 3–4 cm wide under your armpit. Measure along the back from the 7th cervical vertebra to the top edge of the strip of paper.
By the way, using a strip of paper you can take measurements and the width of the armhole. Hold the strip of paper horizontally under your armpit, place vertical lines to the left and right of your hand - this will be the Armhole Width.
Rice. How to take measurements Armhole width
15. Hip height. Measured along the side from the waist line to the hip line. In order to accurately take this measurement, tie a thin tape around the waist and hips. Take the measurement from between the trims along the side line.
16. Leg length from the outside. Measured from waist to outside feet to the floor.
17. Leg length from the inside (step length). Measured by inside legs from groin to floor.
18. Thigh circumference. Measured horizontally 5 cm below the subgluteal fold along the thigh.
19. Knee circumference. Measured horizontally 2 cm below the kneecap.
20. Knee height. Measured from the waist to the middle of the knee.
21. Calf circumference. Measured horizontally along the fullest part of the lower leg.
22. Ankle circumference. Measured horizontally at the thinnest point of the leg.
23. Seat height. Measured while sitting on a flat surface, along the back, from the waist line to the surface.
Hello, today we will talk about how to take measurements for a pattern. I have divided this topic into two articles. In the first, we will study the list of measurements that are familiar to all beginners from school.
They are quite enough to build a drawing, simple and primitive. On a simple figure, clothes built according to such drawings will fit well, but with a non-standard physique, these measurements will not be enough, additional ones are needed, we will talk about them in the next post.
For now, I want to say that we take all measurements on a figure dressed only in underwear; any clothes will add extra centimeters to you, but stretch clothes, on the contrary, will take them away, and this is not good, since the product may end up being small.
Taking basic measurements of the figure
No construction of basic patterns is possible without removing the girths, so we will start with them, since they are the ones who determine the size of any product, be it a dress, skirt or blouse. Many publications advise writing them in half meaning, but I still write full, it’s so convenient for me.
Neck circumference (Osh)
Points along which the measuring tape is laid:
- The dorsum is the seventh cervical vertebra, the most prominent vertebra near the neck.
- The lateral parts are the base of the neck and the beginning of the shoulders.
- In front is the jugular cavity, it is easy to feel with your hands, a centimeter fits on it.
Chest circumference (Og)
In order to construct a drawing you need to make two such measurements. They both start to shoot from the back. The line passes through the protruding shoulder blades, goes under the arms through the armpits. If there are fat deposits in this place, they must be taken into account.
But ahead the measurements diverge:
Chest girth 2 - the line runs along the most protruding points of the chest, the measuring tape closes in the middle (blue segment).
Chest girth 3 - the measurement passes above the chest and also closes in the middle (green segment).
Waist (From)
Before taking this measurement, you need to decide where your waist is. To do this, take any lace and tie it around your figure. The waist is rarely strictly horizontal; quite often in front and behind it is at different heights.
Your task is to determine its location. Position the lace in a way that is comfortable for you, wherever you wear waist products. I'm not talking about thigh-highs.
And only after all these manipulations are completed, we measure the waist circumference, which will pass strictly along the lace.
Hip circumference (About)
This measurement is taken as follows:
- Through the most prominent points of the buttocks.
- Strictly horizontal on the sides.
- And also exactly along the front, but taking into account the belly. To do this, place a ruler vertically down under the measuring tape.
Arm (Op) and wrist (Oz) circumference
These two measurements are taken strictly horizontally, with the hand lowered. The arm circumference measurement is determined just below the armpit along its widest part - the green segment.
Wrist circumference is measured at the hand in the narrowest part of the arm - the blue segment. Now let's move on to length measurements.
Back length to waist (Dts1 and Dts2)
The first length of the back to the waist (green section) is removed from the seventh cervical vertebra to the lace, which should still be at your waist line. There are figures in which it is difficult to determine at first glance where the seventh cervical vertebra is located. To find this point, be sure to lower your head down, this is how you can easily find the most protruding vertebra.

The second length of the back to the waist (blue segment) starts at the side of the base of the neck. This point will be the beginning shoulder seam, so make sure that it does not go either forward or backward, but is in the middle. From there we lower ourselves vertically to the waist. When taking these measurements, it is important not to strain your back and not to relax too much - you need a golden mean.
Front length to waist (Dtp)
We lay a measuring tape to the neck, but from the front, through the most protruding points of the chest, then down to the lace at the waist.
By the way, it would be correct and convenient for you to write down more data on Chest Height during this measurement, I will tell you how to do this below.
Very often, for beginners, length measurements along the back and front are inaccurate, which will definitely have a negative impact on the sewn product. To check yourself, remove the control value. To do this, lay a measuring tape from the back waist to the front waist over the shoulder and chest. Now add up Dts2 and Dtp, if their sum coincides with the control measurement, then you did everything correctly, if not, you need to repeat everything all over again.
Chest Height (Vg)
This measure is one of the most difficult to measure - it must be quite accurate, so it is important to accurately determine the most protruding point of the chest. A novice craftsman cannot always cope with this, so the sewn clothes will have undercuts above or below the required point, which will ruin the entire appearance.
In this situation, I can advise the following: wear a bra that has undercuts. Its end in the center of the chest will be your desired point. The measuring tape should lie from the base of the neck to the tip of the dart. Believe me, this way you will take this measurement perfectly.
Hip Height (Bad)
We measure the distance vertically along the side of the figure from the lace down to the hip line, which passes, let me remind you, through the most protruding points of the buttocks.
You can draw it mentally or also mark it with a cord.
So, we're done with the lengths, all that remains is to take all the horizontal measurements, and let's start with the shoulder.
Shoulder width (W)
You already know what the point at the base of the neck is, it will be our starting point. Now you need to find the place where the shoulder joins the arm. This is very easy to do for thin girls; by touch it is easy to determine where the humerus ends, but for overweight women Finding the right place is difficult. In this case, it is determined purely visually.
We connect two points with a centimeter - from the neck to the arm. We found the shoulder width.
Center of the chest (CG)
To take this measurement, the same bra with undercuts will come to the rescue of beginners. You measure from groove to groove, and you won’t make any mistakes. They also suggest dividing the resulting figure in half, but you and I agreed that we will write everything down in full and will divide it later.
Now we just have to look at the three most difficult measures.
Back Width (Shs)
When taking this data, both beginners and experienced dressmakers make mistakes, but the reason for the error is not so much in them, but in the fact that the customer first stood in one position, and at the time of fitting was in another. You won’t always see it visually, hence the inaccuracies.
The fact is that this part of the body is very mobile, the value of the measurement changes from the slightest movement of the hand, shoulder, or the curvature of the spine. What to do in such a situation? For myself, I came up with three options for measuring one measurement, which help me take into account the customer’s stand. Here's an example:
Stand up straight, place your hands in front of your hips, thus imitating a slight stoop, i.e. the body is relaxed. We measure the width of the back through the protruding points of the shoulder blades from the fold to the fold at the armpit.

Now we imitate the position when a person stands at attention. We place our hands on the back of our hips, as far as the shoulder rotation allows, without straining. We also measure the distance.
And the third option is hands on the sides, and again we take the data. After this, we need to add two widths, with a stoop and with a bend, and divide the resulting value in half, i.e., we find the average figure. Ideally, it should coincide with the third dimension.
But it may also be that these numbers do not coincide, then I still prefer to focus on the average value found.
For example: Shs (day) - 46 cm, Shs (over) - 36 cm, Shs (normal) - 41 cm
(46+36) /2 = 41
You see, in my case the average value and the measurement coincided. This is how you can control this situation.
Chest Width(W)
Just like the back, the width of the chest is very susceptible to the slightest movement, so we take all measurements in the same way as the previous measurements taken, but only this time above the chest. I'll just show you an example of the calculation.
Example: Width (day) -31.5 cm, Width (over) - 39 cm, Width (normal) - 35 cm.
(39+31,5) / 2 = 35,25
As you can see, the error is minimal and can be ignored. I have never seen such a measurement method in any literature, but due to frequently made mistakes, which later affected sewing, I came up with this scheme. She helps me out a lot.
Armhole width (Shpr)
Before obtaining data on the width of the armhole, you need to make a small device. Take a piece of A4 paper and fold it lengthwise four times. Position his armpit strictly horizontally. Now, on both sides of the hand, along the back and shelf, where the folds of the armpit are located, use a pencil or pen to place vertical marks.
You take the strip and use a ruler to measure the distance from one mark to another - this is the width of your armhole.
Example: (Og3 - Shs (normal) - Shg (normal)) / 2 = (103 - 41 - 35) / 2 = 13.5.
Why do we divide by two? Because there are two armholes, each of them will be 13.5 cm. You can use two options and then compare them.
Well, we have taken the basic measurements, using them, you can already sew the product, but a more precise cut requires more information, and it will be in the next post.
In conclusion, I would like to draw attention to one very important rule. During work, the measuring tape should not fit tightly around the figure, but strong loosening is also unacceptable. It must be laid so that between the body and the centimeter can pass index finger. That's all for today, I wish you good luck!
This is to use a certain scheme for its manufacture. When sewing, it is imperative to take measurements correctly. To sew any item, you need to be able to take measurements correctly so that the result is a product that will fit perfectly on your figure.
It is better to take measurements when you are wearing a T-shirt and tights, allowing the measuring tape to easily slide over your figure, without tightening your body, but also not allowing the tape to hang loosely.
We must remember that there are basic dimensions, and there are additional ones. Basic measurements are used to construct most basic patterns, but sometimes patterns are so intricate that a few extra measurements are needed, as you can learn from the pattern description. 
1. Chest circumference (OG)
We take measurements along the protruding points of the chest around the figure.
2. Waist circumference (OT)
We measure at the narrowest point in the waist area around the body.
3. Hip circumference (H)
We measure at the most convex points of the buttocks.
Some women experience the “golife effect.” In this case, it is recommended to duplicate the measurement. To do this, we measure the volume along the protruding lines of the “golifa” just below the measurement of the girth of the buttocks.
4. Chest height (HH) - these are the points of visual transition from the neck to the shoulder to the most protruding point on the chest.
5. Front length (accident)- this is the point in front of the visual transition of the neck to the shoulder to the waist through the most protruding point of the chest.
6. Product length (DI) - measurement from the waist to the length you need in the finished product.
7. Back length (DTS)
We find the seventh cervical spine and measure from this place to the waist line, so as not to make a mistake with the place at the waist, you need to tie a cord at the waist line.
8. Back width (ShS)
We measure the width of the back horizontally through the center of the shoulder blades along the straightened back.
9. Shoulder width (SH)
We find the most horizontal points on the shoulders and measure the width from one shoulder to the other.
10. Shoulder length (Lpl)
We measure from the base of the neck to the end of the shoulder.
11. Sleeve length (DR)
We measure from the end of the shoulder along the arm bent at the elbow to the wrist.
12. Arm circumference - upper part (OP)
We measure horizontally the circumference (width) of the arm - the widest upper part.
13.Wrist circumference (OZ)
We measure horizontally the circumference (width) of the arm at the wrist.
14. Neck circumference (ОШ)
We measure the circumference around the base of the neck.
15. Leg length - outer side. This measurement is also called stride length (LS)
We measure along the outside of the leg from the waist to the floor.
16.Leg length - inner side
We measure from the groin to the floor along the inside of the leg.
The difference between 15 and 16 measurements gives us the seat height measurement ( Sun), which will be useful for those who decide to sew their own trousers or shorts.
The seat height can also be measured by sitting up straight and measuring from your waist to the surface on which you are sitting. If these two indicators turn out to be unequal, then take the average between them to construct a pattern.
17. Thigh height (WB)
We measure from the waist line to the hip line along the outside of the thigh.
A formula is usually used to calculate armhole depth, but this measurement can also be measured.
18. Armhole depth (GPr)
You need to take a strip of paper and hold it under the back of your arm, after which you can measure the depth of the armhole - this is the distance from the 7th cervical vertebra to the strip of paper you are holding.
To receive the best articles, subscribe to Alimero's pages.