How to knit a decoration for booties. How to knit baby booties? Patterns and step-by-step lessons for knitting baby booties. Children's booties-sneakers. Photo. Description
Everyone good afternoon, today we will crochet BABY BOOTS. The baby's very first shoes will be created by the loving hands of a mother or grandmother. You will see beautiful models of knitted booties and learn to understand the GENERAL PRINCIPLE of knitting all booties. You will understand that from this day you began to understand that you can knit any model of booties and even come up with your own designs of knitted shoes for babies and bring them to life. Here I will show you how to knit booties for boys and booties for girls with your own hands, I will give a description to everyone who wants to knit warm boots or sports slippers for their baby - knitted copies of sneakers and sneakers. For all types of crochet booties detailed diagrams knitting, and even the sizes of the inner insoles according to the baby’s age.
So let's start figuring out how to crochet booties... from start to finish. But first, let's see what beautiful models of booties you can knit with your own hands, using our article.
What models of booties
is now in fashion.
Very beautiful booties for boys are styled as fashionable modern shoes for babies. Knitted booties with imitation sneakers, Converse or sneakers.

For boys, you can knit moccasin booties, boat booties, booties. All these models are easy and quick to crochet if you understand the principle by which all bootie models are crocheted. THIS is exactly what WE WILL DO below in this same article.


Knitted booties for girls make them look like beautiful girlish shoes, pumps, sandals and sandals.

Knitted booties are decorated with beautiful buttons, bows, and crocheted appliqués.


Now let's understand the patterns and principles of knitting booties - step by step we will learn how to knit them with our own hands.
HOW TO KNIT ANY BOOTS.
(Crochet patterns + explanations).
All booties consist of two elements - the bottom (insole) and the upper toe part (the toe and heel are knitted together in the booties, in the round). Now we will see everything on the diagrams.

In the diagram above we see an OVAL PATTERN - this is the sole of the booties.
And just below the LONG DIAGRAM is the toe and heel part of the booties.
The arrow in the center of the long diagram points to the CENTER OF THE TOE (the nose of the booties).
We see that central part on a long diagram has connected columns (to taper knitting). That is, in this zone we knit two stitches of the previous row together into one loop - and due to this, the knitting narrows and the fabric at the toe makes a turn. In the photo below we just see a photo of this moment. 
In the photo below we see booties, where each row is knitted with threads of a different color. And here in this photo you can see that in the green row we are making double stitches, hooking up two stitches of the bottom (orange) row with a thread and knitting everything in one loop. Due to this, the cape sharply narrows and makes a circular turn. That is, in this place (the cape) the knitting goes in a circle... and then, moving to the side part, it goes in a straight line as usual - column to column.

Depending on the AGE OF THE CHILD, you will need one or another size of SOLE for booties.
The principle of knitting soles is the same for any size. All of them differ only in the number of rows of columns. 
All booties are knitted using this principle. And on the basis of such boats, many other models of knitted shoes for kids are created.
Here are the different booties you can knit using this one pattern. 


You can ADD the design of the boats a little - add striped STRAPS to them with a button. And our pumps will turn into sandals - men's design You'll get booties - just right for boys.

If you continue knitting on BOTH SIDES - and make a chain of air loops from the heel part - on one side and on the other. And then tie 2-3 rows of posts on this chain... Then we get two straps. They can be thrown CROSS ON CROSS on a button as shown in the photo below.

Or you can make ONE STRAP from one edge of the heel to the other edge on the button on the side (as in the photo below).
Also, pay attention in the same photo with gray booties below - here there is an addition to the TOPE PART - the cape is specially extended with a rounded protrusion - and a rose is attached to this protrusion. From the inside of the cape we make a jumper-strap from air loops - and insert our transverse strap into this jumper.

If you continue knitting the booties in the round (narrowing the toe), you will get taller shoe models. These booties can also have a button strap.

Crochet booties
WITH KNITTED APPLIQUE.
You can always crochet an additional applique and decorate the toe of your booties with it.
Overlay appliqués are crocheted quickly and then secured to the toe using the same threads - pulling crochet stitches through the applique and toe.


Crochet bootie slippers can be styled to resemble the face of any animal - a mouse, a bunny, a dog, an elephant.


Here is a diagram of a regular knitted flower. And also on our website there is a large article with diagrams and photographs just about that - there you will find a lot different colors including roses, daisies, orchids, etc.

HOW TO CROCHET
high booties.
If we continue to knit the boat booties upwards, we will get BOOTS booties. You see, there is no need for any new scheme... we just continue to knit boats but in height further in the circle.

The only addition that is often made in high booties is the LAP PART, which is fastened on the side with a button.

Here on coffee boots (master class below) it is shown THE MOMENT OF THE ORIGIN OF THIS LAP on the boots. We're just doing it in the cape chain of air loops- the beginning of the future overlap, and then we simply knit in a straight line (back and forth). That is, having knitted the chain, we turn around and go back along this chain, knitting stitches... and continue this row of stitches along the side of the boat in a circle, through the heel to the second side of the boat and all the way to the toe (where the chain began). There at the toe we turn around and go back - the same way. And so on - row by row, increasing the height of the boot to the level we need.


You can booties crocheted add interesting design. Choose beautiful buttons and use fluffy threads to trim them to imitate fur on UGG boots.


You can decorate knitted UGG booties with elegant fringe - cut or looped. 

You can make any appliques on the bell of the boots, or decorate the boot with an interesting knitting in the form of leaf scales.


Styles of booties FOR BOYS.
For boys, you can knit men's style booties. Knitted shoes for kids in the form of slip-ons (as in the photo below). If you look closely, we understand that there is nothing complicated here. Just the same pumps - but THERE IS a RISE from the sole.
This rise of the edges from the sole is the moment when we simply knit rows of stitches around the sole (without increasing or decreasing) and therefore these rows RISE VERTICALLY UP and form the edges (with white threads it looks like an imitation of a high rubber slip-on sole).

Here is another style of knitted booties - MOCASSINS. Beautiful male model for kids, which you can knit with your own hands for boys.

Knitted bootie moccasins can be decorated with a strap with two buttons, as in the photo below.
High borders can be made separately (as in the photo below) - like a strip of posts (4 columns in a row), and then sew it along the edge of the insole - like a high border.

You can come up with your own designs of moccasins or slip-ons for baby boys. Beautiful and simple models Crochet booties for real little men.


Here is a model of booties for boys in the form of sandals. Here the heel part has an extension in the form of a side strap with a button. And the cape front part has a process that bends into a loop, forming a strap into which this strap passes.


The diagram above - DOES NOT BELONG TO BLUE BOOTS - is a diagram of sandals with an open toe (open toes) - but it shows how to knit a high heel and how the strap comes off it.
I love these blue and white sandals with a closed toe. I like that the heel part is knitted separately from the toe part. That is, in turn - first the heel with a long strap, and then the toe, like straight rows of columns - from the right to the left edge of the sole.

BOOTS Crochet booties - with real laces. This type of baby shoes is suitable for both boys and girls. And they are easy to make with your own hands.

Below is the principle by which crochet booties are created.
Crochet booties
SPORTS STYLE.
Now let's see how the booties are knitted sports theme- crocheted sneakers, sneakers and converse.

Bootie sneakers consist of THREE PARTS
- sole with high sides (white threads)
- heel part with oblique edge (pink threads)
- toe part with tongue (white, then pink threads)

Here in the photo below we see a detailed step-by-step master class in photographs. It depicts the entire process of knitting and assembling such sneakers.

You can come up with your own design of these crocheted booties and sneakers. Choose your flowers - red, white and black. Yellow-gray-blue. Orange, black and white.

You can make them HIGH (photo above) or LOW (photo below).

You can add sports brand LOGOS to them. 

You can CHANGE the DESIGN of your sports shoes.


These are so simple and interesting ways crochet booties for children. Now you can choose beautiful model booties and knit them with your own hands for a girl and a boy.
Good luck with your work.
Olga Klishevskaya, especially for the site
I think that in a baby’s wardrobe, booties are not only beautiful, but necessary items. Warm, comfortable and cute. Booties are practically the first shoes. If you know how to use knitting needles even a little, then knitting booties with knitting needles will take you a couple of hours, and finished product will be on your baby's legs. Knitting booties for beginners will not be too difficult. First of all, select the necessary threads. You can use any color of thread, and it is advisable to choose the quality of the thread so that the baby’s foot is warm, but there should be no hard hairs on the thread that would irritate the delicate baby skin.
Knitting booties can be done with crochet, two knitting needles or stocking needles. Knitting booties happens different options. Perhaps you can also invent your own way of knitting baby booties. But it will be easier if you knit booties using ready-made tips. Now we will look at knitting booties for hosiery. In our case, we take knitting needles measuring 3 or 3.5 mm. The thickness of the threads should correspond to the size of these knitting needles.
Set of loops
So, let's start casting on loops. We take two stocking needles. We unwind about a meter from the ball. Leave the free end of the thread hanging freely. We throw on index finger working thread. And we wrap the free end of the thread around the thumb. Press the threads at the bottom with your fingers and start knitting. We insert the double needles folded together into the loop that we have formed on thumb. We grab the working thread that goes to the index finger and insert it into the loop on the thumb. We're filming. Next, we perform a similar operation. And thus we cast on 40 loops.
You can use another method known to you. For example, there is different ways cast on the first loop. The methods are completely unique, and, in principle, each of them is worthy of attention. Having cast 40 loops, you need to cut the free end of the thread so that it does not interfere with knitting. Leave about 20 centimeters and trim.
We knit the drumstick
Now you need to distribute the loops onto 4 knitting needles. To do this, you need to take out one knitting needle and distribute 10 loops on each knitting needle. If in your calculations you get 8 loops for each knitting needle, then remove 8 loops for each accordingly. There are options when, for example, you cast on 8 loops on 2 knitting needles and 6 loops on the other two knitting needles. Knitting booties should be consistent with the size of your child's feet. Distribute the stitches so that all stitches face the center of your square. So that there are no overlaps or twists.
Now we need to unfold the knitting so that our working thread faces from right to left. And we start knitting. We knit the first loop with a front loop behind the back wall. Then we will knit an English rib. That is, we alternate the purl loop with the front one. So we knit all the loops on the first knitting needle. It is better if all the loops that you have at the junction between the knitting needles are tied together with a knitted loop. That is, if you finished with a purl stitch, then the first stitch on the new needle should be knitted so that there is not a very large gap. The second row should be knitted similarly to the first. The first stitch will be a knit stitch. Thus, knits 30 rows.
We knit a rise

After this we begin to knit the rise. The rise is knitted on one needle. 10 stitches with knit stitches. Then we turn the work over and knit a row with purl stitches. So we will need to knit 10 rows and then resume knitting in the round again. If your baby is already older, you can make the instep a little larger to increase the length of the foot. For a baby bootie, you can leave ten rows. If the child’s age is closer to one year, then you can knit thirteen rows.
It's better to end with an odd row. For example, if you knitted 10 rows, then finish in the eleventh row. And if you knit a little more rows, then make sure that you still end in an odd row. In this case, the work should be facing you. We cast on new loops on the sides of the rise. The needle enters the hole between the first and second loops of each row and picks up the thread to form a loop. Then we knit everything with facial loops. We knit approximately 4 rows in stockinette stitch. For a child over a year old, you can knit about 6 rows.
Knitting the sole
Now let's start knitting the base of the sole. To do this, we knit four rows with purl loops. Then we knit 4 rows in stockinette stitch. This will be our tuck. What is a tuck, it is necessary so that the sole has a structural shape and the booties are not pressed inward, and the sole is neat, and the shape of the booties is well defined. It will be more comfortable for the child to wear it, and the bootie will fit well on the leg. The tuck can be made by connecting the outer purl stitches and the outer knit stitches.

We knit the front one and throw the purl one over it. Each purl loop in the column corresponds to its own front loop in the column. Thus, we fold the two canvases together literally by a centimeter. After you have completely knitted the tuck around the circumference, you should turn the work over and purl all the loops on one knitting needle. The last loop on the knitting needle must be thrown onto the working knitting needle without knitting. Next, throw it on the second knitting needle, which is located next to you in your left hand, perpendicular to the table. Now the first two loops from this needle are purled together. Thus, the sole is formed.

Now we unfold the knitting and knit with facial loops to the end of the row, leaving the last loop unknitted. You need to throw it on a working knitting needle, then on a knitting needle perpendicular to the table and knit two stitches together. We unfold the work again and knit the purl loops. We do not knit the last loop and repeat the same manipulations. Thus, connecting our sole to the bootie. Knit to the end You will have work left on two knitting needles. Now you need to cut the thread about 50 centimeters. Thread it through a needle and sew it so that the loops from two knitting needles are joined together. Knitting booties with knitting needles is finished. You can try it on.
Decorating booties
To decorate the booties, you can tie a string and thread it with a crochet hook around the booties. Or, while knitting booties, knit special holes. This can be done by knitting two stitches together and then yarn over. It will look interesting if you use ready-made ribbons instead of a lace suitable color, threading them through the prepared holes. You can also decorate the booties with pompoms or tassels. Booties for girls can be decorated with embroidered or knitted flowers. Alternatively, when knitting booties, use threads of different colors. This will help give the booties an interesting color scheme.
Booties can be knitted or crocheted in any design. It will be very interesting to look at knitting booties, for example, in the form of sports sneakers. By combining white and blue threads, and providing for the creation of lacing similar to sneakers. Everything is in your hands. You can get a unique, original result.
Almost anyone can knit booties for a child. The article gives detailed description and patterns for knitting and crocheting booties.
Seeing self-knitted booties on little chubby legs is a sight that will lift your spirits even in chilly weather. The realization that the product you knitted warms and protects this little treasure gives birth to peace and satisfaction in the soul. And knitting booties is not the most difficult thing, the main thing is a competent approach.
Types of baby booties
Booties are a very gentle and touching accessory that perform an important function - they warm a child's foot. Booties can be divided into groups:
- by material: cotton yarn, knitwear, leather or felted
- by gender: for boys and girls
- by season: warm and cold
- by purpose: everyday, formal
- in shape: in the form of bags, cakes, shoes, sandals, boots, sneakers, shoes, with a sharp nose a la “little muk”
How to knit baby booties for beginners. Photo
Threads for booties need to be hypoallergenic. These can be cotton threads, acrylic, microfiber, wool. Booties are knitted from cotton for special occasions or for warm weather. You can knit absolutely any booties from microfiber, be it light holiday ones or warm everyday ones. You can knit very warm booties from acrylic bootie threads.
It must be remembered that booties are either a seamless product or have seams on the outside. Otherwise, the booties may chafe delicate skin child.
Now let's determine the size of the insole:
- 8-9 cm for children from birth to 3 months
- 9-10 cm - up to 6 months
- 11 cm - up to 8 months
- 12 cm - up to 10 months
- 13 cm - up to 12 months
- 15 cm - up to 18 months
But this is an approximate ratio; the length of the baby’s foot may vary.
To determine the number of loops required, we knit a small piece of stitching with the main stitch to determine how many loops there are in 1 cm of fabric. On average, this is 2 loops.
In our example, five needles No. 3 are used, acrylic threads 100% 150m/50g. Booties are intended for a child 10-12 months old. If your child is smaller or has plump legs, then the number of loops must be adjusted. The booties were knitted in 2 threads.
 Knitting pattern for baby booties:

If you simply don’t have five knitting needles, or if it’s inconvenient to knit with them, then you can knit booties with two knitting needles. They will be just as beautiful, neat and functional.
Video: Master class on knitting baby booties with knitting needles from Olga Bokan
Crochet pattern for baby booties
Basic principles and stages of crocheting booties:

Video. Master class on crocheting baby booties by Svetlana Erbyagina
Baby booties for newborns, description
Booties for newborns should be knitted from very soft yarn, the thread should not prick. Especially if it concerns winter booties made of wool or if you will wear them on a bare leg. To do this, take the yarn you like and knit a small sample from it to determine how pleasant the booties will be to the touch.
You can decorate booties:
- satin braid
- lace
- embroidery
- appliqués
- beads
You should not decorate with Lurex, since the metallized thread can irritate the child’s skin.
Threads must be of high quality, hypoallergenic and not contain harmful dyes. You can look for special threads for children, they definitely meet all the requirements.
Booties for newborns should be very soft, elastic, not compress the fingers, without internal seams
Such shoes will not only warm the foot, but also prepare it for wearing shoes with stiffer soles.

 Baby booties for girls
- Little girls are already fashionistas. Therefore, even their booties should be “girly”: bright with bows, ruffles, beads, openwork elements
- For girls, it is customary to take pink, raspberry, red, and orange yarn. Girls look especially cute in this color scheme. Booties for girls are made in the form of slippers, shoes, sandals, boots with openwork decorations
- Stylization of booties for girls can be floral, ladybugs, cakes, cats, foxes
Baby booties for boys
- Boys, although small, are already men. That’s why the booties for them are knitted less brightly and decorated more subtly. Among the colors they prefer are blue, light blue, lilac, gray, black, purple
- You can use yellow, green colors, which are considered suitable for all babies
- Booties for boys are knitted not only in the form of classic slippers and bags, but also in the form of boots, sneakers, sandals, boots
- Booties for a boy can be stylized as dogs, bears, cars, tanks, with a tie, a la “little mug”, chickens, bunnies
Simple baby booties
Simple baby booties mean that they should be simple in design, without any special decorations, but perform the functions of heating and protection assigned to them. Such booties are usually made in the form of shoes or boots.
Here is one option for simple booties.

 We knit with two needles No. 3. Yarn can be taken in any two colors, in our case it is pink and purple.
Cast on 22 loops with pink thread (the width of the knitted product is 9 cm). Knit 62 rows of garter stitch, but if you wish, you can use stocking stitch. The length of this sample was 14 cm.
Now we close off the first 8 loops and knit the row with purple thread. We knit this way:
Row 63 - knit stitches
64th - purl
65th - facial
66th - purl


Now we introduce the pink thread again:
Row 67 - knit stitches
68th - knits again
69th - purl
70th - facial


Alternating the threads in this way, knit 8 stripes in purple and 7 stripes in pink. 
 Now sew the first and last rows. You can use knitting needles while simultaneously closing the loops, using a needle or crocheting.
 It turns out this “ring”:
 We form the sole. We collect the lower striped part of the bootie with a thread and tighten it. Then, towards the heel, we sew the two parts together. The length of the seam is about 2 cm. We collect the remaining pink part on a thread in the same way as the striped part. Thus we form the heel.
We form the toe (sock). We also collect the striped part on top and tighten it with thread. The booties are ready.  You can decorate them with a pompom or any decor. You can crochet it, and also insert braid so that it stays on the leg better.
Children's booties-sneakers. Photo. Description
Booties-sneakers are easy to crochet. The result will be like this:


The sole can be knitted according to the pattern above, or you can use this one: 
 The booties were crocheted from iris using hook No. 2, although any thread can be used. The foot will be approximately 9.5 cm long for children up to 6 months. If the child is older, you can lengthen the foot by adding air loops at the very beginning. Or knit another row.


The next step is to knit the side. We knit one row with a double crochet, placing the hook behind the back wall of the loops. Like this: 
 Now we knit 3 rows with regular double crochets, we get a “boat”:
  Take a thread of a different color and knit the fourth row of double crochets. We knit the next 2 rows in exactly the same way, only with white thread. Then we cut off the white thread.
 Knitting the sides of booties. Fold the product lengthwise to define the middle loop of the toe. From this middle loop, count 8 loops in both directions and mark them. The tongue will be sewn here.
In our case, we attach an orange thread to the 8th loop. We knit in a regular stitch until the 8th loop on the other side.


To get such an oblique edge, each row must be finished and started with a half-column. There are only 5 rows, but you can make them higher.
We knit the tongue. We make 17 air loops (according to the number of loops that we left on the toe). Using a single crochet we knit a rectangle of 10 rows. We add 3 rows of orange thread, where we knit the outer loops with a half-column.  And we sew the “tongue” to the toe.

Having made laces from air loops, we insert them into the sides of the sneakers. The booties are ready!
Baby hedgehog booties, diagram
Hedgehog booties are knitted. To make the “hedgehogs” as similar as possible, you need to knit with grass thread. 
 Here we use “grass” thread of two colors: gray (100g) and white (50g). Knitting needles No. 3.5. For the muzzle you need to take 10g white yarn and a hook number 2.5.
- Cuff. Using white weed thread, cast on 38 stitches and knit 22 rows in garter stitch. Then make holes for the braid using double crochets. Break the thread
- Toe. Draw a gray thread. Divide 38 stitches by 13/14/13. Set aside knitting needles with 13 stitches temporarily, and knit 14 stitches in garter stitch for 19 rows
- Side. Cast on 8 stitches on both sides of the toe. A total of 56 loops are obtained, which all together knit 12 rows
- Foot. We divide the loops on the knitting needles into 22/12/22 loops. 12 loops are a foot. We knit the foot in garter stitch, knitting the last loop of each row together with the loop on the side knitting needles
- Heel. When there are 6 loops left on the auxiliary knitting needles, decrease 2 loops on the sole itself 2 times. Fold the remaining 8 loops of the sole and 4 loops on the auxiliary needles together 8x8. Close them with a hook or a needle.
- Sew the cuffs
- Muzzle. Connect three air loops into a ring. Knit in the round with a stitch. From every 2nd loop, draw two loops, so you get a cone. Knit 7 rows. The muzzle is ready
- Sew the muzzle to the booties. To the muzzle - eyes and nose. Thread the tape. Ready
Baby booties-slippers, diagram
Baby booties and slippers can be quickly crocheted using this pattern. It will be very comfortable for the baby to walk in them.

Unusual baby booties. Photo
Booties are warm, comfortable shoes for little ones, but also stylish accessory, in which you can show your individuality and imagination. At the same time, booties can be used as a tool for development and knowledge of the surrounding world.
Delicate cake

 Little mice
 Winter motives

 World of insects
 Automotive equipment

 Dogs and bunnies

 Patterns for booties with threads, diagram
Knitting patterns for booties:

Although for booties you can use any other pattern you like.
Winter baby booties
Very high demands are placed on winter baby booties. Winter booties should be light, soft, not restrict movement, not pinch boys, and be very warm.
To keep your baby's feet warm, ugg boots and fur boots are suitable for walks. At home, you can wear booties knitted from acrylic and wool threads or sewn from fur.
Baby booties made of fur
If the floors at home are cold, these booties are a real lifesaver. They don’t wash out like knitted ones, but they protect better from the cold. In addition, these booties are very light.
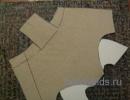
The material can be taken from rabbit or lamb fur, or even from your old sheepskin coat. You can sew fur booties using the pattern:

 The main thing is to take into account the direction of the fur when cutting. Booties can be made with or without lining.
First, decide on the size and make blanks. Sew the sides. Sew the back to the heel, just try to sew it so that no folds form. Now you need to sew the center of the tongue to the center of the toe of the sole. Sew them from the corner to the point where you will place the ties.
Pierce the leather in several places for the lace. Insert the lace. Now you need to sew to the cape, while gathering the edges. These booties can be worn with the fur facing out or in, as you wish. If you decide to wear it with fur inside, you can also sew on a decorative edge for beauty.

 How to sew openwork baby booties, photo


Openwork booties can be knitted from acrylic and cotton threads. These booties are crocheted. We knit the foot according to any of the two previously presented patterns.  Now you need to knit a row with the pattern “ relief columns»:
  Let's move on to the patterns. We knit patterns according to the pattern


We get this “boat”:

 We knit the toe. We find the middle of the side and draw 3 air loops from it:
  From the next three stitches, make 3 double crochets, which you knit together.
 So we knit to the middle of the opposite side. At the end of the row, we turn the work over and knit a bootie with inside. We also start with 3 chain stitches, but now we knit together not three double crochets, but two.
Now knit the row into which the ribbon will be inserted. We knit a double crochet, make air loop, and skip the loop in the bottom row. Now again knit a double crochet, chain stitch, etc. And a single crochet.

 So the whole row.

 Tie the lower part in the same way, only instead of an arc, skip two loops.
All that remains is to sew on the beads and insert the ribbon.
Tips and reviews for knitting and crocheting booties
- If you sew a suede sole to the booties, for example, then you can take your first steps in them even on the street
- All beads, bows, and buttons must be sewn on very tightly so that the child cannot tear anything off. Be sure to check the strength of the threads on decorative parts after washing
- Knit booties easier crochet, although not by much. But there are many more options for crochet decoration
- It is better to knit the insole with a tighter knit than the rest. After all, the child will learn to walk in booties, and a hard insole in this case is better
Marina:
I knitted booties for the first time for 2(!) months. When the little one was born, it turned out that they were small. They’re so “damn lumpy,” but I keep them as a memory. But now I can even knit a suit with openwork elements.
Pauline:
I knit well, so when I was on maternity leave and had money problems, I knitted booties and sold them. Although not big, there was a profit.
Video. Booties are the first shoes in a child's life
Most young mothers love to dress their babies beautifully. Some sew scarves, others knit blouses and elegant hats. But probably the most popular and sought-after wardrobe item for newborns remains knitted booties. They will always come in handy for a child, because babies love and need warmth. But simple crocheted or knitted booties are one thing, and a completely different thing - elegant, beautiful booties with a twist! These are exactly the kind of booties we will learn to knit in this master class! Svetlana Izumrudova is a real fairy who knows how to turn ordinary knitted booties into very beautiful “shoes” for a newborn princess.
To knit booties, prepare:
- hosiery knitting needles (3 mm) - 5 pcs.;
- ALIZE Sekerim bebe yarn - white, pink and yellow (a little for the flower);
- "Iris" threads - green;
- hook 2.5 mm and 1.0 mm;
- “Strawberry” buttons – 2 pcs.

Knitting booties
Let's cast on 36 stitches on knitting needles.

We distribute them onto 4 knitting needles, 9 stitches on each.

Knitting soles
The work involves pink thread and 5 knitting needles.
How to knit 1st row
Needle No. 1: 1st knit stitch, 1 yarn over, 8 knit stitches.

Needle number 2: 8 knit stitches, 1 yarn over, 1 knit stitch.


Needle number 3: 1 knit stitch, 1 yarn over, 8 knit stitches.

Needle number 4: 8 knit stitches, 1 yarn over, 1 knit stitch.

If you do not break the knitting description into individual knitting needles, then the 1st row is knitted like this:
Knit 1, knit 1, knit 16, knit 1, knit 2, knit 1, knit 16, knit 1, knit 1.
2nd row and all even rows
In all even rows, including the 2nd, we knit all the loops purl.

3rd row
Knit 1, knit 1, knit 17, knit 1, knit 4, knit 1, knit 17, knit 1, knit 1.
5th row
Knit 1, knit 1, knit 18, knit 1, knit 6, knit 1, knit 18, knit 1, knit 1.
7th row
Knit 1, knit 1, knit 19, knit 1, knit 8, knit 1, knit 19, knit 1, knit 1.
9th row
Knit 1, knit 1, knit 20, knit 1, knit 10, knit 1, knit 20, knit 1, knit 1.
Once again, I draw your attention to the fact that in all even rows we knit all the loops purl.
The sole is ready. At this stage of knitting, there should be 14 loops on each of the 4 knitting needles, i.e. 56 loops in total.

1-5 rows
In the next 5 rows we knit all the loops.

6th row
Knit 2 together, 1 yarn over, knit 2 together, 1 yarn over, etc. until the end of the row.

7th row
In this row we knit all the stitches, including yarn overs.

First row after yarn overs
8-10 rows
Again we knit all the stitches, including the yarn overs.


The last row of work with white thread
In order to complete the binding, you need to pay attention to the view from the inside. When switching to a white thread, the result was a row where both pink and white thread were combined in one row.

11 row
We knit everything with knit stitches, picking up the loops pink color from the first row of binding.
The loop on the knitting needle and the tacked loop are knitted together.


This is how you get “teeth”!

We continue to knit in circles with pink thread. To lift, you need to knit 10 rows, alternating them as follows:
1st row - all purl, 2nd - all knit, 3rd row - all purl, 4th - all knit and so on.

At the next stage, we move on to decreasing the loops in the front part of the bootie (where the fingers are).
Now there are 14 loops on each of the 4 knitting needles. We knit the loops on the first knitting needle (14 loops).
Now only knitting needle No. 2 and knitting needle No. 3 (front part) will be used. We forget about the loops on knitting needles No. 1 and No. 4 (back part) for a while, leaving them simply out of work.
So, on needles No. 2 and No. 3 there are only 28 loops. Visually divide them into three parts (10 p. + 8 p. + 10 p.).
Conventionally, these parts are distributed as follows: 8 loops - the middle (at this stage, these loops are on two knitting needles: 4 loops on knitting needle No. 2 and 4 loops on knitting needle No. 3) and 10 loops on each side - these are side loops).
Knit 10 side stitches.
Now we knit the middle - 8 loops - as follows: 4 loops (middle on knitting needle No. 2),
3 loops (middle on knitting needle No. 3) and 1 p. (last from the middle) + 1 p. (from the side loops) purl together.

The fifth knitting needle will no longer be needed. There are 4 knitting needles in use.
Let's turn the work around. In this case, only side loops remain on knitting needle No. 3 (already 9 loops).
Knit 7 stitches (middle), 1 st (middle) + 1 st (side) knit together.
Let's turn the work around. We knit in the same way until the side loops end,
i.e., out of 28 loops on these knitting needles, only 8 loops in the middle should remain.
In this case, it is necessary to take into account that the 7 loops in the middle are always knitted with knit stitches, and the eighth loop together with the side one (when decreasing) in the purl row must be knitted with the front one, and in the front row - purl (this way the edges look neater as they decrease).
This way we will have only 36 loops left (14 sts + 8 sts + 14 sts)


It is necessary to secure and hide the thread from the wrong side.

Top edge binding
Along the edge of the booties we will tie it with a white thread using a hook No. 2.5 mm.

Pattern for tying booties along the edge of the elastic band


Knit the second bootie in the same way.
Decoration of booties
Strawberry leaves and tendrils
Using a hook No. 1 mm, you need to knit 4 antennae and 4 leaves according to the pattern (in the work, the “Iris” thread is green).


Strawberry flowers
Use a hook No. 2.5 mm to knit 2 flowers (you will need any thread of suitable thickness, white and yellow). Flowers can be knitted with white thread, and the middle embroidered with yellow thread, or according to the pattern, the first two rows can be knitted with yellow thread, and then switch to white thread.