Master class on colored paper applique “Traffic light. Lesson summary "traffic light" application Explanation of the sequence of work
Municipal budgetary educational institution
“Primary comprehensive school No. 5”, Yurga
Lesson notes on educational field
“Artistic and aesthetic development”
Application
On topic: “A boat sails on the waves”
For children of primary preschool age
Completed:
Educator at MBOU "NOSH No. 5"
Levitskaya Elena Anatolyevna
Yurga 2018
Lesson notes
Application in the second junior group
Subject: "The boat is sailing on the waves."
Preliminary work:viewing illustrations on the topic: “Spring. Nature comes to life", "Boat"; watching a toy boat sailing along a stream while walking, learning a poem: “Boat” (Agniya Barto), learning a finger game: “Boat”.
Handout material:oilcloths; napkins (for each child); glue; glue brushes; blue cardboard; set - paper boats, waves, seagulls made of white paper (for each child).
Demonstration material:“Boat” made of paper, magnetic board, visual picture “Boat”.
Program content:
Target: teach children to create applications, create a feeling of joy from the created application.
Tasks:
Educational:consolidate and clarify knowledge and understanding of maritime transport - the ship.
Educational: teach children to first lay out (in a certain sequence) ready-made parts of different shapes and sizes on a sheet of paper and stick them on; develop the ability to carefully use glue (spread a thin layer of it with a brush on the back side of the desired figure), apply the side coated with glue to the cardboard and press tightly with a napkin.
Educational: cultivate friendly relations between children, instill in children a feeling of joy from the resulting image.
Progress of the lesson:
Lesson parts and times | Notes |
||
1.Introductory part (3 min) | 1.Creating interest in the topic | Educator: Guys, listen to the riddle: Snow and ice melt in the sun Birds fly from the south And the bear has no time to sleep So she came to us... (Spring) Educator: That's right guys, it's spring(the teacher shows a picture depicting spring). With the onset of spring, the snow begins to melt, because the sun warms brighter. And when the snow melts, what appears on the roads?(Children's answers). Educator: Of course, these are streams. Listen to the sound of a spring brook.(The audio recording “The Sound of a Spring Brook” is played). Educator: It is very fun to launch boats in such a stream. (The teacher shows an origami boat). Educator: You and I know a poem about the boat of Agnia Barto. Listen to him. Tarpaulin Rope in hand I'm pulling the boat Along the fast river And the frogs jump On my heels And they ask me Rent a captain Educator: Guys, today we are brave captains, and every captain must have his own ship. Do you want to have your own boat? (Children's answers). Educator: Come to the tables, let's start making boats. | The teacher and children sit on chairs in a semicircle. The teacher reads out a riddle about spring and the poem “Boat”. Then he turns on an audio recording for listening to “The Sound of a Spring Brook.” |
2. Review and inspection of the object | Educator: See how this can be done. Let's look at the boat first. A ship is a maritime mode of transport. There are passenger and military ships. Who controls them? (Children's answers). Right. These are the captains. Educator: Guys, look at the boat.(Shows an origami boat).What does the ship have? What does it consist of?(Children's answers). Pay attention to its hull and sail. I show you and name the parts of the ship, and you repeat after me. Educator: This is the hull of the ship. What is this, children?(Children's answers). Educator: This is a sail. Repeat.(Children repeat). Educator: Guys, along with the boat we will glue waves and birds so that you can get a beautiful picture. Fine? (Children's answers) | The children sit at the tables. Examination and examination of the boat. The teacher shows an origami boat. |
|
3 Display methods display | Educator: Children, watch carefully how to properly glue your boat, wave and birds to the cardboard. To make a beautiful picture. (Full show). Once again, look carefully at how to properly glue the boat, wave and birds to the cardboard.(Step by step show) We take the brush and hold it with three fingers at the iron tip. Like this. Place the brush in a jar of glue. Excess glue must be removed from the edge of the jar. This way.(Visual demonstration). Apply glue to the ship with a brush, carefully holding it with your other hand.(Visual demonstration).Then we glue the ship onto the cardboard. Press the napkin. Then, carefully, dip the brush in glue and spread the wave. Glue the wave to the bottom of the cardboard, under your boat. Press with a napkin to remove excess glue. Like this.(Visual demonstration). In the same way, dip a brush in glue, dip it in and apply glue to the birds. Like this. Glue the birds onto your cardboard on top.(Visual demonstration). | The teacher conducts: full, phased and partial demonstration of the application. |
|
4.Motor activity | boat I will press two palms And I will sail across the sea. Two palms, friends, - This is my boat. I'll raise the sails I'll swim in the blue sea. And on the stormy waves Fish swim here and there. (For the first lines, connect two palms with a boat and perform wave-like movements with your hands. To the words “I will raise the sails” - raise your hands). | Finger gymnastics is performed with children. |
|
5. Consolidation of image methods | The teacher shows it clearly on a new sheet of cardboard. | You can call students to the magnetic board. Children repeat the sequence of gluing the parts to the cardboard. |
|
2. Main part (10 min) | 1. Productive activity | Educator: guys, you are now little captains, I ask you to make your own boat. All the necessary materials and equipment are on the tables in front of you. Let's start creating our own boat. (Practical independent work). | Children are sitting at tables. The teacher individually shows the image not on the children’s work, but on a magnetic board. During the work, the teacher monitors how the children hold the brush, use glue, a napkin, and pays attention to the fact that upon completion of the application, the children put the work area in order. |
3.Final part (2 min) | 1. Summary of the lesson | Educator : What kind of ships you made! Now you are real captains! Did you like your boats?(Children's answers). Educator: What are your boats doing?(Children's answers). Educator: I really liked your boats. Well done to all of you!(Children's answers). Educator: Today we will show your pictures with ships to your parents, let them also rejoice at how beautiful the ships you have turned out! | At the end, lay out all the work on the table. The teacher and the children examine the work and rejoice at the overall result. |
Educational areas:Social - communicative, cognitive, speech, artistic - aesthetic, physical. |
|||
Nadezhda Teryukova
Master class on application"My traffic light» .
Application from traditional"children's" materials such as colored paper and cardboard is one of the most common and favorite techniques among preschool children. These materials make it possible to bring their ideas to life more realistically.
During production traffic light I had an excellent opportunity to unobtrusively repeat with the children the rules of crossing the roadway,
and at the same time continue to develop artistic abilities and fine motor skills.

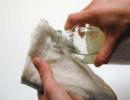
Before starting work, I prepared a set of materials that were used in the manufacturing process. traffic light: colored paper in suitable shades - green, yellow and red, white landscape paper; black cardboard; a simple pencil; scissors; glue stick; napkin; a round object with a bottom of suitable diameter.

I made a template for the product from landscape paper, it turned out very original, then I transferred it to black cardboard and cut out the blanks. The result is the basis traffic light. On paper of red, green and yellow colors I drew circles of the same size “eyes” traffic light and cut them out along the contour.

The children applied glue only to light side of the colored circles, and glued them one by one onto a cardboard base, trying to place them strictly under each other, as they are located in real traffic lights.

Working with the red circle, we reasoned that when we see this signal we should stand in our place, because cars are driving at that time.

As they smeared the yellow circle, they remembered that when they saw this Sveta we must wait for the right signal traffic light.

When smearing the green circle, they repeated that we are allowed to move at this time.
And now our version of making the most important item on the roads is ready!

The children were delighted with the result.

Publications on the topic:
Our group has a lot of massage mats, but we wanted something new. A week of traffic regulations passed, and the idea came to mind to make a “Traffic Light” mat.
During preparations for the event “Road rules, we are all supposed to know,” the need arose to create a mobile “traffic light” suit.
Goal: Formation of artistic and creative abilities. Objectives: develop fine motor skills of the hands; practice working with templates; develop.
Three multi-colored circles Blink one after another. Light up, blink - Help people. So a traffic light settled in our group. The history of its appearance.
I would like to present to your attention a simple master class made by children. For work you will need: red and yellow corrugated paper.
Master class "Traffic Light" /application/ for the second junior group. The main task in creating a traffic light is to give children an idea of what...
Hello colleagues. I would like to present to your attention a master class on making an educational educational game “Traffic Light” for classes.
Abstract of GCD "Traffic Light"
in the correctional group for children with mental retardation
Direction: artistic and aesthetic.
Target: update and supplementchildren's knowledge about traffic lights, the meaning of traffic signals.
Educational objectives:introduce the meaning of traffic lights and their signals. Fix the name of red, yellow, green colors, geometric shapes.
Developmental tasks:develop visual perception and fine motor skills. To develop knowledge of the rules for crossing the street at a traffic light, spatial orientation. Develop speech.
Educational tasks: to cultivate a culture of behavior for children on the roads. Cultivate perseverance, accuracy in work, and the ability to complete the work started.
Methodical techniques:display, explanation, search questions, reminder, artistic expression, individual assistance, work evaluation.
Preliminary work:reading and viewing posters on safe traffic on the roads, guessing riddles, outdoor and didactic games.
Progress of the lesson
Educator : Children, look what I have in my hands (traffic light), prepare your ears and listen to the poem.
Let's start a conversationWe're talking about an important traffic light!
He's standing on the roadmonitors the movement.
If the red light is on,the traffic light tells us:
Stay where you are, don't go!Just wait a little.
The bright yellow light is on“Get ready,” he says.
The traffic light warnsthat he switches the light.
He turned on the green lightthe way forward was cleared for us.
All the cars are waiting together,children and mothers are walking.
If you know the rulesand you always follow them -
Go boldly on the path forward,Bring your friends along!
Educator - Guys, what did I read the poem about?
Children - about the Traffic Light.
Educator - Right. Look, the traffic lights have different colored signals. What color are the traffic lights?
Children – Red, yellow, green.
Educator – A traffic light establishes order on the roads and controls traffic. It only has three signals, but they are very important. Three eyes - three orders! They light up one by one.
– Do you know what each traffic light color means?
Children - Yes
Educator – At what traffic light can you cross the road?
Children – You can turn the road to green.
Educator – Can I go for red?
Children - No.
Educator - Why can’t you go to red?
Children - The car will crush you.
Educator – What does a yellow traffic light mean?
Children - Wait, get ready.
Educator: That's right, guys. How are the colors arranged on a traffic light?
Children : red on top, yellow in the middle, green on the bottom.
Educator: what a great fellow you are, and now our traffic light invites you to some fun exercises.
Physical education minute
You walk along the path,Raise your legs higher.
(Step with high knee).
And jump a littlejust, my friend, don’t rush.
(Jumps).
You walk on your toes,straighten your back.
(Walking on toes, arms to the sides).
And jump along the pathgood springs - legs.
(Jumping on two legs while moving forward).
Educator : oh, what happened to our traffic light? Broke. Let's fix it.
The game “Broken Traffic Light” is being playedThe teacher invites the children to repair a broken traffic light - arrange the circles in the order in which they should be on the traffic light.
Well done! Oh, do you want to make a traffic light yourself? I invite you to our workshop.
Application "Traffic light"
Q: Today we have to work with scissors and glue. Let's remember our rules. We don’t wave the scissors, we cut carefully, and after cutting we put the scissors on the edge of the table. Apply glue and place the part on the board.
Children, on your tables there is a rectangle and a black stripe. Take a strip, we need to fold it in half and cut it so that we get two identical short strips. Lay out the traffic light body on a piece of paper and glue it. Everyone did it, well done.
What is missing from a traffic light? (signals). Look, you have three squares, a circle is drawn on the back side, carefully cut out along the contour. We move the scissors smoothly turning the part.
Don't forget, red circle on top, yellow in the middle, green on the bottom.
What wonderful traffic lights you have made.
Lesson summary application on traffic rules in the preparatory group “Traffic Light”
Target:
Continue to familiarize children with the rules of road safety, with the concepts of “street”, “road”, “sidewalk”, “traffic light”;
Develop the ability to create an image of a traffic light through application, master the sequence of work;
Continue to develop the ability to hold scissors correctly, use them and follow the rules for handling scissors;
Develop the ability to cut out round shapes from squares and carefully stick them onto the silhouette of a traffic light.
Progress of the lesson.
Educator:
– Guys, look carefully, what do you see in the picture?
– What are traffic lights for?
– You and I know that you need to cross the road only in places marked with a “Pedestrian Crossing” road sign, when the traffic light is green, and only for children holding hands with an adult.
– Guys, guess this riddle:
I blink my eyes
Relentlessly day and night
I help cars
And I want to help you.
(Traffic light)
– Yes, the traffic light gives us signals to wait or go ahead.
Red light - no road
Yellow means we'll wait,
When the light is green, let's go.
– Guys, a bear from the forest came to visit us, he brought a letter from the forest inhabitants. The letter says that a disaster happened on a forest street: Baba Yaga bewitched all the traffic lights and they went out. And now neither pedestrians nor drivers want to give way to each other. The bunny was hit by a car and his legs were crushed, now he is in the hospital. They are asking for help. (The teacher takes out damaged traffic lights from the envelope and asks the children how they can help the forest dwellers restore the traffic light)
– Fine. Now let's play the game “Red! Yellow! Green!" Let's check! How attentive you are!
A game of low mobility is played.
Children sit on chairs. The teacher shows each time a traffic light of a different color (red, yellow, green), and the children must perform the following actions at the teacher’s signal: on red - sit on chairs, on yellow - stand up, on green - march. The game is played 2-3 times.
– Now you and I will help Mishka make new traffic lights.
– Guys, on your table on trays there are silhouettes of traffic lights and 3 squares of different colors. What color are they?
– The traffic light eyes are the same color.
– What geometric figure do they resemble?
– And you need to cut a circle out of the squares. This must be done very carefully.
The teacher hands out scissors and reminds them of the rules for handling them.
– The cut out circles must be carefully glued into place. We start gluing from the top circle. Be careful not to confuse colors!
Now we glue thin strips folded in half around the circles!
Children work independently. 

Works are posted on the board. 
The traffic light applique can be made with children in classes in kindergarten or at home. To create a craft, you need to prepare materials (paper, cardboard, fabric, leather) for the base and the templates themselves.


It is worth worrying in advance about the method of securing the application. It can be threads or glue, depending on which option is chosen. The degree of difficulty of the work depends on the age of the child and his level of training. A traffic light applique can be made using almost any execution technique as a basis.
This article discusses ideas for making a traffic light using the most popular application methods and provides photo examples.
For preschoolers, practicing an application appropriate for their age will be very useful from the point of view of developing fine motor skills, spatial and figurative thinking, sensory perception, intellectual abilities, abilities for analysis and synthesis.
Photo master class “Traffic light”
For children in the younger group, you need to prepare in advance a traffic light template and circles of the appropriate diameter from green, red and yellow colored paper. It is better to choose the overlay applique method for beginners. With its help, you can get an interesting and uncomplicated multi-color option. Younger children will spend time with interest and benefit by simply gluing circles onto the base with their own hands, step by step. The lesson will reinforce their knowledge of the shape of a circle and a rectangle, as well as the corresponding shades, and will give them an understanding of the basics of composition.
Video: Application for kids
Application for middle and older children
In the middle group of kindergarten you can also conduct a lesson on appliqué and make a traffic light. But, a child of this age will find it interesting and easy to prepare stencils from colored paper. Having cut out the circles and rectangles themselves, the children will then glue them together step by step, according to the color arrangement scheme. If the usual applique in the group is already working well, then you can move on to more complex methods. For example, conduct classes on making a traffic light using modular or cut-out appliqué. Creating crafts based on them develops creative thinking especially well.
Modular applique involves the use of fairly small pieces of the selected material of the same size and shape. For the craft you will need pieces of three colors: yellow, red and green and a base. It is better to prepare them in advance, and also print out a drawing with the outline of a traffic light for each child, so that it is easier to stick a large number of blanks on its base.


Cut-out applique is an even more entertaining activity for children of middle preschool age. They can make the traffic light entirely themselves, but it’s still better to prepare pictures with its drawing.


To create a broken traffic light applique, you will need to tear colored paper of the four desired colors into fairly small parts, and then stick them according to the appropriate pattern.
Lessons for the senior group
For children in the older group, you can complicate the traffic light applique, for example, by using symmetrical blanks of various shapes. The children must cut them out from colored cardboard or paper themselves. Or you can give each of the circles additional individuality by adding facial expressions.


The turning on and off of a traffic light signal can be indicated in various ways by drawing darkening bars, or instead of a “switched on” signal, use not a circle, but a star-shaped, radiant shape.


In older preschool age, modular or broken appliqué is much better. In such classes you can make many original traffic lights. Additional pictures with an auxiliary outline will no longer be needed; instead, it is better to use sheets of cardboard or plain paper.
Unusual traffic light applications are obtained by combining applique and origami techniques. To do this, some identical characters with different facial expressions must be specially made from red, yellow and green colored paper for gluing onto the base.


It is not necessary to make faces using the origami technique. If there are no step-by-step instructions or a detailed description process, you can prepare simple flat templates of faces for children, according to which they themselves will redraw and cut out the blanks, then adding the necessary features. 
Video: Simple application “Traffic light”
Applications for older children
In the preparatory group of a kindergarten, you can successfully practice all the application methods described above and conduct more educational classes on the topic of traffic rules and existing types of traffic lights. Children at this age are able to work together to create amazing compositions, and not just individual works.
Twisting
A traffic light applique using the quilling technique, which is based on creating an image from paper rolled into ribbons, may seem like too complicated a craft for a preschooler. But, with detailed instructions and the sensitive attention of the teacher, you can get interesting and high-quality options.


Trimming
To diversify the process of preparing for school, you can conduct classes on creating an original traffic light applique using the cutting technique. This method involves winding a piece of paper onto a piece of rod, then the resulting shape is glued onto a base sheet, with or without an outline.


The presence of empty spaces is minimized and a multi-colored, three-dimensional image with an interesting texture is obtained. To apply a traffic light, you should prepare yellow, green and red colored paper.


Learning to cross the road
Children of the older group should know that traffic lights are at intersections and regulate traffic. But there is also a traffic light for a pedestrian crossing. And what does each color mean?
For preschoolers in the preparatory group, the process of creating such an unusual traffic light, as well as the preparations for it, will be incredibly exciting and entertaining.