A simple crochet hat for beginners. How to crochet a hat: diagrams and description. Voluminous knitted model for the winter
Winter is coming soon. It's time to knit a new one warm hat crochet You shouldn't walk in cold weather without a hat. And at the same time I want to look beautiful. Therefore, we present you a selection of knitting patterns with descriptions winter hats crochet with diagrams and descriptions so that you have a choice to suit every taste.
Spectacular crochet winter hat
Warm cozy set for winter
The first option is a bright knitted hat for the winter and... The set is knitted from thick yarn sectional dyeing, so you can knit it in a few days, even if you are a beginner knitter. The principle of knitting embossed columns is shown in the photo step by step, the pattern is completely simple.
You will need:
- yarn with parameters 100met/100g - 200 grams;
- hook No. 8;
— faux fur pompom with a diameter of 15 cm.
Scarf pattern: (multiples of 4)
1st row: 3 air loops (VP), then s/n columns;
2p.: 2 VP, * 2 relief column s/n (RSSN) for the front wall (the hook must be inserted in front around the s/n column of the bottom row), 2 half-columns * - repeat from *, finish 2 RSSN for the front wall, 1 half-column.
3p.: 2 VP, * 2 RSSN behind the back wall (insert the hook from behind into the bottom row), 2 half-columns * - repeat from *,
complete 3 half columns.
4p.: 2 VP, * 2 half-columns, 2 RSSN for the front. wall *, 3 half-columns.
5p.: 2 VP, * 2 half-columns, 2 RSSN behind the back wall * 3 half-columns.
Repeat the pattern the first time from rows 1 to 5, then from rows 2 to 5.
Elastic band (for hat): (circular rows, multiples of 4)
1st row: 3 VP, then column s/n, finish 1 connecting column in the starting point;
2p.: 2 VP together with the 1st p/st, * 2 RSSN for the front wall, 2 p/st *, finish with 2 RSSN for the front wall, 1 RSCH, 1 connecting column. to the second initial VP.
Density: main pattern 7 p. = 10 cm.
Description of knitting hats:
- Cast on 36 VP, close it in a circle with a connecting column.
- Continue working with a 14 cm ribbed pattern.
- Begin rounding the cap to form the crown. In the first r. knit all the half-stitches together (=27 stitches). In the second r. knit raised treble stitches together (=18 stitches). Next, knit a row of treble crochets, knitting them 2 at a time (=9p.). One more r. without decreases and pull the remaining ones together with a working thread. Strengthen it firmly.
- Make 1 row along the edge of the hat. in a crayfish step (place dc/n from left to right).
- Sew on the pompom.

Loop scarf: Start with a chain of 24 ch and 3 ch for the rise. Continue with the pattern for a 170 cm scarf. Sew along the short side.
Source: Little Diana magazine.
Hat made of bulky yarn for the winter

Many girls and women love small, neat hats. But in the winter cold you need to dress warmly. An excellent solution for this case is knitting from bulky wool yarn. The headdress will look stylish with fur coats and down jackets.
Size: 56-57 cm
Required:
- two types of yarn 1 - from Lana Grossa: Famoso dark gray (45% wool, 55% polyacrylic, 38m/50g) - 100 grams;
— 2 — Uno gray-black color (52% wool, 48% polyacrylic, 65met/50g) — 50 grams;
- hook No. 12.
Density: 5 p. = 10 cm
Crochet hat description:
- Start at the top of the cap with two chain stitches using thread #1. In the 1st circular row, knit 6 columns of b/n into the second chain stitch.
- In the 2nd r. continue with the same stitch and double the stitches (=12 stitches). At 3 p.m. double after 1 p. (=18 p.).
In the 4th - after 2 p. (= 24 p.). - From 5 to 14 p.m. knit without additions. Finish with a row of connecting posts.
- Use yarn number 2 to make a pompom.
Source: Filati magazine
White winter hat with lapel and openwork scarf

White is always a popular color for winter
It’s good when the hat is warm, but if there is also a flap, then in winter it will be even warmer. And it will look great over a jacket, fur coat, or down jacket. Let's look at a warm winter crochet knitting pattern. But only those who know how to crochet and knit can knit it.
Size 56 cm
Required:
— 450 g of yarn with parameters 190 met/100 g;
- knitting needles No. 3.5;
- hook No. 3.5.
Density: 23 p. = 10 cm
Scheme for making a women's hat:
- Cast on 96 stitches on the knitting needles and knit 23 cm in stockinette stitch in the round (all stitches are knit).
- For the crown of the hat, knit every second r. All loops are two together. Pull and fasten the remaining 24 stitches.
- At the bottom of the cap for an openwork lapel, crochet 10-12 cm of the pattern according to the pattern. Fold the lapel twice, laying out a beautiful openwork pattern.
- For a scarf, dial 51 air stitches. and knit 180 cm with a pattern according to the pattern (= 12 repeats and 3 stitches for symmetry). Make 46 tassels (23 per edge) by cutting 8 30 cm long threads for each tassel.

Crochet blue hat with pompom for girl
Crochet a bright hat for winter weather and you will immediately feel warmer. The stripe effect is created by the sectional dyeing thread.
For head circumference 50-54 cm.
Required:
- yarn with characteristics 250m/100g with color change - 100 grams;
- hook No. 4.
Pattern for the hat: double crochets in a spiral without connecting stitches.

Blue color for blue winter
How to crochet a hat?
Work starts from the top of the cap.
- Cast on 10 chain stitches, join in a circle and work 10 treble crochets.
- Second row: double the number of loops, inserting the hook twice in each gap (=20 stitches).
- In the third r. increase every 1 p. (= 30 p.), in the fourth - after 2 p. (=40p.), 5 and 6 rubles. - no increase, 7 rubles. - add after 1 p. (=60p.), at 8 p. double every 6th stitch (=70 stitches).
- Then continue without increments until the height is 22 cm.
- Finish with one p. Art. b/n.
- Make a pompom from the leftover threads and sew it to the hat.
Source: Little Diana magazine
Delicate winter hat made of mohair crochet
If we talk about winter knitted fashion, then it is impossible to ignore products knitted from mohair. The yarn is soft, fluffy and warms well during the cold season. The presented version of the hat is very simple. Even a novice craftswoman who has picked up a hook for the first time can knit it. So, a step-by-step pattern for crocheting a winter knitted hat for women.

Mohair charm for winter
Head circumference: 54-56 cm, hat height without pompom - 21 cm.
You will need:
— Mochairlana yarn from Lana Grossa (42% mohair, 33% merino wool, 25% polyamide, 137 met/25g) — 50 g gray-lilac color;
- hook No. 4,5 and No. 5.
Density: 18 half. = 10 cm
How to knit a half-stitch: make 1 yarn over on the hook, pull out a loop, then with one new yarn over close all three stitches on the hook. Knit half stitches in circular rows, each circle starting with 2 chain stitches. rise.
How to add loops: from one half-column of the previous row. knit two at once.
How to decrease loops: Yarn over the hook and pull 1 stitch through two loops, then use a new yarn over to cover all stitches on the hook.
Step-by-step instructions for beginners:
- Make a chain of 4 chain stitches with hook No. 5, close them in a circle with a connecting stitch. Next, knit the hat in half-stitches.
- We make additions: 1 circle - dial 2 air.p. for lifting and increase the number of half-columns to 10.
Round 2: double each half stitch (=20 stitches);
Round 3: add every other stitch (= 30 stitches);
Round 4: double every third half-stack. (=40p.);
5th round: doubling every fourth half st. (=50p.);
6 circle: every fifth half-column (= 60 p.);
7 circle: every sixth half-column (= 70 p.);
8 round: every seventh (= 80 p.);
9th round: - » - eighth (= 90p.);
10th round: - " - ninth (= 100p.);
11th circle: - “- tenth (= 110 p.);
12th round: - » - eleventh (120p.)
Round 13: knit without increments.
At this point you have knitted the flared part of the hat. - Now you need to decrease the loops:
Round 14: Cast off all 9th and 10th stitches 12 times. together (=108p.);
15 round: 12 times all 8 and 9 sts. together (=96p.);
Round 16: similarly knit 7 and 8 stitches together. - 12 rubles;
17th round: 12 r. all 6 and 7 half-columns (=72p.);
4. Next, we will knit the stand-beads with crochet number 4.5:
Circles 18-23: single crochet 72 p. - Make a bomb with a diameter of 5 cm and sew it to the hat.
Several models of winter hats for experienced craftswomen
For those knitters who already have considerable experience in crocheting patterns, there is no point in bringing step by step instructions, as for beginners. Enough pattern diagrams. You can do all the calculations yourself and figure out the pattern of the pattern.

Pattern for experienced craftswomen

Another crochet pattern for a women's winter hat

Star pattern for hat

Knitted hat with colored stripes 


Incredibly beautiful crochet pattern for a hat:

For lovers of exclusive hats

Stylish women's hat style for women
Speaking of winter knitted hats, it is impossible to forget about the caps. There are two with a beautiful pattern for your choice.

You will need:
— Patons Canadian threads (100gr/187met);
- hook No. 5;
- 2 buttons.
Density: 14 tbsp. — 10 cm
How to knit a hat:
- Dial 3 v/p and close it in a ring. Knit from 1 to 14 r according to the crochet pattern. Expansion stage.
- Next, repeat rows 13 and 14 until you reach 20.5 cm from the top.
- Let's move on to making the plank: 1p. - 1 v/p, 1 column b/n in each column, connecting. pillar. (=64p.). Repeat this row again.
- Visor:
1st row: 1 single stitch, (1 double stitch in all columns) - 46 times, turn the product;
2-10r.: repeat 1r. turning rows “back and forth”. - Unscrew the side edges of the visor as in the photo. Secure them with buttons.
Voluminous knitted model for the winter
Development of the Urbu Garn style, adapted from the Swedish by Marina Lindberg.
You will need 100g of medium thickness yarn and a No. 4 hook.

A classic beret is always in fashion
Knit a chain of 3 stitches and combine into a circle. Each new r. start with an air loop. From the ring, knit 7 columns. (STBN)
1st row: * 1 STBN, 2 columns each. in every 2nd column. previous p. *;
2p.: * 2 STBN, from one column. - two *;
3rd: like the second;
4p.: * 3 STBN, from one column. - two *;
5 and 6 rubles: like the fourth;
7p.: * 5 STBN, from one column. - two *;
8 rub.: * 6 STBN, from one column. - two *;
9p.: knit in the same way, increasing the loops in every 7th loop;
10p.: add in the eighth p.;
11p.: add in the ninth paragraph;
12p.: add in the tenth p.;
13r.: increase in the eleventh paragraph;
14 rubles: increase in the fifteenth paragraph;
15-18 rubles: no additions;
19p.: 13 STBN, * pull out a stitch from the next column. (=2 sts on hook), pull sts out of next stitch. (=3 sts on hook), pull yarn through all 3 sts, 13 sc*
20r.: * 7 STBN, one on three points as in 19r. *
RUR 21-27: knit according to the pattern.
Next we knit a bar: from 70 STBN - 5 rows.
Visor: along the edge of the strip, tie 34 STBN - 2 rows. Then at the beginning of each r. skip 1 p. Such decreases must be made 8 times.
Finally, tie the entire hat with STBN around the entire circumference.
Perky hat with columns

morning fashionable color— Bay of Biscay
A cheerful model of a winter hat in this season's trendy Bay of Biscay color. crocheted diversifies your wardrobe. The color looks especially good when combined with dark chocolate.
Size: 52-54 cm
Required:
— section-dyed yarn with characteristics of 90 m per 50 g;
- hook No. 6.
Pattern for the hat: circular r. in a spiral - * 1StBN, next st. pass with air. * - repeat from *. Knit the next rows of stitches from the air stitch of the previous row.
Work progress: make a chain of 64 sts, close in a circle using a connecting stitch. and knit with a pattern for a hat. When you knit 14 cm, knit all 7 and 8 sts together (= 56 sts). In the second decreasing p. - 6 and 7 at once (= 48 p.). Decrease in the same rhythm until 8 stitches remain. Pull them together with a working thread and secure. diameter 8 cm.
Charming female knitted hat with a bell
The knitting pattern has already been given on our website, there is no need to repeat it, follow the link under the photo.


Combination beautiful pattern and sectional yarn - incredibly beautiful!
Head circumference: 54 cm
Required:
— section-dyed yarn Kid Royal Missisipi (62% kid mohair, 38% polyamide, 500 met/50 g) — 100 grams;
- hook No. 1.5
— clasp for a brooch.
We knit with thread in two folds.
A chain of 6 chain stitches close it in a ring. Then we continue according to pattern 1 until the desired diameter of the hat, then we knit straight. Along the bottom edge of the hat, knit a pattern according to pattern 2. Schemes 3, 4 and 5 show how to make 3 flowers. Connect them together. Using a pin, pin onto the hat.

Two models of winter hats. Please note that the green cap is double.


Video master class on knitting hats for winter:
In this post I want to tell you how to crochet a baby hat for beginners and provide you with my first step-by-step tutorial. Please don't judge strictly.
Since I don’t have a lot of experience in knitting, but just a little, I spent a lot of time and very carefully scouring the Internet for hours, and looked at a bunch of pages for the queries “how to crochet a hat”, “crochet a baby hat”, “crochet a hat " etc. In my step-by-step MK "Crochet baby hat for beginners" I will try to optimize and put together all my searches, and I hope that in a few days you will be able to pamper your child with a new, beautiful hat.
I crocheted my hat from leftover yarn, and it took me a little time - only 1 day, it would have been faster, but the child takes up the lion's share of my time.
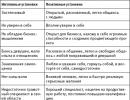
So, let's begin. First, we need to decide and calculate the size of the children's hat. In order not to burden you with long measurements and calculations, I offer you the already calculated dimensions in the picture:
First we need to knit the bottom. We knit it with single crochets in a spiral (I like this method the most, since the seam is not visible). But there are other ways to crochet a hat, now I will show you the patterns.
Crochet hats, knitting patterns:
But if you decide to knit using the 3rd method, like me, that is, in a spiral, then let's get started:
2. 2 sc in each loop (12)
3. 1 sc, increase = repeat 6 times (18)
4. 2 sc, increase = 6 times (24)
5. 3 sc, increase = 6 times (30)
And so on until we get a circle - the bottom of the size we need; during the knitting process we measure it with a centimeter or a ruler. A few rows before the end of knitting, we knit the bottom in a row without increments - so that the transition is smoother. For example, I knitted the bottom up to 10 sc, increase - repeat 6 times. After 8 sc, increase - 6 times, I knitted a circle without increase, then I knitted 9 sc, increase - 6 times and again a circle without increase. Then I knitted 10 sc, increased 6 times and got the circle bottom of the size I needed. I think everyone understands. I knitted a hat for a 1-year-old child using 1 thread of Yarnart Jeans thread, it took less than half a skein of blue and half a skein of black. I used hook number 3.
Now we simply knit in a spiral, without increases or decreases, to the depth we need. In my case, the depth of the hat is 15.5 cm. In order to measure it, you need to fold the hat and place a ruler/centimeter in the middle, from the highest place (top of the head) down. If you want to tie a hat with a crayfish step, then do not knit 0.5 cm to the required depth, and if you want to do it like I did - I tied 1 row with a blue thread, and then knitted a crayfish step with the same thread - do not knit it to the required depth 1-1 .5 cm depending on the thickness of your thread. I tied the hat over the ears.
How to knit a crab step - watch the video
Ears for a crochet hat: we finished the hat and knitted it to the depth we needed. We knitted the last loop of the connecting post (SS), pulled it through and broke the thread if you want to make ears of a different color. Now we attach a new thread (you can leave the one that was there - do not break it) if you have ears of the same color.
Ears for the hat:
1.2.3 row 1 lifting loop, 14 sc.
4, 5 row -1 loop ascent, decrease, 10 sc, decrease
Row 6 - 1 lifting loop, 10 sc
7,8,9 row - 1 lifting loop, decrease at the beginning of the row, sc, decrease at the end of the row. As a result, you will have 3 loops left. We will thread ties through them.
We also knit 2 eyelets. In my hat, the distance between the ears was 25 loops. I measured it like this - I put the hat on the child, and put the knitted ear to his ear, then carefully took it off and folded it in half, marked the intended place of the second ear of the hat with pins, tried it on again and crocheted the second ear for the hat.
For clarity, here is a crochet hat with a bunch of notes.
If you are planning to crochet a hat but don't know where to start? Take advantage detailed description, tips and recommendations that are set out in the article. Stock up on threads, a little patience and get to work.
Before you begin, prepare all the necessary material. You will need:- header diagram;
- yarn;
- hook;
- scissors.

- Head circumference or maximum circumference is measured from the front through the brow ridges, and from the back along the most prominent part of the back of the head.
- The height of the hat (depth) is from the crown to the earlobe.
- For a regular hat, you will need one more measurement - the radius of a flat circle, which will become the beginning of the hat. Divide the head circumference by Pi (3.14).


Before finishing the piece, think about how you can decorate the hat. Perhaps it will be a cute knitted flower, pompom or brooch.
If you want to learn how to crochet, start with the simplest items. For example, you can try to knit a beautiful autumn-spring men's hat. This stylish and beautiful accessory will definitely please your man.
Its implementation only at first glance seems labor-intensive and complicated. In fact, men's knitting is simple and quick. You just need to set aside a little time for work and prepare everything necessary materials and tools. In this article we will share with you two simple master classes on making beautiful crochet men's hats. We hope our tips will be useful.
The easiest way to make a men's hat

If you are just starting to learn how to crochet, take advantage of this simple and clear master class, which tells you how to make a man's hat using regular double crochets. Making such a product is quite easy.
The production of any product begins with the selection Supplies and tools. Of course, to make a beautiful and comfortable men's hat you need to choose good, high-quality yarn. In this case, it is advisable to give preference to knitting threads of medium thickness. For example, in our work we used knitting threads consisting of acrylic and wool, with a density of 50 g/150 m. The color of the yarn can be any, but, naturally, it is necessary to know the preferences of the future owner of the item. As a rule, men's hats are made of dark, muted shades. You can purchase threads in grey, dark green, blue, purple and black. It is also important to remember that the color of the headdress should be in harmony with other parts of the wardrobe. To make a men's hat, you will need three skeins of yarn weighing 50 g each. In addition, for the job you need to select a “working tool” of the right size. We used hook #4.
We carry a beautiful accessory for men

The second step in our work will be taking measurements - head circumference. In our case, it is 56 cm. Next, we make a calculation: divide the resulting value by 3.14. We get the figure (17.8 cm) that we will need when making the bottom. We will create the product using the most common double crochets. In this case, we will begin each row of the hat with three air loops, and end with a connecting half-column, knitting it into the upper lifting loop. We will focus on the presented diagram. So, we start by completing and closing a chain of five VPs in our crochet pattern. The men's hat is then designed as follows: perform 10 dc. In the second row, we perform 2 double crochets in each loop. Next we work according to the scheme: 1 dc and in the next loop of the base 2 dc. As a result, in the third row you should have 30 single crochets. Next, we knit 2 dc in every second loop and finish the fourth row with a connecting loop.
We continue to produce stylish men's accessories

The fifth row is created as follows: in every fourth loop we make 2 dc. As a result, the number of columns increases to 50. We make the sixth row by analogy with the previous one, only we make increases on every fifth loop of the base. Thus, we get a circle - the bottom of the hat with the diameter we need (17.8 cm). Therefore, we will knit the next 9 rows without increases. The sixteenth and seventeenth rows will be done using single crochets. That's all, our men's crochet hat is almost ready. All that remains is to make a pompom with a diameter of 8 cm and sew it to the top of the product. If you wish, you can make it in addition to this one by also making it with single crochet stitches.
Master class: hat with a diamond pattern. Learning to crochet

To make it beautiful, you need to choose yarn and a hook. You will need a skein of yarn 150 g and a hook number 5. We used green knitting threads (100% polyacrylic). This interesting hat with a diamond pattern is made from such crochet elements as:
- single crochet;
- half double crochet;
- convex column.
If knitting them does not cause you any difficulties, you can start taking measurements. To make a “men’s hat” crochet product, calculate the size of the bottom. We measure the circumference of the man's head and divide the resulting value by the number "Pi". This way we get the value that we will use when making the bottom of the headdress. Correct calculation will protect you from annoying mistakes and make the product required size. We'll tell you how to crochet a man's hat below.
Step-by-step description of the work process
First we perform the “magic ring”, which will allow us to avoid an unsightly gap in the initial row.

Crochet men's hat: the work pattern is as follows. We start the first row with 2 chain stitches. These loops replace the first post and are necessary for lifting. In the future, we will start each row of our product with two VPs. We advise you to insert the hook under the post of the previous row before knitting them, so as not to distort the pattern. After completing two VPs, we knit 7 double crochets (dc). Then we tighten the magic ring and complete the knitting with a connecting loop. Second row: we make two convex columns in each dc of the base. The third row, like the previous two, starts with 2 VP lifts. Next we knit as follows until the end of the row: in the first loop there are 2 convex stitches, and in the second - 1 convex stitch.
We continue crocheting. DIY men's hat

We knit the fourth row of the product like this. In the first loop of the base we make two convex stitches, and in the second we knit one convex stitch. And then we do one half double crochet. We complete the row to the end, alternating these elements. Next, we use the following pattern: 2 convex columns - 1 convex column - 1 half double crochet - 1 half double crochet. Repeat the element until the end of the fifth row. By analogy, we perform the following rows, making the necessary increases until the bottom of the product reaches the required diameter (17.8 cm). And then we continue working without increases. After increasing the number of half double crochets to 7, we begin a gradual decrease in the following rows. At the same time, we simultaneously increase the number of convex columns from 3 to 6. When their number is increased to 6, in the next row we begin to knit one half-column between them (that is, we work according to the scheme: 3 convex columns - 1 half-crochet - 3 convex columns) . We begin the expansion again, knitting half double crochets between lush columns. As a result, we get a pattern of diamonds. We recommend tying the last rows of the product with an elastic band, crab step or single crochet. Now you know men's crochet. We hope you will take our advice into account!
The lesson is based on my daughter Varya’s hat. She is 2 years 3 months old. But, knowing the technique, you can knit this classic hat to any size.
Yarn COCO 100% cotton. In 50g. 240 m. It took about 35 grams of green yarn. And for the flower - a little milk. Hooks No. 2.25 and No. 1.75.
Photos enlarge when clicked, so you can see everything in detail!
Before you start knitting, you need to take measurements from your head:
1.
Head circumference. We draw a measuring tape horizontally above the eyebrows and along the level of the most protruding part of the back of the head. In our case, the head circumference is 48 centimeters.
2.
Depth. If we want a cap in depth to the beginning of the eyebrows, then we draw the tape from the middle of one earlobe to the middle of the other earlobe through the center of the crown. In our case, this measurement is 36 centimeters.

If we need a hat to the middle of the eyebrows, then we measure the depth not from the middle, but from the end of the lobe of one ear through the center of the crown to the end of the lobe of the other ear.
Crochet hats are most often crocheted:
1. From the bottom to the crown. The advantage of this method is that if we take a straight fabric pattern for a hat, it will not be turned “upside down”, but will remain as is, since straight fabric patterns are read from bottom to top, and the hat is knitted from bottom to top. This is where the advantages end. Disadvantages: you need to knit a sample in order to calculate the loops at the beginning of knitting. You can, of course, make a “cunning move”: pick up a chain of chain stitches, wrap it around your head and knit according to this “calculation”, but then the evening will be wasted, because we are unlikely to get the size right. Only a full-fledged sample and calculations based on it! Another disadvantage of knitting from the bottom is that we will not get such a perfect crown, unlike knitting a hat from the top. Although this does not apply to all patterns.
2. From the top of the head - from top to bottom. This method is chosen probably in 90% of cases, primarily because it gives the perfect crown and makes it easy to adjust the size while knitting. I myself crochet hats from the top of the head, and I recommend the same to you.

How to knit the crown of a hat?
The crown of the hat is knitted in the round. The main part and the rim are a pipe. There are certain rules for forming a circle.
For a circle of double crochets they are:
Row 1 – knit 12 dc;
2nd row - 24 CCHs: 2 CCHs are knitted into each column of the previous row;
3rd row - 36 Dcs: 2 Dcs are knitted through a post;
4th row - 48 Dcs: 2 Dcs are knitted through two columns;
5th row - 60 Dcs: 2 Dcs are knitted through three columns;
Row 6 - 72 Dcs: 2 Dcs are knitted through four stitches, etc.
Thus, to increase the diameter of the circle, 12 stitches are added evenly in each row by knitting two stitches into one loop in each wedge. There are a total of 12 wedges in this circle of double crochets. Options for distribution of increases:

Choose the method of increase that you like best. I use the second method - I add an increase at the end of each wedge.
If we tie 13 wedges instead of 12, then before moving to the pipe, the circle will look neat:

But, when we move on to knitting the main part, it turns out that the top of the head is folded, which is why it doesn’t look quite neat, and to give the hat a neat look, you’ll have to work hard with an iron and steam:

The diameter of the circle up to which you need to knit the crown is calculated by the formula:
Divide the head circumference by 3.14 (Pi).
48 cm: 3.14 = 15.3 cm. This is also the diameter of the widest part of the hat.
In order for the hat to fit your head beautifully, the transition from the top of the head to the main part of the hat must be made smooth. To do this, subtract 3–3.5 cm from the calculated diameter of the circle.

After that, we knit these remaining 3-3.5 cm to the required diameter with increases through a row: a row with increases, a row without increases, a row with increases, a row without increases, a row with increases. As a result, the top of the head will gradually and neatly round, like a dome.