Masterpieces made from colored paper: recipes in stop-motion style. Paper food from Paper Donut Print paper food
Delight your children by making dishes and food for their dolls from the most different materials: from paper, from plasticine, from clay, from lids and caps.
Such utensils consist of plates, cups, saucers, a teapot and other items.

It's hard to believe that these items are made from waste material. Look at what similar dishes for dolls are made from.

Some objects need to be glued together, then painted in a certain color.
To make it as clear as possible for you how to make such utensils, watch the master classes, illustrated with photographs.
How to make a plate with your own hands?
Made of plastic

To make such kitchen utensils, you will need:
- plastic lids for vegetable oil;
- scissors;
- cardboard;
- stickers.
Attach a sticker to it, glue this element to the center of the circle.

If there are no stickers, then just draw a flower on cardboard.
You made small plates for dolls, see how to make deep ones. To do this, you will need the plastic packaging from Kinder Surprise, which is located inside this artificial egg.
Cut off the deeper part from the shallower one, singe the edges as follows. Place baking paper on the electric burner and place the workpiece on it, cut side down. If you have a gas stove, then the glassine needs to be placed on the frying pan.

From paper
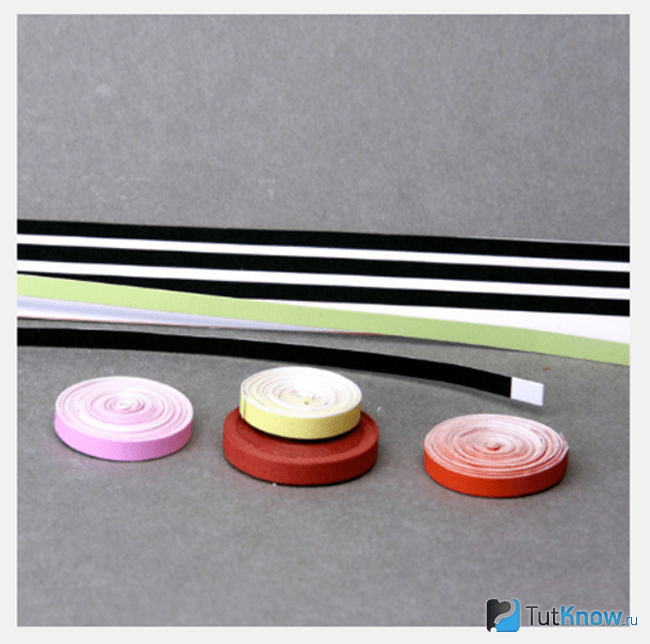
Here's how to make a plate for dolls out of paper so that it is deep, like a bowl. This will help.

Cut a strip 1–2 cm wide from white or colored paper. Screw it onto a pencil or rod and remove it from this auxiliary device.
Glue the tip, slightly pull the middle to give the plate shape.
From polymer clay
Beautiful plates for dolls are also made from polymer clay. To make them, you need to take:
- polymer clay;
- white acrylic paint;
- caps;
- toothpick;
- brush;
- glossy varnish.

Knead the plastic. Roll out a piece, attach a round object to it, cut out the future vessel according to this template. Now place a round object of smaller diameter in the center of the workpiece and press it onto the plastic.
Attach a toothpick to the edges of the plate, making them openwork. Paint the edge. When it dries, smooth it out with a knife. You can draw a flower in the center of the dish, then leave the plate to harden in the air or bake in the oven (this is written in the instructions for the specific polymer clay).

From cardboard

On the wrong side of the cardboard, draw a circle of the same diameter as you want the bottom of the plate to be. Draw a larger circle around this blank. Cut out the resulting ring, which is located between the large and small circle.
Make a cut on its side. Align the two edges of this blank, glue them in this position. Place the remaining circle on the cardboard and cut it out to spare. Glue the prepared ring onto this blank, you will get a plate with sides.
To make this item more durable, you can make several layers and glue them together.

And here's another interesting option, which will allow you to make a whole toy set for feeding dolls. It will require old boards that have failed and should not be thrown away.
How to make a toy set for dolls?

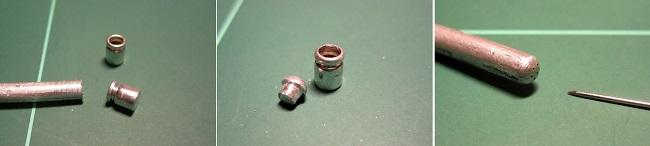
You can see what kind of source material was used. You will need to carefully disconnect the small elements from the base so as not to damage them, remove the winding with your hands, slightly prying it with the tip of small scissors.
Insert a wooden rod inside such an element and saw off the excess.

Make several of these toy containers with wooden lids, write the names of seasonings on them on small paper strips. Attach them with glue or tape.

The child will also be delighted with the kits for bulk spices; they are also quite easy to make.
Take a metal element, use a nail and a hammer to make several holes in it.
All you have to do is close the lids and admire what an interesting toy set you have created.

You will transform old capacitors beyond recognition. To do this, you first need to remove the covers from their lower parts and saw off one part in half.

Work on some other details in the same way. This is what you will get at this stage.

Go around the edges of these blanks with a file to make them even. In the same way, you need to process smaller parts, such as handles and lid opening elements. Cut these items from a tin, for example, from a can of condensed milk or stew.

Solder them into place and see what a wonderful gaming set you have.

You can make it from other materials together with your child, for example, from plasticine.

- To do this you need to knead the plasticine. To make a saucer, roll the mass into a ball, flatten it, slightly lift the edges up.
- Show your child how to make a cup. To do this, you also need to first roll the ball, then press into its center with your finger, shape it into a cup.
- To make a handle for it, roll a thin sausage out of plasticine, bend it slightly and attach it to the side.
- You can also make a coffee pot out of plasticine. To do this, you first need to roll this material into a pear-like shape. This is the body. To make a handle, roll a sausage out of plasticine, bend it and attach it to the side. The spout of the coffee pot is also made from a curved sausage, and its lid is made from a figure similar to a flatbread.

Look how delicate and beautiful it will turn out.

A set of dishes can be made from natural materials. Just now the acorns are ripe, you can stock up on them to make crafts throughout the winter.

To make such a set, you will need:
- acorns with caps;
- twigs;
- twigs;
- small hacksaw;
- glue gun

Saw off a thin circle from the branch, which will become a saucer. Place a cup on it; you need to turn the acorn cap into it. Glue a curved rod as a handle. Make another similar cup and saucer, and you can start a doll tea party.
You can make a wide vase from an acorn cap and glue cone scales to the bottom, decorating this item.

Make children's play even more exciting by making not only dishes for dolls, but also food for them. Of course, the kids are not averse to using a real one, but this one will quickly deteriorate and is short-lived. You will show them how to make food for their charges so that they can play with it for a long time.
How to make food for dolls?

Look how wonderful this lemon cake looks. His great advantage lies not only in his beauty appearance, but also that you can play with it for a long time. After all, this dessert is made of polymer clay, which is quite durable.
Do not give such items to play with small children; it is difficult to explain to them that this is not a real cake and should not be tasted.
Before you make food for dolls of this type, you need to take:
- polymer clay of the required colors;
- toothpicks;
- stationery knife;
- rolling pin.
Now take the light yellow clay and cut this piece into 6 equal pieces with a utility knife. Roll each into a sausage.

Next, use white clay, which you need to knead in your hands and roll into a thin layer. Place the first yellow sausage on it and roll it into a roll.

In this way, decorate all the yellow sausages, using a knife to give them a drop shape. Now roll a rope out of white polymer clay; it will become the central element. Attach six decorated slices to it.

You need to wrap the resulting beauty first in a white and then in a yellow layer of polymer clay.

It's time to make the cakes yourself. To do this, you need to roll out a circle of white, brown and yellow polymer clay. Roll them out into thick cakes and place one on top of the other.

To make the doll cake next, you need to tackle the lemon shavings. To do this, you need to chop a hard piece of clay into shavings with a sharp knife, then roll the sides of the cake in it, attaching this decoration with your fingers.

Roll out the white plastic into thin sausages, roll them into a rope and bend them into roses, decorating the cake with this improvised cream.

To ensure that the lemon preparation cuts well, put it in the freezer for half an hour. Then it will be easy to chop this sausage into thin slices, which is what you will do.
Place them on the surface of the cake, decorate with shavings of brown clay, and admire with your child what a wonderful food for the dolls it turned out to be.

Place this masterpiece in the freezer for 30 minutes, then it will be easy to cut into slices.

To see how fluffy the dough is, carefully make a few holes on one side of the piece and then on the other. Following the instructions for polymer clay, leave this culinary masterpiece to air harden or bake in the oven.
And here's how they make food for dolls from other pliable material.
From salt dough

To make these baked goods, you will need:
- salty dough;
- molds and bottle caps;
- pastel;
- stained glass paints;
- stationery knife;
- rolling pin;

From the rolled out salt dough Use cookie cutters to cut out cookies; the remnants of this material will make beautiful closed pies.

- Here's how to make food for dolls so that it looks like bagels. Roll out the salt dough flatbread into a thin circle, first cut it in half, and each half into three more pieces.
- In each of these triangles you need to wrap a small sausage of dough, then form a bagel. To do this, this triangle must be rolled up, starting from the edge, towards the corner.
- Using yellow or light brown pastels, add color to the bagels by painting them. Dip each one in coarse salt as if it were sugar.

You can cut several pies into pieces, then bake all this wealth in the oven so that the dough dries.

To make open pies more realistic, coat the spaces between the flagella with dark red stained glass paints. Mix white acrylic and acrylic varnish, paint the top of the cookies with this “glaze”.

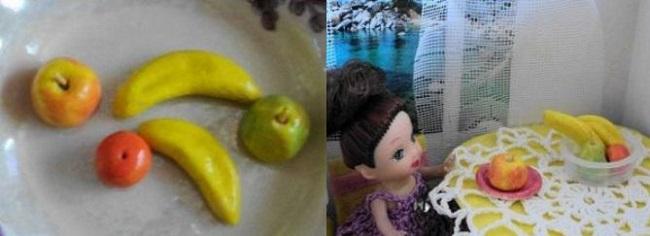
You can decorate the cookies with multi-colored beads, then you need to put the baked goods in a box and decorate the doll table with it. Salted dough fruits can also be found here. Create them from the remains of this material.
Make apples and bananas together with the children, paint them with gouache desired color, then varnish.
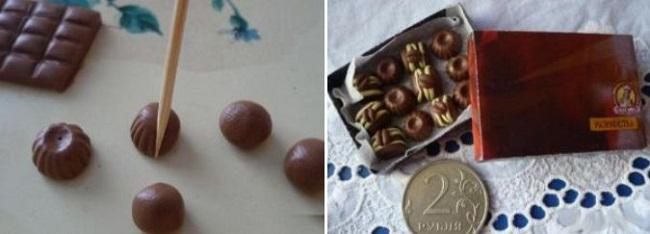
A chocolate bar will also come in handy. To make it, take:
- polymer clay brown and white;
- stationery knife;
- toothpicks.

To make chocolates for dolls, you need to mold small balls from brown plastic and use a toothpick to apply a design on them. All that remains is to put the candies in the box and you can put them on the kitchen table.
Food for dolls can be made from a variety of materials, such as fabric. The main thing is to know how.
If you liked the topic, we suggest you see how to make food for dolls that will be like from McDonald's.
Perhaps the child will want to “feed” his charges healthy food? Then see how to make borscht for them.
The third master class will teach you how to make dishes for dolls: forks, spoons, a ladle and other items.
![]()
One of the most useful activities for most children of any age is origami paper crafts of varying complexity.
The essence of the game is simple and lies in the fact that you need to look at the diagrams of origami crafts for children, then choose the most suitable one in your opinion, and then fold the paper according to the instructions.

Of course, do-it-yourself origami crafts are far from just ordinary fun, but also real lessons in creativity, which make it possible to actively develop fine motor skills of children’s hands, as well as imagination.

Many parents make new origami crafts with their children, and most of them noted that this game has a huge number of different advantages compared to others.
Why is origami useful?
It will be difficult to list all the advantages of crafts made from modular origami. But the most important thing is that thanks to a game that is quite simple at first glance, the child gradually learns to fold paper, cut it, and also glue it and bend it accordingly.
Most modern games that parents have to buy for their children for development purposes are quite expensive, but paper is a material that is always available in abundance in any home.

Benefits of origami
Firstly, during the creation of any toys, the child is actively developing fine motor skills hands, because the child learns to carefully monitor the course of his thoughts, and also consciously create interesting crafts.

Secondly, thanks to origami, the baby’s attention is concentrated on any one object, which teaches him to truly concentrate.

Thirdly, having decided to learn how to make origami crafts with your child, you will thus stimulate his imagination, as well as fantasy.

Fourthly, such a game contributes to the development of the child’s memory, because in order to end up with a figurine, it is necessary to remember the sequence of performing absolutely all actions.

Fifthly, thanks to the creation of crafts, the child learns to work with scissors and other tools that he will encounter at school.

In addition, such a joint hobby allows all family members to unite. If you from time to time fold even the easiest origami with your child, gradually, unnoticed by him, moving on to more difficult ones to perform and interesting schemes, then the child will definitely be properly prepared for school, since he will already have various skills and minimal knowledge in a science such as geometry.
Making a mouse
If you are looking at photos of origami crafts and want to try making a light figure for the first time with your child, then a mouse is an ideal option.

The sequence should be as follows:
- Bend the white sheet into a square shape from left to right, and then straighten it.
- In order to end up with a triangle-shaped sheet, you need to carefully bend the sheet from top to bottom.
- Bend the resulting sheet in a straight line to the left. It is important to be sure to capture approximately 1/3 of 1/2 of the final product. That is, it is necessary to ensure that the edge never reaches the middle.
- Using a ruler, carefully bend the corner of the sheet to the right. Make sure that the edge on the left always lies along an imaginary vertical axis, roughly drawn in the middle of the sheet.
- Using a ruler, bend the bottom of the sheet without touching the central triangle.
- Open the corner of the resulting central triangle and bend it gently back a little to create a fold.
- On the resulting triangle, all that remains is to draw the eyes, nose and mouth of the mouse with a pencil.

Of course, doing easy origami with children is one of the most exciting games, which, in addition, is also very useful for a child of almost any age.

In addition, thanks to the real variety of different patterns of almost any complexity, even an adult can find an origami craft to suit his taste.

The peculiarity of creating crafts is also that when creating various figures, not only imagination, but also thinking actively develops, which is especially important in the modern world.
Note!


Photos of origami crafts


Note!


Loved by many children and very useful for their harmonious development. To arrange a cafe, restaurant or home tea party, a set of dishes and a table will be enough for preschoolers. Children begin to prepare complex food and actively fantasize about this topic at about four years of age. Then you can offer them a paper “ration”, which will be discussed in this article.
Food for paper dolls is good on its own or as an addition to bulk products. For children two or three years old, you can make the simplest preparations: buckwheat, pasta, rice, milk porridge - in general, what they recognize and name. Complex dishes in pictures are a serious creative challenge, and deciphering them is sometimes surprising in its unexpectedness.

Making paper food is easy: You need images and something to give the images some rigidity. Picture sources for doll food:
- culinary magazines;
- flashcards;
- printouts from the Internet.


We measure the diameter of the bottom of toy plates and pots, and then look for a suitable glass. We will circle him.

Then we cut out the circles and think about how to give them strength so that they don’t get wrinkled during children’s play.

I currently know three options:
1) laminate;
2) stick it on cardboard and roll it up in tape;
3) make a base of velvet paper or cardboard with an adhesive layer.
We made it from self-adhesive velvet paper, but, of course, there were a lot of scraps left. They served as a base for paper food.

I took pictures from unnecessary gastronomic magazines. Ah, everything is so beautiful and delicious!

As a result, our girls play in two ways. Either they immediately put soup, shish kebab, or vegetable stew into the pan, or they first put toy products there, which at the end of cooking turn into a complex dish.

Sophisticated cafe visitors are happy. And this is the main thing, because eldest daughter dreams of becoming a restaurateur.

Playing with dolls is recognized by most child psychologists as the most socially oriented, during which the child develops the most important skills of responsibility and communication, learns caring and, albeit childish, the basics of culinary skills.
The most popular doll food from:
- plasticine
- polymer clay
- paper
In our article we will tell you in detail how to make food for dolls in order to turn the gameplay into an even more exciting joint event, which your child will definitely love.
Food for plasticine dolls
Modeling doll food from plasticine is one of the simplest and most inexpensive options. The cost of plasticine is affordable, and the color range is so diverse that it allows you to create foods, dishes and drinks of absolutely any shade.
In order to make food for dolls, the videos are truly diverse and will help diversify the set of plasticine products and help with new ideas.
You can try to sculpt food from plasticine with a child over 1.5 years old. For example, let's try to cook a delicious pizza for your favorite doll.
You will need: plasticine of different colors.
- Roll out orange plasticine into a round cake with a diameter of approximately 5-7 cm.
- Made from plasticine yellow color Roll out a long thin strip and place along the edge of the circle, creating a pizza ornament.
- Make small tomatoes from red plasticine. Place on a flatbread.
- Made from plasticine Brown roll up the sausage and “cut” it into circles, make white inclusions from small white pieces - you get pieces of sausage. Also, place them on pizza.
- We fashion olives from dark blue plasticine. We decorate the pizza and you can call your favorite toys to the table.
Also, if your child needs food for dolls, you can watch the master class in video format, clearly showing your child a variety of options for making pies, sandwiches and other doll delicacies.
By the way, plasticine makes excellent food for Monster High dolls, which are so popular and loved by many children lately.
Food for clay dolls
Cooking food for polymer clay dolls requires skill and can be done by a child over 7 years old. But such food for dolls turns out to be very colorful and bright! So, if we make food for dolls from clay, for example, various buns and rolls, we need to prepare the following materials.
- Multi-colored polymer clay.
- Gloves for working with plastic materials.
- Oven preheated to a temperature of 130-140 degrees.
- Fantasy.
We knead the clay in our hands, sculpt the desired fruit, vegetable or berry - we illustrate the process of sculpting strawberries. Place the strawberries in a special baking container (to avoid the spread of harmful fumes throughout the kitchen), place them in a preheated oven and bake without closing the lid (!) for about 15 minutes.

Important: the time and temperature for firing polymer clay is specified on the packaging and depends on the manufacturer. After cooking, thoroughly ventilate the kitchen.
Take a photo as a souvenir - food for dolls from the oven turns out very beautiful, lasts a long time and is not afraid of water!
Polymer clay produces both substantial-sized and miniature food for dolls, the production of which requires an almost jewelry-like approach, accuracy and less firing (baking) time.

Food for paper dolls
If your child wants food for Barbie dolls to be unusual and colorful, try “cooking” paper treats for the dolls. Choose a special set where the food parts are already prepared and only need to be assembled into ready-made vegetables, fruits and pastries.
Food for dolls video
Photos of food for dolls

Tatyana Agapova
Back to top school year, as always, teachers are updating the corners for children's role-playing games. And in our group "Tulaki", the guys and I decided to open a cafe "Berezka". The menu was made quickly, but with the products turned out to be a hitch. We thought for a long time about what we could use to make chicken legs, cutlets, pizza, bread, etc. There was a proposal to make all this from salt dough. But another alternative was adopted solution: paper.
Paper products, it turned out to be very simple and interesting to do.
For work we need: egg boxes, PVA glue, basin and desire.


The cells need to be torn finely and placed in a basin. Pour boiling water over it. Cover with a bag to prevent the water from cooling quickly. keep it up paper in water for 2-3 days.


Then squeeze paper, add PVA glue.


Mix this entire mass until smooth. Next is your fantasy and imagination. We made pizza and chicken legs, bread, loaves, cutlets, candies, meatballs, etc.


Then products Place it on a hard surface and place it on the battery. After 2-3 days, paint and varnish everything.