Knitted crafts for the home: tips for creating decorative elements with your own hands (95 photo ideas). Knitted crafts for the home: tips for creating decorative elements with your own hands (95 photo ideas) Interesting crocheted crafts
How to crochet a toy for beginners with the easiest and simplest ideas? Where can I get step-by-step video tutorials?
How to knit an educational toy quickly and easily? Where and how do I learn to crochet? What toys can I knit now?
Where to start? Who will help me? When can I start? How long can I study? Is this free training? How to crochet a toy for beginners: a dog, an owl, a cat, a bunny and the easiest thing you can crochet on a kinder?
Beginners encounter all these questions and very often give up or give up; our website will help even a beginner to cope with every question and understand it.
The ideal option for starting to knit a toy is to have it in 4 places at once:

- Video tutorials on YouTube.
- Pictures or photos in Google or Yandex.
- Blogs from experienced toy knitters.
- Descriptions, diagrams in Yandex or Google search.
Having familiarized yourself with all the details of knitting toys, we recommend that you look.
This article will help you knit a dog from a Kinder container, a ball for a Christmas tree in the shape of a dog, a dachshund, a pug and other dogs.And crocheted flowers will always go well with any toys, from the simplest and easiest to the more complex, an article with instructions and photos. The most important thing in knitting any toy is to understand the details and step-by-step sequence of actions, then any model will become simple and accessible.
Why is this so?
Perhaps you will like some simple toy, you will start knitting it and questions will arise, people will help you and answer you promptly if you don’t figure it out yourself. The more sources of information, the better.
It's hard to imagine how to knit a loop if you've never knitted, so a video and diagram + real help and answers is the best option.

An ideal and simple option is a tied kinder container, which is decorated and has eyes, a nose, and a mouth. 
It could be: a cat, a bee, an owl, a steam locomotive, a rocket, a caterpillar, a chicken, a dog, a rocket, a bunny.
The second option is the same kinder, but we make a mushroom or an acorn out of it.
If you can’t imagine what it might look like, then take a look at the photo of the toys above.
Leaves, flowers, balls, smiley faces, cat balls, flat leaves, snowflakes are not always knitted according to the circle principle.
If you liked toys based on the Kinder Surprise container, we recommend watching these educational lessons.
How to tie a Kinder Surprise container?
What you need for knitting: hook, thread and scissors.
Step-by-step instructions (photo, video): 
Let's write down what steps it consists of: the first loop, the amigurumi ring, knitting a circle with increases, knitting the middle part in a circle without increases, finishing the knitting by decreasing the loops, cutting the threads, pulling the thread and finishing the knitting.
- Knit the bottom, a circle according to the size of the kinder
- We knit the middle part in the round without increasing
We start with an air loop and knit an amigurumi ring. To do this, watch the video and repeat step by step.
Amigurumi ring
Video tutorial will help you crochet an amigurumi ring:
How to knit a bottom in the round
Detailed video tutorial on how to crochet the bottom in a circle for beginners:
Single crochets
Tutorial video on knitting single crochet:
How to make invisible reductions?
How to tighten stitches at the end of knitting
Description step by step
The thinner the yarn, the more rows you will have to knit for the bottom.

What should happen at the stage when the container is tied and how will it become a toy? 
Now that you have already looked at the description and loops, you tried to tie a container and make a mushroom, an acorn, a dog, an owl out of it.
Crochet a snowman with a kinder container
Such a snowman is also a keychain, a toy, a toy for the Christmas tree, a small surprise - a gift, and also an aroma - a pendant in which a piece of cloth with oils is placed and the aroma hovers around you and helps you, for example, cope with viruses if you choose oil tea tree.
Materials needed: yarn, hook, scissors, eyes, kinder capsule, glue, needle.
Useful video on tying a Kinder Surprise container:
Or maybe we'll knit a pig or a pig?
 For such a pig you will need: the remains of pink threads - acrylic, a hook, scissors, beads - 2 pieces, black threads for the eyebrows, the remains of felt for the snout, cotton wool or filler for stuffing and 1 free evening.
A pig is the same principle of knitting in the round, with the only difference being that in the place where the tail is we will decrease the loops and fill the pig itself with filler.
Knitting principle:

How to knit a smiley face, a pop-eyed one?

We will need: pink, black, green and white yarn, hook, needle, scissors.
We make a sliding loop and 1 air loop.
- 6 single crochets into a slip stitch and tighten. Insert the hook into the 1st loop and knit connecting stitches.
- In each loop we knit 2 sc (single crochet) 12 loops. We close the knitting with a connecting stitch, VP (air loop) lifting.
- We increase through 1 loop. 1СБН, 2СБН... repeat until the end of the row of 18 loops. Connecting loop, lifting loop.
- Increase through 2 loops, 1СБН, 1СБН, 2СБН... 24 loops. Connecting loop, VP. We knit tightly so that the stuffing is not visible.
- Through 3 loops. 1СБН, 2СБН, 3СБН. 30 loops. We alternate the increments for a uniform circle.
- Through 4 loops. 36.
- After 5 loops. 40 loops.
- We make a pancake - the desired size of the ball.
- Without increments we knit 6-7 rows in a circle. Insert a thread where you start knitting to track the required number of rows.
- Form a ball. We begin decreasing the loops in the same way as we did the increases, i.e. from 5 loops to 1.
- 1VP, 5СБН, 1СБН from 2 loops; repeat until the end of the row, connecting loop.
- 1VP, 4СБН, 1СБН from 2 loops; repeat until the end of the row, connecting loop.
- Fill the ball with padding polyester; if you have it in skeins, then cut it into pieces. Distribute evenly throughout the ball. Maintain the ball shape.
- 1VP, 3СБН, 1СБН from 2 loops; repeat until the end of the row, connecting loop.
- 1VP, 2СБН, 1СБН from 2 loops; repeat until the end of the row, connecting loop.
- 1VP, 1СБН, 1СБН from 2 loops; repeat until the end of the row, connecting loop.
- Continue knitting and close the knitting by cutting off the end and pulling it into the loop. The ball base is ready. Hide the thread inside by crocheting through the nearest loops.
- We knit the eyes in the same way, circles, like the basis for a pancake.
- Sew on the eyes and embroider the mouth.
Master class with step-by-step explanations in the video:
How to knit an owl?
 For beginners who want to learn how to knit an owl, we recommend that you read the article:
Here you will find step-by-step descriptions and recommendations, as well as secrets for making various versions of owls, from the simplest patches that can be knitted in 5 minutes to keychains, toys, and phone cases.
All this with video tutorials so that even the most beginners can repeat it and knit their own.
It's time to grab a hook and thread and start knitting your owl. Lots of ideas await you, and this will help you fall in love with owls and knit them in different ways. If you are already an expert in knitting amigurumi toys, then you just need to look at the video.
Detailed video tutorial with step-by-step explanations and showing each loop for crocheting an owl:
Video and pattern for knitting a bunny
Since you have already mastered tying the Kinder, it’s time to turn it into a toy.
To do this we prepare: threads, hook, eyes, needle.
Crochet bunny with step-by-step knitting and video explanations in 1 hour:
Easter bunny in the video tutorial for the evening:
Easter Egg
Beanbag
How to bind a mouse?
How to knit an apple?
Chick
Ginger cat
What to do if you can't keep up with the explanations?
We have a diagram for this + you can also slow down the video scrolling as much as you like!
Why these toys?
- Most bulky toys are knitted in the round: head, torso, arms, legs.
- Having mastered knitting in the round or the amigurumi principle, you can then knit more complex toys consisting of several parts.
More ideas on what toys to crochet with kinder?
Video with ideas for knitting toys:
How or where should beginners start?
- Irina Chadova - she has a detailed description with a photo of the mushroom. It can be not just a toy stuffed with filler, but also a rattle with a kinder egg and a pea or beads - a fungus inside.
- We tie a container of Kinder Surprise and get a mushroom or acorn. The author of the master class is Natalya Kuzmina. Step-by-step photos will help you immediately understand what your toy should look like at each stage of work.
- Another option is an opening acorn crochet


What else can you knit after learning how to knit a Kinder Surprise toy?

Useful uses of such chest toys for the street, garden, school
Inside the opening toy we place a napkin soaked in oil to improve immunity or fight ARVI during periods of exacerbation in the garden or school. An example is to make holes in a box and put garlic inside or a few drops of tea tree oil on a napkin.
What can you achieve if you use all the tips and tutorials?
With time and the acquisition of knitting skills, the mushroom will grow into a clearing with flowers, mushrooms, and hedgehogs.
Video about the game hedgehog in a clearing, what useful properties besides the toy will your child easily develop
If desired, you can knit, for example, a chipmunk, as in this video.
Other options for toys are: acorn, animal rattle toys (cat, dog, chicken, bee).
How to turn an ordinary toy into an educational one?

- Come up with a plot and action. For example, a hedgehog or a chipmunk collects mushrooms and eats them.
- The flowers in the meadow can be all the colors of the rainbow, so you and your child can learn counting and colors.
- Place 10 flowers and 10 mushrooms in a clearing, and you will get a count of up to 20.
- Sizes from large to small, largest and smallest.
- While playing with the baby, the bee sits on different colors to collect nectar, name the colors of the flowers.
- One clearing, but hundreds of lessons. You can ask your child: Which fungus is the largest, the smallest? Ask them to arrange the mushrooms in order of growth from small to large.
- Such a clearing will become the basis for all other fairy tales - games. It is collapsible, then having placed the trees, we knit leaves of different colors, flowers, and fruits of the trees for different seasons. With the arrival of autumn or summer, we replace the flowers in the meadow with berries.
- Winter. When, according to the fairy tale, winter has come to you, we exchange the mushrooms for a snowman or a Christmas tree. You can also add Santa Claus, Snow Maiden, Snowman, and gifts under the tree to the clearing.
- Animals: bunnies, foxes, wolf, bear, hedgehog, frog, mouse. Heroes of fairy tales: Kolobok, grandfather, grandmother, granddaughter.
What loops should you know how to knit?
Often the descriptions have loops written at the very beginning. They are designated by abbreviations.
The needlewomen show in the video what and how to knit, but for maximum understanding and to make it easy to repeat, we recommend looking at each loop option separately if you couldn’t figure it out even when watching slowly. Repeat knitting only those loops that you need.
In most patterns and descriptions you will need to learn how to knit:
VP, RLS, SS, SSN, increases, decreases.
- VP - air loops
- RLS - single crochet
- СС – connecting post
- Dc - double crochet
- Increases are knitting in 1 loop 2.
- Decrements are 2 loops we knit 1.
How and when can you start crocheting toys?
The easiest thing: flowers, mushrooms, acorns, leaves, balls, heroes to put on your fingers, rattle toys with eggs from Kinder Surprises.
If you want to knit something, but don't know what it will look like or how to knit it, start by looking for pictures and video tutorials.
We analyze what parts the toy consists of, find similar descriptions and diagrams.
This way you will learn how to start knitting and what parts you need. If you are lucky and there is also a video tutorial, then the toy is almost ready.
What are the best toys to knit for kids?
For very small children, fully knitted toys without sewn parts are suitable. We recommend embroidering the eyes and nose with thread.
Choose cotton threads; they are not bright colors, but natural. When the child chews or soaks them, nothing will bite off.
You already have a selection of ideas and master classes with photos and videos; all you have to do is choose the toy you like and start knitting.
We wish you good luck and will be happy to answer all your questions about how to crochet a toy for beginners, perhaps the easiest thing for you turned out to be another creature, share with us your photo of the finished work, we will be happy to publish it on the Kayu website.
Knitted crafts with knitting needles are not only interesting, but also very fast. At the same time, there are a number of products that will seem easy even for beginners.


You will need:
- yarn – black and orange fleecy thin in 4 layers;
- gray ribbon made of organza;
- stuffing material;
- hairpins - 3 pieces;
- hairspray;
- black beads - 3 pieces;
- felt-tip pen;
- black threads;
- black leather scraps.
Job description

- Orange thread - cast on 6 loops.
- Row 1: knit stitch, k2 from 1 - repeat 6 times = 12 stitches total.
- Row 2: (P2 from one, P1) – repeat 6 times = 18 loops.
- Row 3: knit.
- Row 4: purl.
- Rows 5-6: continue using black yarn, 2 p.
- From rows 7 to 10 - knit with orange thread, 4 p.
- From 11 to 20 rows - knit with black thread in 10 r.
- From 21 to 24 rows: continue knitting with orange thread in 4 rows. Continue with black thread for faces 1 p.
- Row 26: (knit 2 purl stitches together) 9 times = 9 knit stitches, 1 p.
- Next, you should cut the thread, pass it through the loop, pull it off, and fasten it.
Assembly
First you need to make the head by tightening the loop. You should sew the bottom seam, while filling the product with cotton wool. Next, the wings are made from organza. They are simply cut out of tape and painted with varnish.
Attach the wings to the body. Make antennae out of leather and attach to your head. Sew beads in place of the mouth and eyes. The soft toy must be equipped with paws. You can make them from hairpins.
For the legs of a knitted bumblebee, you can use waxed cord rather than pins. This is worth doing if you are going to give a toy to a child. When performing toys for beginners, you don’t have to make a mustache at all.
The simplest option: a rabbit from a square

Let's knit a rabbit! To do this you will need:
- yarn,
- cotton wool,
- pompom for ponytail.
The first step is to knit a rectangle using stockinette stitch or garter stitch. You can use any thread.
How to knit a rectangle? Cast on 28 stitches and knit in garter stitch. After the square is ready, you should stitch it in the center with a thread and a needle.
The second stage - in order to make a toy, we do not tear off the thread, but stitch it so that we get a triangle.
You should now have the head of a toy.
Then you need to sew up the back of the toy and fill it with cotton wool. Sew with a hidden stitch.
Don't forget to tie a pompom - it will act as a tail.
You can do embroidery on the muzzle, sew on beads, or you can just leave everything as it is.
Knitting rattles for beginners
If you are going to knit your first toy, it could be a simple rattle. You can make several products of different colors at once. What are the advantages of a knitted toy? The baby will not get hurt while playing with it; there are no small parts that the child could swallow.

So, we knit a rattle with our own hands. It is better to take a type of yarn such as “Krokha”. It is soft and the fibers do not fall out, since it is very difficult to tear the thread from the base.
The products are textured, which allows the baby to use the toy to develop motor skills. A knitted rattle can also be used if a child’s gums itch. The toys do not fade and can be washed in a regular washing machine.
Knitting a rattle: what will you need?
- Yarn “Krokha”;
- beads;
- knitting needles – 3 mm;
- scissors;
- needle with a large eye;
- felt-tip pen - you need to remove the rod from it and wash the product with soap;
- Kinder surprise container.
Job description
- First we knit a cover for the container. We will put beads in it so that the rattle makes sounds. Knitting is done with knitting needles, but you can also use a hook.
- Knitting a cover is very simple. Just make a square whose sides are slightly longer than the container. The easiest way is to make 15 loops and knit 15 rows.
- Then we take a strong thread and stitch the product around the perimeter. Next, we put the container into the resulting case. We tighten it. We sew up the resulting hole. The rattle ball is ready.
- All that remains is to place the knitted part of the toy on a stick, which can be a felt-tip pen.
Knitted sheep

To make a lamb out of yarn, we knit the body and head with knitting needles, making the fabric widen at the beginning and narrowing at the end. We sew the head on one edge, and the legs can be knitted with sock knitting needles, or made from braids from the same yarn, or take a thick cord for this. The hair on the sheep's fur coat and head is knitted in long loops.
Are you an enviable needlewoman, do you know how to use knitting needles, crochet, are your family and friends already knitted from head to toe? Don’t despair, knowing how to handle these tools will open up inalienable horizons for yourself! And we have made a selection of “the best ideas for knitted crafts” to help you.
Since Easter is early this year (April 8), and there is very little time left, I suggest you start knitting themed crafts to increase potential sympathy from your mother-in-law, grandmother, mother, and simply for your own pleasure.

Rainbow egg
To work, you need an egg (you need to remove the contents with a syringe in advance). You can learn more about how to make blowing correctly in the article “Crafts from Eggs.” Treat it with a gentle layer of PVA glue, or any other glue you have in stock.


We take embroidery threads of different colors and randomly glue them in the form of multi-colored stripes. After all the procedures have been completed, let’s leave our craft to dry for 8-10 hours. Better yet at night

Multi-colored egg cases
You will need the smallest crochet hook, thread (must match the thickness of the hook itself), a testicle for trying on, and a thin decorative ribbon.

Having decided on the size of the cover using an egg template, we begin to knit a ring. From the ring in columns (you can choose any pattern) we move upward.

Having reached the desired height, we knit the last row with a pattern so that there are holes, they are needed in order to thread the ribbon (tie function)

Having tied this bag, carefully place a boiled egg inside and tighten it with a ribbon. Now you can admire your work. To better understand the progress of the work, look at the photos of knitted crafts below.


Flower foot massage path
To complete this composition we will need video tape, plastic corks, glue, a hook and thread for knitting, and old unnecessary disks.

We tie the disks with ribbon and sew them together in the desired shape. We tie the corks and glue the corks to each disc in the shape of a flower.


And now our rug is quite functional. By the way, this massage is very useful because all the nerve endings are located on the soles of our feet.

Our ancestors also know a very wide range of crocheted and knitted crafts. Remember your grandmother’s rugs on the floor, or the seats on the chairs, so colorful, soft, and most importantly warm and cozy in the cold.

But that was before, and now pillows, kitchen towels are tied in these ways, a hot stand is knitted, even holiday decorations can also be decorated with such details.

Practical point of contact
In order not to get confused in the work, to understand how to create this or that pattern in the form of knitting, there are patterns and instructions for knitting crafts. Even craftswomen with great experience use patterns, because one slightest mistake can reduce the quality of the product.


If you have a daughter, be sure to sign her up for this kind of club; this activity will teach your child perseverance, determination, develop fine motor skills, and train memory.

She will receive her first basic skills there, which will remain in her memory for the rest of her life.


Hollywood movie star Julia Roberts loves to knit, and she takes all her creations to film sets. We deviated a little from the main topic... Next are simple knitted crafts for beginners.

Rug made of pompoms
The work uses knitting threads and scissors. The instructions are very short:
- Wrap the threads around your hand.
- Cut to create pompom
- Do the same with other pom-poms.
- Sew to form a rug.

Even a schoolchild can cope with such a craft, the main thing is the presence of desire and a little imagination. Well, if you are here now, reading this article, then your imagination and perseverance are in perfect order.

At the end of the article, I want to tell you another master class on knitted crafts.


Hot stand
You will need 50 plastic caps and crocheting thread of different colors.


Here, too, everything is banally simple - you need to tie each cap separately, then sew them in the shape of flowers, add a little fancy knitting. Done, now you can give it to someone or start using it yourself.

History of knitting
The facts of history cannot be precisely clarified, because many centuries ago people knew and appreciated this craft. Most likely, the monks wrapped something around the sticks, after which this activity began.

There were rumors that one sock was found during excavations in the tomb. I don’t know how it was preserved there, since then I have been tormented by one question - “what kind of thread is this, since it has not disappeared for so long?”


Dear ladies, I wish you to remain so caring, beautiful and wise always. Make beautiful knitted crafts with your own hands using your skills, or simply by looking at our article. Thank you for your attention, and see you here again soon!


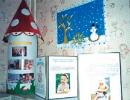
Photos of knitted crafts


Knitting for the home makes a double accent in the interior: a harmonious combination of natural materials and amazing craftsmanship. Handmade items in the interior allow us to create a cozy, warm atmosphere in our home as opposed to cold standard interiors. Beautiful knitted items in the interior of the house are full of sincerity and harmony, and reflect the ideals of family values.
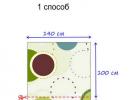
Knitting for home. Do-it-yourself plaid with knitting needles.
In order to knit such a blanket you do not need to be a super craftswoman. If you know how to knit scarves, then this blanket actually consists of stripes connected to each other.
 You can choose those patterns for stripes that are convenient and suitable for you to knit.

From the wrong side we sew a fleece lining to the knitted fabric.

We crochet the edges of the blanket. A similar blanket can be made from old knitwear.

Knitting for the home is suitable for those of us who enjoy wearing home-knitted sweaters and are ready to sit all night by the fire, admiring the shine of the stars.
Knitting for home. Round rugs photos and diagrams.
We all know round knitted rugs. Crocheting a circle is a basic skill. But we can give this rug a more modern look.  We can simply connect knitted circles together, or we can make a butterfly.

Or an owl - after all, this rug is still the same simple crocheted circles.

Or you can use the following pattern to knit your rug:

The secrets of a stylish interior with handmade items lie in careful planning of the color scheme and functionality of each item. The primary colors of a handmade interior are taken from nature: the color of unbleached yarn, bark, leaves and earth. This color scheme is most harmonious for the interior.

Natural colors of knitting for the home create a calm, peaceful atmosphere. Handmade items merge with the space of the entire room. They don't shout about their beauty. And only a loving, attentive eye can appreciate all their elegant sophistication.

Simple, functional furniture typical of modern design creates practical but laconic interiors for us. What this room needed to be truly beautiful was at least one beautiful handmade item. For example, like this knitted rug “Owl”. You can use knitted circles or a pineapple knitting pattern to create such a rug.

Knitting in the interior of the house.
Small items decorated with knitting are very popular in interiors, where enough attention is paid to natural materials and individual style. 
Knitted elements can be simple and very small, so as not to create a chaos of colors and textures.
 But how nice it is to take such a kitchen towel in your hands and feel its uniqueness and warmth.

Look, all these knitted items speak of the idea of friendliness, delicacy and warmth.

Knitting in the interior is so popular that we can meet cute ones in the most unexpected places in the house.
 Not every housewife will be able to knit a stylish item that would adequately decorate her home. But you can start with small items and simple knitting patterns.

Take a closer look; the strict geometric shapes of this stool take on a completely different meaning when this knitted cover is put on it.

Every cute little thing like these carries friendly information about the personality of the owner of this house.