Makeup for beginners for every day. Everyday or evening make-up: step-by-step photo tutorials for beginners Make-up lessons as a make-up artist
Many people have to resort to the services of a makeup artist only in cases where they are planning some kind of gala event. What to do if you always want to look beautiful? To tidy up your image, you need to learn how to beautiful makeup. In fact, there is nothing complicated here. The main thing is to purchase high-quality cosmetics, know your skin type and face shape, and carry out all the steps step by step. Watch photo and video tutorials for beginners, follow the technique and you will definitely be able to make a flawless make-up!
Modern foundations are available in various shades. You need to choose a tone in daylight. Before you buy foundation, you need to apply it to your cheek and draw a line down to your neck. If it is noticeable and looks unnatural, you should continue choosing and purchase the option that will blend with the skin.
When applying a base with a tinting effect, there is no need to abruptly end the line on the chin. The cream should be applied to the neck area and blended. This technique will remove transitions and prevent the “mask” effect.
It is advisable to use foundation when you need to hide obvious skin defects. If there is no need for thorough concealment, it is enough to apply concealer or corrector pointwise.
For normal and combination skin choose a gel foundation that has moisturizing properties.
For oily skin with red spots, BB (bibi cream) is ideal, as it copes with masking imperfections and moisturizes. If there are no obvious defects on such skin, use a powder coating.
How to apply foundation correctly is shown in the photo:
Brows
Correctly shaped eyebrows make the face more attractive, expressive and highlight beautiful makeup. You can transform your eyebrows yourself. To do this, you need to prepare a special brush, pencil and shadows.
How to make up eyebrows step by step:
- Comb them with a brush.
- Determine their highest point.
- Fill in the gaps with a pencil.
- The eyebrow should gradually taper.
You can replace the eyebrow pencil with special shadows. If your eyebrows are not devoid of thickness, use a dry brush. There is no need to finish drawing them; it is enough to paint over the gaps with shadows to match the color of the hairs.
Rare eyebrows should be slightly wetted and a thick layer of shadow should be applied to them, then combed with a brush so that they are distributed along the entire length. This will also help eliminate excess.
If you are just starting to learn makeup lessons for beginners, you should choose eyebrow shadows in two tones of brown.
Filling the gaps between hairs is not easy without a good soft brush. It is desirable that it be made of natural pile.
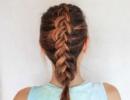
In the photo you can see what the eyebrows look like after shaping:


Eye makeup
Eye shadows should be super pigmented. They should leave a clear imprint on the finger and cast rich in color. You should test them before purchasing.
These shadows are easy to apply to the eyelids and have good longevity. There should also be no difficulties with shading.
Another good option- These are baked eye shadows with a beautiful shimmer that will play shades depending on the lighting.
How to do eye makeup step by step
- Before applying shadows, cover your eyelids with a special base, which will prevent them from rolling.
- Apply the darkest color of eyeshadow to your brush.
- Make a mark in the form of a dot above the crease of the eyelid and stretch it along the entire length of the eyelid.
- Paint the outer corner of the eye with the same color. Blend all the transitions with the appropriate brush.
- Apply light shadows with a pearlescent tint to the moving eyelid. Mix dark and light colors, then blend them. You should have a slight transition from light to dark.
- Apply the lightest color from the palette under the eyebrow.
- Apply dark color to a blending brush and line your lower lash line.
- Fill in the interlash area with black eyeliner. It is desirable that it has a creamy texture and can be shaded without problems.
- Cover your eyelashes with a layer of mascara.
How to do this eye makeup step by step, see the lessons in the photo:

Applying lipstick
Applying lipstick is much easier than applying eye makeup. If necessary, you can correct the lip contour with a special pencil. It is important that its shade matches the color of lipstick or gloss.
Apply lipstick from the center to the edges. It is best to perform these actions with a brush. After applying lipstick, blot your lips with a tissue. This will help eliminate excess.

If your lips lack volume, or, on the contrary, you want to emphasize this feature, apply lip gloss over the lipstick.

Blush
When mastering makeup lessons, you need to be sure not to ignore such an important stage as applying blush.
You need to choose them in accordance with the overall color scheme of the make-up. You should not apply them in a generous layer; the blush should be natural. Use a large soft brush to apply blush.
How to apply blush to different face shapes photo:

As you can see, makeup lessons for beginners do not involve any difficulties. If you choose the right color palette and perform all actions based on the photo, you will get a flawless make-up.
Any master class for beginners is carried out step by step and consists of several stages.
- Facial cleansing.
- Hydration.
- Application of primer.
- Applying foundation.
- Correction of face shape.
- Masking flaws.
- Drawing the eyes.
- Applying blush and lipstick.
Now let's look at each action in more detail. This is very important, because it is quite difficult to perform professional makeup for beginners; any missed detail can ruin the entire result.
Applying foundation
 A cream or special base is applied only after cleansing and additionally moisturizing the face. It is also advisable to apply a primer, which will help even out the texture of the face and hide minor skin imperfections. You need to apply the tone using a brush, sponge, or apply it with your fingers (you should choose a more familiar method).
The application technique is always approximately the same and includes three stages.
- Apply the cream pointwise, in small quantities, to the nose, forehead, chin and cheekbones.
- Using light, slightly patting movements, distribute the base from the center to the hairline. Be sure to make sure that there are no clear boundaries between your skin and the foundation.
- Correcting the shape of the face. You can understand how to do this at home yourself by watching the video tutorials below.
Experienced makeup artists say that eyebrows hold up the entire face. In reality this is true. It is especially important to take this fact into account when doing makeup for beginners for every day.
 We correct the shape of the eyebrows step by step:
- Comb the eyebrows down.
- Using light movements, paint over the gaps in the direction of hair growth.
- We draw the tails of the eyebrows especially carefully.
- Using a brush, distribute the pencil along the length of the hair.
- Apply fixing gel.
 Shadow application technique:
- Using a damp brush, apply shadow along the bottom of the eyebrow and blend it towards the bridge of the nose.
- We apply a new portion of shadows to the top and extend the tapering tail to the temple.
- Carefully comb the eyebrows with a special brush.
- Fix with gel
Important! All movements should be smooth, gaps should be filled with stitches, imitating your own hairs.
Advice. Makeup for a beginner is best done with the help of shadows; with this method, a natural eyebrow line is obtained easier and faster.
This video master class clearly shows how to shape eyebrows at home:
Eye makeup
 The design of the eyes can be very diverse. Consider the basic rules of makeup for beginners at home:
- You should start with a base for the shadows; it will ensure even distribution and prevent them from rolling off.
- Shadows must be applied pointwise and blended with a brush.
- There is no need to paint over the eyelid with one color; you should use at least 2 shades.
- The eyes will be more expressive if you draw the space between the eyelashes with a pencil or shadows.
- Mascara should be applied at the very end.
You should also pay attention to the following video master classes:
Spectacular evening makeup:
Hollywood Makeup:
Applying blush
A natural blush on the cheeks refreshes the face, making it more youthful and sculpted. To properly highlight your cheekbones at home, you just need to adhere to the following rules:

Lip makeup
 This stage completes the master class. For daytime makeup, it is enough to apply gloss on your lips; for evening makeup, you can use bright shades.
Application technique:
- Apply foundation to lips to fill in hollows and wrinkles. Then lipstick It will go on smoother and last longer.
- Draw an outline using a brush or pencil (its shade should match the color of your lipstick).
- Using smooth movements, spread the lipstick over the surface of your lips, then apply another layer.
- Apply highlighter or gloss if you need to make your lips look fuller.

The following video master class clearly shows how to do lip makeup step by step at home.
After you watch video tutorials on makeup for beginners, facial design will seem surprisingly simple. Now you can do makeup for any occasion at home: for work, a party, for video and photography. And finally, we suggest you look bad advice, and maybe somewhere you can recognize yourself.
Not always and not everyone has the opportunity to pay for a personal makeup artist and contact him every day to tidy up his image. Many ladies solve this issue on their own and do their makeup at home. You can learn how to do beautiful makeup; there is nothing super complicated about it.
Makeup tutorials for beginners are easy to learn. It is enough to know your skin type and determine the oval of your face. A little orientation and understanding of how colors combine with each other. And do the application itself step by step and do not confuse the stages.
Makeup stages:
- Cleansing.
- Foundation.
- Eyebrow shaping.
- Eye makeup.
- Lipstick.
- Blush.
Selecting the tone
Today, stores offer a large selection of foundation creams with various shades, these are yellowish, and pink, and creamy, almost chocolate, and even olive. In order to choose the right tone for your face and make your skin look natural, there are several secrets.
Lighting
You need to select a foundation in daylight; it is this lighting that helps you choose the right combination of skin tones and cream.
Tone selection
Before purchasing, apply foundation to your cheek and draw a line down to your neck. If the cream is noticeable, stands out and looks like an unnatural stain, then this tone will not work. Such a cream will add artificiality and will look vulgar, especially for daytime makeup. The cream should blend into the skin and be almost invisible.

Application
It happens that a girl has a different tone of color on her face and neck. In this case, it is more correct to select a foundation that matches the shade of your face, and when applying makeup, apply the cream to your neck as well, so the color of your face and neck will be the same.
The photo clearly shows the correct application of foundation.

Cream lines
When applying foundation, do not abruptly cut off the line on the chin. It is better to apply the cream up to the neck and blend it, this will hide all the transitions and there will be no feeling of a plastered face.
Images
If you wear makeup and are trying to achieve a certain look, you can choose a foundation that is a shade darker or lighter. True, this technique is best used in evening looks; it is not advisable to do this for daytime natural makeup.
Eyebrow care
Neatly designed eyebrows always only emphasize the beauty of a girl. It's easy to do this at home. Makeup artists advise maintaining the shape of your eyebrows at all times.
You will need:
- eyebrow brush;
- pencil;
- shadows.
Lessons step by step:
- Comb your eyebrows with the brush down towards the pupil.
- Determine the highest point of the eyebrows as desired.
- Use a pencil to fill in the gaps in the eyebrows, and pay closer attention to the highest point.
- Comb again and the pencil will be distributed along the entire length of the hair.
- The eyebrow should end in a thin tail, which gradually fades away.
- The inside of the eyebrow should be a little lighter, so it is better to draw the eyebrow from the outside, and then use a brush to comb the pencil from top to bottom.
You can also shape your eyebrows using shadows.
If you have thick eyebrows, it is better to take a dry brush; for thinner eyebrows, you can moisten the brush a little with water. Thick eyebrows there is no need to finish drawing, just slightly adjust the color and fill small gaps with shadows to match the eyebrow.
But for sparse eyebrows, the shadow should be applied in a thicker layer. And be sure to comb your eyebrows with a brush. This will evenly distribute the shadow along the entire length of the eyebrow and remove excess.
The photo will show how the appearance has changed after registration:


Eye makeup
- To begin, apply an eyeshadow base to your eyelid. This is optional, but the shadows will stick better. A base is a foundation for the skin.
- Then apply the most to the brush dark tone from the selected palette.
- Place a point above the crease of the eyelid and stretch it along the entire crease.
- Apply the same tone also to the outer corner of the eye, this part should be the darkest. Use a clean brush to blend the edges of the shadows.
- Next, fill the moving eyelid to the inner corner of the eye with a light pearl shade, blend it a little, and mix it with dark shadows. There should be a smooth transition from light to dark shade.
- Now apply the lightest color under the corner of the eyebrow.
- Using a clean brush, blend and blend dark and light shadows so that there are no sharp transitions.
- Using a dark color blending brush, apply under the lower lashes from the outer corner to the middle of the eye.
- Use a black pencil to color the space between eyelashes.
- Apply mascara.

You can watch the video and photo for more details:
Applying lipstick
The technique is simple. If necessary, the lip contour can be adjusted using a pencil. The color of the pencil should match your lips or lipstick. It shouldn't be visible. The contour should also be shaded a little.
Lipstick is applied from the center to the edges. It is better to do this with a lipstick brush. After applying lipstick, it is advisable to blot your lips with a napkin to remove excess.

If you apply a transparent, colorless gloss on top of the lipstick, your lips will appear fuller.
When choosing lipstick in a store, be sure to take into account the shade of your eyes; if you have cool-colored eyes - gray, blue, green, then it is better to choose a lipstick color with a cool tone too. For brown eyes A warm shade of lipstick is perfect.
In addition, consider what kind of hair and skin color you have - light lipstick colors are suitable for fair-haired and fair-skinned people. But dark-haired and dark-skinned girls can safely experiment.

More details in the video:
Blush
Makeup tutorials for beginners also include blush application. This is the final stage of makeup.
Blush should be selected to match the color scheme of all makeup and clothing. It is not advisable to apply a large number of them. Blush should lie naturally. They are not a corrector for facial imperfections. It is better to apply blush with a soft, large brush.
To remove excess blush, also use a large brush, just a clean one.
The photo shows the correct application of blush on different face shapes:

As you can see, putting on makeup correctly is not difficult. It is important to maintain the color scheme, learn to select tones and not overuse bright colors. This is especially true for daytime makeup.
Every girl wants to learn for beginners at home. It’s not always possible to go to a salon, and it’s a little expensive. But a woman wants to be beautiful 24 hours a day. In addition, you must determine your type of appearance, because makeup for fair-skinned and dark-skinned girls may differ. Knowing this, you will be able to perform makeup techniques correctly. Therefore, you should learn everything, and makeup lessons for beginners will help with this.
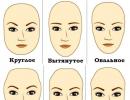
Determining your face shape
If you know how to determine the structure of your face, as well as existing flaws, you can easily correct it with makeup. To find out the shape of your face, you should remove all makeup, comb your hair back, and take off your glasses. Now go to the mirror, it is better if it has a magnifying effect. Look at the outline of your face. Determine which geometric figure your face shape looks like:

- Circle. Defined by expansion in the cheekbone area. To correct such a face, you need to visually make the cheeks not so large. To do this, on the sides of the face and in temporal region A darker color of foundation or powder is applied. The center of the face (forehead, nose and chin) is highlighted. Attention is focused on the eyebrows.
- Heart. The forehead and temple area are expanded relative to the jawline. The cheekbones are set high, but do not protrude. To make your face appear narrower, apply a darker foundation color to the sides of your forehead. Cheekbones, on the contrary, need to be made lighter.
- Pear. In this case, the forehead is narrowed, and the chin and jaws are wider. To do this, darken the sides of the jaw. To make the forehead appear wider visually, its sides are highlighted.
- Oval. An oval face has no pronounced flaws; its lines are smooth, with regular transitions. This face shape is considered ideal, and other shapes follow this type.
- Elongated oval. The height of the face is greater than its width. To hide such elongation, the upper part of the forehead is darkened just below the hairline. The chin area is also darkened, approximately up to the cheekbones. The cheekbones are highlighted.
- Rhombus. Here the cheekbones protrude significantly. Other parts of the face: forehead and chin are narrowed. A darker color in relation to the base is applied to the cheekbones, and the chin is highlighted. The blush is applied to the most convex place on the cheeks and shaded closer to the corners of the mouth. Highlight the eyes.
- Trapezoid. With this form, the jaw is widened and the forehead is relatively narrow. The lower jaw is darkened. A lighter color is applied to the corners of the forehead. Blush is applied from the temple. The lower cheekbones are decorated with blush.
- Square. The face is characterized by a massive forehead and jaw, while the shapes are all angular, reminiscent of a square. The darker color is applied to the corners of the forehead and jaw. The skin on the chin should be lightened. Blush is applied from the temples to the corners of the mouth.
- The triangle is defined by a wide forehead and a pointed chin. To give a face oval shape, you should darken the temples and the protruding part of the chin. The area of the side cheekbones is lightened. In this case, blush of two colors is used. At the same time dark colors shade the upper cheekbones, and lighter ones are applied to the hollow of the cheekbones. The emphasis is on the eyes.
Features of foundation
 If your skin is imperfect, there are circles under the eyes, spots and pigmentation, then you should master the technique of masking defects. It will be better, of course, if you cleanse your skin first, since even carefully disguised defects can look unnatural.
Before applying the makeup base, you should cleanse your face with lotion or milk. The base consists of emulsions that allow makeup to stay on the face longer. After this, foundation is applied. It is worth noting that if your skin is young, elastic and, most importantly, clean, you should not use foundation so as not to clog your pores.
The foundation should be good quality, when choosing it you need to rely on the following factors:
- It should match your skin color. Apply cream to inner side wrists, the tone should blend with the color of your skin.
- Good manufacturers produce foundations for every skin type. Therefore, when choosing a foundation, check what type of skin it is made for.
- A good foundation cannot be too cheap; buy only proven products.
If your skin is young, do not buy silicone-based foundation, as it clogs pores.
 For mature women, such a product is necessary: it not only evens out the complexion, but also smoothes out fine wrinkles.
When foundation is applied to the face, it is usually set with powder or thermal water. The powder makes the skin velvety, and the thermal water moisturizes.
Blush is applied to the face in a small amount; it should blend in with the complexion. It is better to use a brush angled to the side. Apply blush to the protruding part of the cheeks and shade towards the edge of the face.
Evening makeup for beginners
Simple everyday makeup is done quickly, so you shouldn't focus on it. You can go straight to evening version(step by step).
After the face has been cleansed, foundation, foundation and powder have been applied, proceed to eye makeup.
Sequence of actions:

- Do your eyebrows first. If you are going to visit a restaurant, then you should prepare your eyebrows for this in advance by correcting them yourself or in a salon. Eye shadow or eyebrow pencil will help make them more charming. If your eyebrows are already expressive, then apply a little gel to them so that the eyebrows lie perfectly. Shadows are used to highlight the eyes. If this is evening makeup, then you can use two or more colors. If you are a brunette, then the ideal color for you will be gold in combination with a brown tint; for blondes, a combination of silver and dark gray will suit you. If the corners of the eyes are closer to the nose, you need to apply light shadows. This will give the image freshness.
- Let's move on to the eyelashes. To create a dramatic look, apply eyeliner along the upper eyelid close to the lash line. It is better to line the lower eyelid with a pencil. The next step is applying mascara. For evening makeup You can make your eyelashes thicker.
- Before applying lipstick, outline your lips. The lip pencil should be slightly darker than your natural color. After this, shade the lipstick with a brush or use lip gloss. If you want to add a sensuality to your look, cover your lips with a clear lipstick or gloss.
- The makeup is almost ready, all that remains is to correct the image with powder and blush. First, blush is applied to the cheekbones. After this, powder is applied in small strokes to areas where an oily sheen may appear (forehead, wings of the nose and chin).
Evening makeup for beginners is ready.
Makeup Brushes:

- Buy a set of quality makeup brushes, there may not be many of them. The main ones include brushes for applying eye shadow, eyeliner, blush and foundation.
- Brushes should be soft.
- Since you are new to this, invest in a foundation sponge.
- Buy an eyebrow kit, even if you correct them in the salon, you know very well how quickly they grow back. Therefore, just in case, you should have tweezers.
- Don't forget about proper care and storing brushes. Remember that they need to be washed with soap from time to time.
Face. As mentioned above, foundation is produced according to skin type. When choosing it, you need to be guided by your skin type. So, for dry skin it is better to choose a liquid foundation, for oily skin it is better to choose a powder-based or mattifying one. For older women, a product with a moisturizing effect is suitable.
If you have dark circles under your eyes, you should apply a lighter foundation. The foundation should be chosen to match your skin color. Don't buy pink foundation, it will make your face unnaturally red. Concealer is also available for sale. This is a foundation that is applied pointwise. It is intended to correct skin defects.
Rules for applying blush:
- Blush is applied to the apples of the cheeks, that is, to their most protruding part.
- If you can’t decide where to apply blush, then just smile. You will find the most protruding part.
- When purchasing blush, remember that cream types are suitable for smooth skin, but powder blush can disguise skin unevenness, acne and wrinkles.
Features of applying shadows and using eyeliner:
- When choosing the color of shadows, it is not necessary to be guided by the color of your eyes; now this is no longer relevant.
- Eyeliner makes them wider and more expressive.
Lips can be distinguished as follows:
- When choosing a lipstick color, the main thing is not to make a mistake. Don’t chase fashion, the main thing is that the color suits your skin type and color. If you are a dark-skinned girl, then warm shades will look good on your lips; if you have a pale face, it is preferable to use cool colors. You should also know that light colors make lips fuller, dark ones narrow the contour of the lips.
- Use lip balm occasionally to keep your lips healthy and beautiful.
These are makeup tutorials for beginners. These makeup lessons will help you learn the structure of your face and the appropriate way to apply makeup. Makeup for beginners and its lessons are very important for women who are inexperienced in this matter.
Every girl sooner or later begins to get acquainted with the basics of makeup. You can understand this interesting matter with the help of makeup lessons for beginners, which will help you not only learn more about cosmetics, but also give practical advice about how to always look good.
Learning makeup from scratch is not as difficult as it might seem. But for this you will have to acquire an initial “arsenal” of cosmetics. This set can be called irreplaceable and even mandatory.
First you need to choose a suitable product that will create a complexion and correct it. It all depends on your specific needs and needs. For light skin makeup and barely noticeable tone, you should choose BB and CC creams. Such products are well suited for young skin without obvious problems: acne, acne marks and others.

If the skin requires a more serious correction, then you should pay attention to foundation creams different density and shade. With the help of testers in the store, you can easily select the appropriate composition.
The rhythm of modern life is very fast, many women are faced with such a problem as dark circles under the eyes, which form due to fatigue and lack of sleep. For such an occasion, it is important to always have concealer in your cosmetic bag. It will help refresh your look in a couple of touches. You need to choose a concealer a little more light shade than the underlying facial skin.
The next indispensable product in any beauty’s makeup bag is powder. With its help you can achieve a matte well-groomed skin. If we talk about makeup for beginners, then makeup artists recommend having 2 types of powder: loose or in balls for home use and compact for carrying with you. By the way, when oily skin there is no need to powder yourself several times a day, because this “clogs” the pores. It is much more practical to use matting wipes that will absorb excess oil from the skin.
Not all girls can boast of a natural blush, which makes makeup look so advantageous, and therefore it makes sense to get blush. They will help highlight your cheekbones and also visibly refresh your complexion. You need to choose the color of blush to suit your color type. For example, peach tones are most often suitable for brunettes with dark skin. Brown-haired women look good with powder rose blush. Blondes should resort to warm pink blush. However, in in this case There are no clearly defined recommendations, since a completely unexpected color option may suit each unique appearance.
Forming a cosmetic bag: add brightness!
It's time to set the accents! The main place on the face, of course, is occupied by the eyes. You can make them bright, expressive and deep not so much with the help of a pencil and mascara, but by successfully emphasizing the eyebrows. To do this, you can use a special eyebrow pencil or shadow.

As for mascara, it is important to find “the one,” that is, ideal in every way. Lengthening or voluminous, black or colored, with a natural or silicone brush - every representative of the fair sex will find something that suits her.
To highlight your eyes, you need to have at least 2 pencils in your makeup bag: a lighter one and a darker one. If we talk about shadows, then let it be 1-2 palettes with different shades: both basic and bright.
How can you do without lipsticks and glosses? Let there be at least 3 tones in stock: nude, red and natural pink. The rest is a matter of taste! Fuchsia, raspberry, plum shades, ombre lipsticks - the choice is not limited to this.
Makeup for every day: simple art, basics
Theory is a useful thing, but the most interesting thing begins with practice. There are basics of makeup that will help you transform in 10-15 minutes. They are accessible even for dummies, so don’t think that learning from scratch will be difficult.
You can often find video tutorials on the Internet. professional makeup, where the makeup artist carefully sculpts the face. But such options are only acceptable for photography or a scene, and therefore there is no point in “suffering” so much for makeup. The simpler the better!

As already mentioned, the dominant place in makeup is given to the ideal tone. This is typical for both beginner makeup at home and professional makeup.
Make-up should begin with an even application of tone. The face must be well cleaned, which will help the makeup last all day. This is a tribute perfect makeup, which even the most “zero” in cosmetics should know about.
The selected product (foundation or BB cream) is applied to the skin with light movements. It is important not to overdo it: 1-2 drops of the product are usually applied to the face. You can distribute the tone in a way convenient for yourself: with a brush, an egg beauty blender, a sponge, or even with your hands. By the way, the makeup artist’s advice is this: your hands distribute the cream well over your face, since their warmth makes the texture of the product more pliable.
But to give your makeup the right to last longer, you can spray it with a special setting spray at the end.
If there are dark circles under the eyes, then you need to disguise them. The product is applied pointwise under the eyes (4-5 dots are enough), after which it is “driven” into the skin. It is important not to stretch the thin epidermis under the eyes, so as not to develop premature wrinkles.

Makeup for beginners continues with the competent application of blush. To do this, you will need a brush with slightly angled bristles. This will help make the lines clearer and at the same time shaded. How to find a place to apply blush? Many makeup tutorials advise pulling in your cheeks and applying blush to the bulges that form. Indeed, such a method has a right to exist, but it is not universal.
For example, a higher placement of blush will suit a round face: above the cheekbone, mainly on the cheek. A square face needs emphasis shifted towards the nasolabial fold. Blush for oblong and triangular face are applied with a straight horizontal line along the cheekbones.
But all the most interesting and exciting things are yet to come. It's time to feel like a real creator.
Place accents: make-up artist as artist
For beautiful and professional eye makeup, you will need several products step by step: mascara, eye and eyebrow pencil, basic shadows.
Eye design begins with the application of shadows. But few people know that the surface of the eyelid must be prepared for this. Every second woman's eyelid skin can be oily, which is why the shadows quickly roll off. What can be done in this case? For example, makeup experts recommend lightly powdering your eyelid. This advice is quite logical and effective, but the powder has a drying effect, and the skin on the eyelids is delicate and sensitive. This may lead to her premature aging. It is much better to use special mousses or gel bases for the eyelids.
For every day you need to choose calm colors of shadows. And let it be 1 tone: beige, milky, creamy, creme brulee, coffee with milk. Trend modern makeup is such that more and more makeup artists are leaning towards shadows without glitter and pearl.

The shadows are applied with a brush step by step: from the inner corner of the moving eyelid to the outer one. If some of the shadows have crumbled under the eyes, then you can remove such unwanted residues with a powder brush.
The eye makeup master class continues with the use of an eyebrow pencil. It emphasizes the natural line of the eyebrow.
You definitely need to highlight your eyes. You can use a pencil to emphasize the entire upper eyelid, slightly extending beyond its line from the outside. Let the lines be well shaded and soft. Most pencils have a shading tip.
But the lower eyelid needs to be drawn only halfway: from the outer edge to the middle of the eye. The line should be smooth and barely noticeable.
No makeup look would be complete without the final touches: mascara and lipstick. Mascara should be applied from the bottom up, slowly pulling each section of the eyelashes. For the upper eyelashes, 2 layers of mascara are enough, for the lower ones - one.
Careful application of lipstick is done with a brush; it is provided in glosses. It is allowed to go slightly beyond the edge of the lips, but not more than 0.1 mm. This will make your lips fuller and more expressive.
Such makeup lessons for beginners at home are a real lifesaver for all those who thought that beautiful makeup was incomprehensible and complicated.
Video - Express makeup at home