Crafts from cones and pine branches. Beautiful DIY crafts from pine cones. Decorative basket of fir cones
Hedgehog made of cones
If you find a lot of beautiful pine cones while walking with your baby, then you can make this funny hedgehog that will cheer you up in winter, reminding you and your child of an autumn forest or park.
For production we will need:
- Several cones, approximately equal in size.
- Plastic stand.
- Black smooth pebble.
- Acorns.
- Plasticine.
Let's get to work.
- We sculpt the body of a hedgehog from white plasticine.
- We attach a black pebble to the sharp nose, form a small strip from red plasticine and make a mouth for the hedgehog, and make small eyes from black plasticine.
- We carefully place the cones along the entire back of the hedgehog.
- Having moved away from the eyes, carefully attach the acorns. If there are no acorns, then small spines for the hedgehog can be made from black plasticine.
- Place the finished figurine on a stand.
Can be done hedgehog made from cones simpler, like this.

or something like that


Lion made of fir and pine cones
Materials for each body part: 
- 1 large fully opened pine cone;
- ears and muzzle - 3 large acorn caps;
- nose - a large scale from a fir cone and a small chestnut, several times smaller than an acorn cap, or a black peppercorn;
- eyes 2 peppercorns, a small piece of birch bark;
- mane - birch bark or thick paper;
- body: 1 long large fir cone;
- front paws – 2 pine sticks and 2 small pine or spruce cones;
- hind legs - 2 two small pine or spruce cones of the appropriate shape;
- tail - a small fir cone, a long flexible stick or a piece of string.
All parts are glued together with superglue.
Performance


Leo is ready! 
Baba Yaga made of pine cones
 Surely at school you were asked to do . Let's try to make a fabulous Baba Yaga from pine cones and twigs.
We will need:
- Stand – a shoebox lid or a small wooden plate may work
- Plastic or cardboard disposable cup. Brown is better. We will make a stupa out of it
- Double-sided or plain transparent tape
- Twigs or straws for covering our stupa
- A long twig and old thread or rope for a broom
- 2 pine cones - body and head. Try to find a rounder bump for your head
- Old rope or hair thread
- Two bent branches - for hands
- A piece of red fabric - for a scarf
Let's get started with the craft:

- We take our mortar cup and cover it with double-sided tape on the top and bottom. (If you don’t have double-sided, you can take a regular transparent one and fold it in half with the adhesive side facing out). We cut the branches and cover the glass. Additionally, the top and bottom can be tied with threads. Fill halfway with moss or cotton wool. The stupa is ready.
- We stack the cones one on top of the other so that we get a body and a head. We wind them together with a thin black or brown thread, hooking it onto the scales. We also tie the handles. We put it in a mortar.
- We make hair from threads or ropes and glue it onto the head so that the blunt side of the upper cone (face) remains open. We tie a scarf from a piece of fabric. Draw eyes on white paper and glue them onto the pine cone. (Tip: look in a book at what the eyes of people and animals look like. This will help you draw correctly)
- We tie a whisk of thread to the end of a long branch (you can tie pine needles). We stick the finished broom into the mortar.
- We put the moss on a stand and place the stupa with Baba Yaga there. The moss can be decorated with red hawthorn berries, or rolled into red plasticine balls. Behind our grandmother you can carefully place a pine branch with green needles for decoration.
- You can sit an owl next to Yaga. For it you will need a pine cone, any bird feather, drawn eyes and a beak.
- We take the cone with the blunt side up. From the found feather we cut off pieces for owl ears. Glue the cones to the top side a little from the back. Draw round yellow eyes and a beak and glue them on. On the side of the eyes, between the scales of the cone, we stick thin strips of feathers - these will be the eyebrows. We sit the owl in the moss next to Baba Yaga.
Ready.
Cockerel made of cones and plasticine
Even a baby can make such a funny chicken, of course, if his mother helps him a little in making the craft.
 For work we will need:
- One big shot.
- Plasticine.
- Two large white buttons.
- Plastic stand.
Let's get started:
- Let's treat the bump. To do this, carefully cut off the top and bottom of it with scissors.
- We form the head from yellow plasticine and sculpt the paws.
- We sculpt eye pupils from black plasticine and glue them onto white buttons (eyes).
- We take red plasticine, and from it we fashion a beak for the chicken and its crest.
- We attach the head of the figurine to the upper part of the cone, and the legs to the lower part.
- Place the finished figurine on the stand.
Craft from pine cones “Swan on the Lake”
Such a wonderfully beautiful swan can be made using a pine cone and decorative material. Invite your child to make such a craft; he will probably like both the creative process and the resulting swan on the lake.
 To make it you will need:
- One big and two small bumps.
- Plasticine.
- Two branches.
- Dry tree leaves.
- Colored cardboard.
- Gouache.
Let's start the work process:
- For a large cone, cut off the lower part a little.
- Let's sculpt a neck for a swan from black plasticine and attach it to the top of the pine cone.
- For the bird's head, you can use white or green plasticine. Form the head, make the growth with black plasticine, the beak with red, and the eyes with blue. Make a small stand from blue plasticine and place the finished swan on it.
- We cut out thin strips from green colored cardboard; they will serve as grass.
- We decorate small cones with thin strips of plasticine so that they look like reeds. Attach them to the branch using glue or plasticine.
- On plastic stand glue the reeds with plasticine, place strips of green cardboard using glue, and place the swan on a stand.
- Draw a lake with thick blue gouache.
- When the gouache dries, beautifully glue the autumn leaves.
It all depends on your imagination and desire, I will offer you a few more photo of crafts made from pine cones.
Crafts from pine cones
Summary: Cones and crafts made from them. How to make a children's craft from pine cones. DIY crafts from pine cones. Crafts from pine cones for children. Photos of crafts made from pine cones. Crafts from pine cones for kindergarten. Crafts from pine cones and plasticine. Craft from cones and acorns. Craft from a hedgehog cone. DIY autumn crafts. Craft made from natural materials.
Many people like to go to the forest to pick mushrooms. Do you like to go shopping for cones? Why is this necessary? Because you can make a lot of interesting and beautiful things from pine cones. In our area, the most common are spruce and pine cones. Most of all, the shape of the cones resembles the torso and body parts of animals and humans. Therefore, they are an excellent material for making volumetric crafts with your own hands.
For making crafts from cones, both opened and unopened cones are suitable, depending on the design.
To fasten the parts of crafts made from pine cones together, you can use glue or plasticine. Plasticine is more suitable for working with young children. Children of senior preschool and junior school age can work with glue.
1. Crafts from pine cones. Crafts from pine cones and plasticine
Even 2-3 year olds can take part in creating crafts from pine cones. Make the body and head of your crafts from pine cones; all missing parts can be molded from plasticine, completed with a marker, or made from twigs, leaves, acorns, feathers, etc.
People made from acorns and pine cones.
Autumn crafts made from pine cones and acorns are popular. The body is made from a cone, and the head is made from an acorn.


The skiers in the photo above have skis made from popsicle sticks painted with paint. Handles are made of chenille wire.
Instead of an acorn, you can use wooden beads when making the head. It is best to make clothes for little men from felt. To fasten the parts of crafts made from pine cones together, it is most convenient to use a glue gun.


Hedgehog made from pine cones and pine needles.
To make such a cute hedgehog from a cone, you need to stick bunches of pine needles under the scales of a pine or larch cone using a toothpick and plasticine. Then you can trim them a little, or you can leave them, but then it will be a porcupine. The hedgehog's face is made of plasticine and its nose is made of black peppercorns. Attach rowan berries and homemade mushrooms from twigs, plasticine and acorn caps to the hedgehog’s needles. We found this hedgehog on the wonderful website Kokokokids.ru


By the way, you can make a hedgehog from a pine cone even easier. This craft made from pine cones and plasticine is something a preschooler can do.


With a school-age child, you can make a more complex craft from hedgehog cones. You will need: a large number of opened pine cones, an unnecessary plate (bowl), bottle caps, a plastic bottle, moment glue (or any other), tape, paint. Detailed wizard for a class on making this autumn craft from pine cones, see the link >>>>

As you probably already understood, if you have some imagination, you can make a large number of crafts from pine cones and plasticine. Here are examples of just a few children's crafts made from pine cones and plasticine.
Crafts from pine cones "Hare"

Crafts from pine cones and plasticine "Turtle"
Making this craft from a pine cone and plasticine is quite simple, but at the first stage - preparing the cone - the child will need the help of an adult. Using pliers or a knife, you will need to cut off the top part of a well-opened pine cone. This will be the turtle's shell. After this, the child will have to mold the turtle’s head, paws, eyes and tail from plasticine.

Crafts from pine cones for kindergarten "Swan"
It's very easy to make a swan from a pine cone and plasticine. For this craft made from natural material, you will also need a small piece of cotton wool.

DIY crafts from pine cones "Crocodile"
Unopened pine cones can be used to make a cute crocodile. To make it more realistic, paint the cones green with gouache paint before starting work.

To make crafts from pine cones, you can also use feathers, doll eyes, filler for soft toys, chenille wire(so-called “fluffy” wire), felt and other materials. Here are some more photos of successful crafts made from pine cones for children.


2. DIY crafts from pine cones. DIY crafts from pine cones
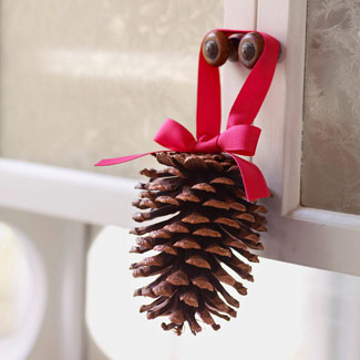
Crafts made from pine cones are well suited for decorating your home for the New Year and Christmas. They can be hung on christmas tree instead of toys.

or decorate your apartment with them.
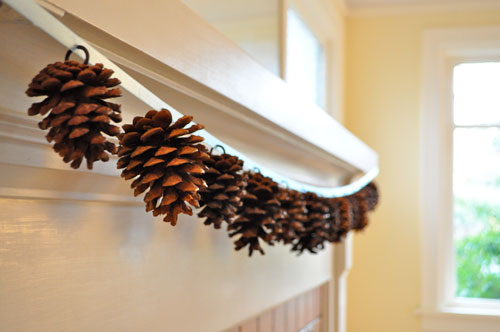
You can make a New Year's garland from pine cones,

and also decorate a New Year's gift with them.

Place pine cones painted with acrylic paints in a glass vase to create a beautiful and unusual decoration for your home.

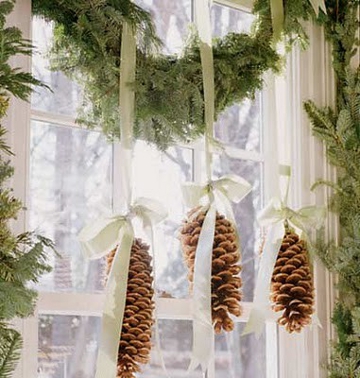
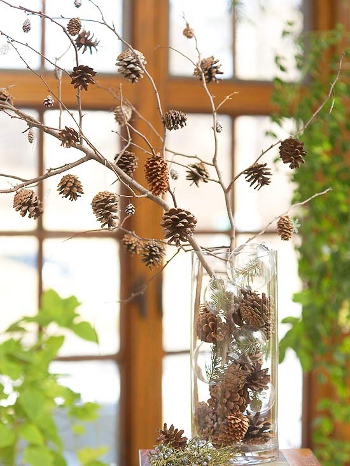
Another New Year's decoration made from cones for the home is tree branches decorated with small pine or fir cones. The cones can be painted with paint (white, gold, silver) or left as is. Place the branches in a glass vase, which you also fill with pine cones and small Christmas balls.
You can also make original candlesticks from cones. When making the second version of the candlestick from pine cones, an unnecessary disk (CD or DVD) was used. Detailed instructions for making this craft from pine cones, see the link >>>>

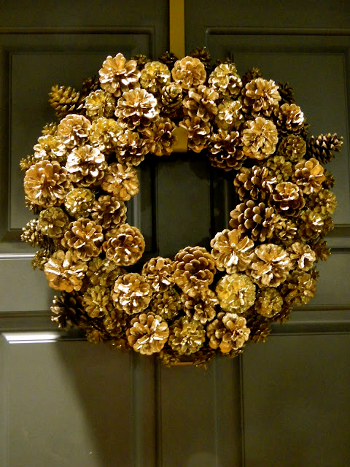
If you glue cones of different shapes and sizes onto a cardboard base in the shape of a circle, you will get a New Year's decoration - a wreath. True, you will need a lot of cones, so stock up on them in advance. The finished wreath can be coated with paint.

You will also need a lot of cones if you want to make another one original craft made from natural material - a Christmas tree made of cones.

To make such a beauty, make a cone-shaped base from cardboard or any other suitable material, then cover it with pine cones. For a detailed master class on making a Christmas tree from cones, see the link >>>>
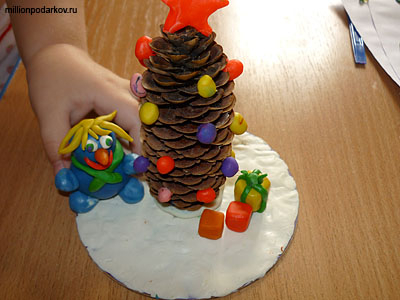
With kids you can make a mini Christmas tree from an open pine or fir cone. Attach the cone to the stand and let your child decorate it with multi-colored plasticine balls or small pompoms.

3. Crafts cones. Crafts from pine cones photo
Basket of pine cones.

To make this craft from natural material, you need to collect more cones in order to then select them according to size. The cones should be open. In the photo the basket is filled with flowers, but if you decorate it autumn leaves and bunches of rowan, it will turn out wonderful autumn craft. For detailed instructions on making a basket of cones, see the link >>>>
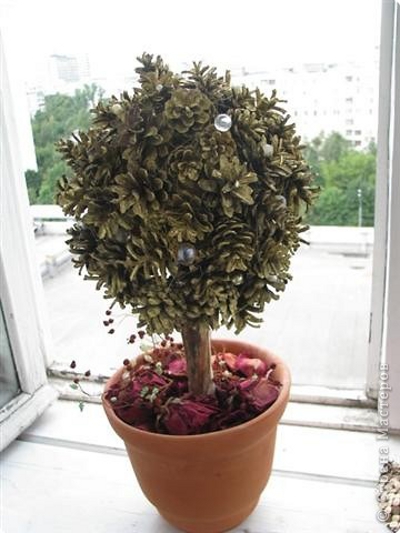
Tree of cones.
4. Crafts from pine cones for children. Crafts from pine cones for kindergarten
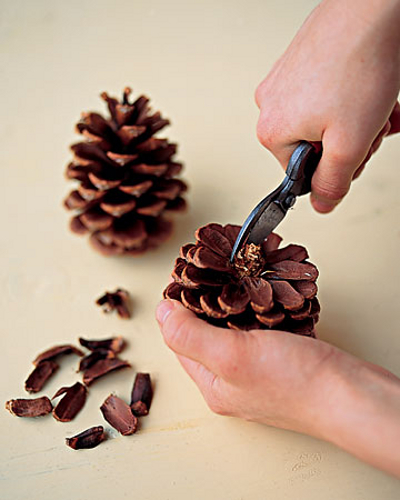
You can make DIY crafts not only from the cones themselves, but also from their scales. It is convenient to disassemble the cones into scales using wire cutters.
You can paste over family photographs with spruce and pine scales and then decorate the New Year tree with them. These look beautiful new Year decoration in combination with Christmas tree decorations made from pine cones.


The scales from the cones make wonderful flowers. Making such crafts from natural materials is very simple. You must first use pliers to divide the cone into scales, and then glue them onto a circle of cardboard. The easiest way to do this is to use a glue gun. You can glue a bead into the center of the flower for beauty.


You can then make a garland from these flowers.


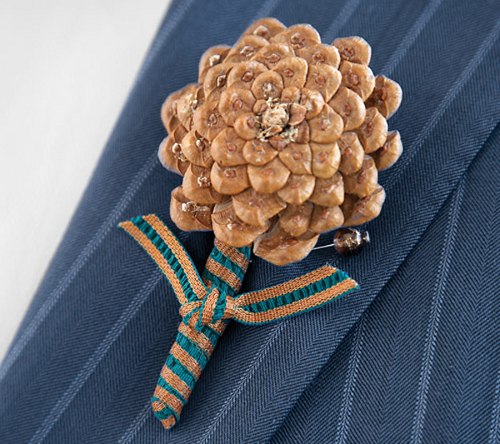
Also, if you cut off the “butt” of a pine cone, you can make a flower out of it that can serve as a brooch or boutonniere.
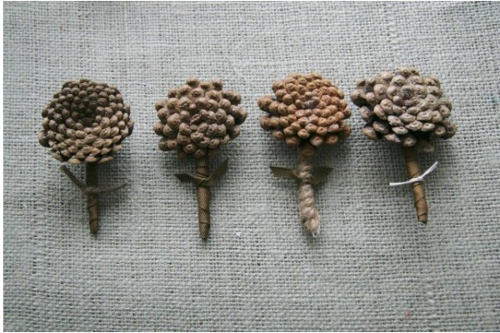
An everlasting bouquet of flowers can be made from pine cones. To do this, you need to cut them in layers with pliers and paint them with acrylic paints.

Material prepared by: Anna Ponomarenko
Other publications on the topic of this article:
So let's see any ideas I collected some crafts from pine cones for you today.
Craft idea
from shelled cones.
(7 new ideas)
If you disassemble the cone into scales (pull them out with pincers), then you can use these scales to lay out any picture (a fluffy dog, a natural landscape, or such a formidable owl.

Can be done paper cone... and using a glue gun(sold at a hardware store for $5) cover the entire cone with pine cone scales, overlapping each other (like a skull). You will get a Christmas tree. You need to start covering the cone with scales from the bottom of the cone... and gradually move row by row to the top of the cone.

Using the same principle, you can lay out plasticine turtle shell, or a hat mushrooms

Or very good idea which itself begs to be covered with cone scales - these are HEDGEHOGS. We sculpt the body from plasticine. We poke the back with sharp scales. And we form the muzzle from a bunch of panicles. The question is, what to make this bun out of? So I think I can try cut thin twigs from a regular broom...Or take corn cake and cut it with scissors into thin straight chips– gather them into a bun, bend the bun in half (the bend will be the tip of the nose). Next, we fluff this bent bundle... so that it spreads like a whisk on the sides - and with this spread we glue it into the nose part of the plasticine craft.

By the way, I was thinking - probably the muzzle can be made not from the natural material of corn leather... and cut from paper(small narrow strips) ... or take just threads (make a bun, bend it in half, wrap the fold line of the bun into a belly button nose). Perhaps the threads will need to be starched later so that they keep their rigid shape.

This children's craft is made using the same principle - SQUIRREL from pine cones and plasticine.

First the body is molded... then on the body with a pencil the boundaries of the zones are outlined. We will cover one zone with cone scales, and another zone with a small paper panicle (or natural materials).
When the body is ready, we separately sculpt a tail from plasticine... and its upper part is covered with cone scales. And we cover the lower part of the tail with white thin cut paper pile.
You can make an EAGLE from plasticine... or another bird - make plumage from the scales of a pine cone.

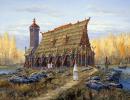
You can use these scales to lay out a HOUSE FOR FAIRIES. Making such a house is very simple. For this we need an elongated zucchini (you should not buy a fresh zucchini with thin skin, which can be easily pierced with a knife... but a garden zucchini that is already yellowed or dark green, the skin of which not only cannot be pressed through with a fingernail, but also not the first time with a knife. So hard garden zucchini is sold by grandmothers at the market. Walk along the market row, poke your fingernail quietly and choose. If your zucchini is not PEAR-LIKE in shape as in the photo of the house below - do not worry… your house roof will just have a slightly different shape (not so elongated, but more rounded). This will not diminish the beauty of your pine cone craft. And most importantly try to choose one that can be placed on your butt - and so that it does not fall... But if it falls, then it’s okay - you can just put some plasticine under its base.

You can leave the zucchini whole (do not remove the middle) - but be prepared for the fact that the zucchini may rot from the inside over time... Or you can cut off the lower butt part. Scoop out its contents with a spoon... and dry it in the sun so that its crust hardens with inside(this way your house will be eternal and will not rot).
We paint the zucchini brown (if you paint with gouache, then after painting, thoroughly spray the entire damaged zucchini with HAIR SPRAY, so the paint will stop staining your hands)
Details of doors, windows and rosettes above the doorway WE MAKE WITH HANDS. It's best to sculpt from polymer clay(plastics), which hardens in the oven.
BUT IF you don’t have plastic surgery, then will do salty dough (water + salt + PVA glue + flour + paper napkin). I add pva glue and a finely torn paper napkin to the salt dough so that the dough does not crack when it dries, but is smooth and holds its solid shape well.
OR you can mold all the details crafts from plasticine... and so that it does not float in the sun, it needs to be hardened. A suitable hardener would be canned varnish (from a hardware store)… or hairspray… or nail polish. The only one by-effect is that the figurine will have a shine from the varnish. But it's not scary. The main thing is that after the plasticine has hardened, do not try to PUMP it (the varnish crust may crack). Therefore, we will varnish the doors and windows that are already attached to the zucchini.
CRAFTS FROM THE TOPS OF CONES.
(take the top part of the cone)
And if you start peeling the cones from the tip - and leave the tops of the cones with scales. Then to such scaly caps You can glue round pads or pompoms. You put a ball of cotton wool (or padding polyester) into a square of canvas fabric, gather the edges of the square into a bundle and tie a string (you get a round knot (like a hedgehog in the fog from a cartoon). You cover this round knot on top (where the tie is) with a pine cone cap - with glue.
And you will get an acorn craft. Such cone-shaped acorns can be hung as decoration on a wreath made of willow twigs.

Instead of canvas bags, you can use half a foam egg... it must first be painted (for example, gold paint).

Or such a cone top can serve as a shell for a plasticine turtle.
Now let's move on to crafts made from WHOLE pine cones. We'll start with the birds... then we'll take the animals... and then the little people.
Birds made of pine cones
(pine and spruce)
PENGUINS.
Like this nice idea penguins from fir cones Requires plasticine and white paint. We sculpt a head and wings from plasticine and cover the belly with paint. Or you can make wings from corn cob cake.

OWLS AND CHICKENS.
Here in the photo below you can see that auxiliary material can be pieces of felt, cardboard, feathers and acorn caps(they can be used as bulging eyes of birds - turn the caps reverse side, paint it white and draw the pupils with a black marker.


If you put the cones on top of each other, you can make owl crafts like this. The wings and eyebrows are made from pieces of bark, the eyes and nose are made from paper. The paper circle for the owl's eye can be cut in a circle with scissors and threaded through these cuts - this way we will get expressive rays on the eyes of the owls from the cones.

And if you roll a pine cone in cotton wool pinched into the fibers, it will get this fluffy white color. From such fluffy cones you can make snowy owls, chicks, snowmen, or try making a fluffy dog.

PEACOAS AND TURKEYS.
Possibly from a cone make a peacock. For this craft you need thick paper for the head, and soft crepe paper for the tail feathers.

And here is another option from the same type of crafts. The principle here is the same, but the bird is no longer a peacock, and a turkey.

SPARROWS from pine cones
Here is another version of a bird made from a pine cone. The sparrow's wings are made from pieces of bark, and the head is a ball sewn from terry cloth (if you have piece of terry cloth, you can donate to the creation of this bird - fur fabric will also work). It’s better when the napkin is white...then you can paint the frontal part of the chick’s head with black paint. Plus, this is a bunch of fabric that was pulled back with a pinch, this pulled pinch was wrapped with thread at the base (so that it would be fixed) - and painted black. Beads were sewn or glued to the head.

Or you can make the head from a pompom. Take regular white threads and wind them into two holey circles... as you usually do with your own hands (Google it, you will find such a tutorial).
Or you can make a head for a bird from a regular foam ball. They are sold in craft stores, or you can order them from online stores (they are very cheap). And if you order from China on the AliExpress website... then it will be generally cheap.
The plasticine head will be VERY HEAVY, and the bird will fall...
But there is still something you can do ping pong ball heads.
And also the head can be felted from wool(sold wool for felting) ... also quite inexpensive. You need to put it in a bowl with warm soapy water - and roll it into a ball right in the water... as you roll the ball becomes denser and denser... (you need to roll it for 2-5 minutes, it’s a long time). And then we take it out and dry it. And we get a ball as dense as felt boots. It is light and holds well on the pine cone without weighing or overloading the craft.

Bird legs can be made from wire...wire can be obtained from large PUSHER CLIPS. Wings made of paper are attached to plasticine inside the scales.
HERONS, SWANS AND OSTRICHES made from pine cones.
Here are examples of TALL BIRDS made from long cones. The tail for the left bird in the photo below is made from strips of paper, which are covered with scales pulled out from the cone.

If you have feathers (pulled out of a pillow, for example), then you can make beautiful swans from the pine cones. Necks can be rolled out of plasticine and wire.

Here are more examples of crafts with feathers - ostriches made from pine cones. The neck and head are molded from plasticine. The secret of the stability of such thin and long necks in the wire that is hidden inside these necks (rolled in plasticine) like a metal frame... the end of the wire sticks out and it is this that sticks into the bump.

Thanks to the flexibility of the wire neck, it can be bent in any direction and give any bend to our pine cone craft (as in bottom photo). By the way, note that one of the birds is made in the form of a FLAMINGO... and in the background we see a pink one sheep made from cones.

HEDGEHOGS and MICE
FROM PINE CONE.
Hedgehogs from cones are made in two ways. Or we sculpt a muzzle from plasticine and attach it to a pine cone. Or we cut out this muzzle from felt (cardboard). Glue the button eyes and glue the felt to the pine cone.


Here are ideas for creating bears from pine cones. Coarse postal thread (for wax sealing of parcels) – suitable for wrapping the bear’s muzzle and belly. We first stick plasticine onto the cone's face so that the thread sticks.


But the squirrel - the head is made from a pom-pom (sold in craft stores) and the arms and ears are made from wire brushes (also sold there).

But below we see mice whose heads simple cones made of gray felt (or fleece).

If you buy pieces of fur, you can make these crafts from pine cones for the New Year tree. Even more New Year's crafts from natural materials I will post it in a separate article and then a link to it will appear here.

PEOPLE are like crafts made from pine cones.
(several ways).
Remember, a little higher, I explained How to roll a felt hard ball from a piece of felt wool - in soapy warm water. You can make little people out of these balls and cones.
Or you can replace the felt balls with ping pong or wooden balls.

Here is an example of a MOTHER AND BABY craft made from pine cones and felt...mom's hair is made from orange felt wool. The handles are also made of wool, rolled into a flagellum in warm soapy water.


And here is a family of gnomes made of cones. Craft from a felt head and pieces of felt or fleece fabric + bells on hats.

Another similar craft. Pine cone gnomes - on the head of each gnome is a cap (a cell from a paper egg cassette). Legs are leaves glued to cardboard, Beard is from a piece cotton pad, glued to a cardboard muzzle.

And in addition to the family of gnomes, you can make another company from the pine cones - the forest inhabitants of the magical forest - FAIRIES. Roll the face out of plasticine - glue a bunch of cut threads to the top of the head - and put an acorn cap on top. And glue bright wings made of cardboard or felt to the back.


And from the cones you can make beautiful skiers in bright scarves. Hair is a bunch of threads. Scarves - a piece of Christmas tree garland.

Caps for such skiers can be crocheted or knitted. Cut scarves from fleece or soft crepe paper (you can just crumple a white sheet of paper... and cut a scarf out of it - it will be soft and easily wrap around the bump. Skis are made of cardboard (or ice cream sticks)... toothpicks serve as ski poles.
Good luck with your creative ideas.
Olga Klishevskaya, especially for the site
1. To make such a Christmas tree from cones you will need:
- cones;
- whatman paper (cardboard);
- plaster bandage;
- artificial snow;
- glue at your discretion;
- scraps of colorful New Year's tinsel.
Decide on the size of the spruce. The height of the spruce will become the radius. IN in this case height 32 centimeters. The circle at the base is about 12 centimeters in diameter. Take a sheet of Whatman paper and draw circles of the required radius. Cut it out.
Roll the sheet into a cone so that the base of the cone is approximately 12 cm in diameter. Staple. On top, where the stapler does not reach, use glue or tape. The cone you get will become the trunk of a future tree made of cones. Cut off the very tip of the cone at the very top of the head; then it will be easier to attach the last cone - the top of the head.
Take a plaster bandage and cut it into pieces. Moisten a piece, squeeze it lightly and attach it to the trunk of the tree. Smooth out. And so cover the entire trunk. Let dry. If you don’t have a plaster bandage, use a lot of papier-mâché, it will also come out strong.
Sort the buds by size. Use larger cones at the base and smaller ones at the top. Apply glue to the base of the cone and glue it to the trunk of the tree. Hold it until the glue sets, or press it down with something. The work is not difficult, but it will take a lot of time to glue each cone.
Fill the resulting gaps between the cones with pieces of multi-colored New Year's tinsel. Apply glue to the pine cones in places, not over the entire surface. And quickly sprinkle with artificial snow. Instead of artificial snow, sticky areas can also be sprinkled with coarse salt. Give the glue time to dry completely. 
Option No. 2 - from scales)):
To create such an interior Christmas tree from a pine cone you will need:
- cones
- ready-made foam base of cone shape or whatman paper/cardboard
- hot glue gun, scissors
- aerosol with paint
- Christmas tree decor (optional)
The first step is to collect cones in the nearest park or grove with coniferous trees. Choose larger sized cones, because in this case you will need their “scales”. At home, if necessary, the cones need to be dried and cleared of debris.
You will need a tree base. The best option will be the use of a ready-made foam blank, as in this case. But if there is none, then you will have to create it yourself. You can twist a cone from a piece of whatman paper or make it from papier-mâché. It should be the appropriate height for the tree you want to create. In the first case, simply roll up the paper sheet and secure it with tape or glue. The bottom must be cut so that the cone stands firmly on a hard surface. It can also be covered with foam rubber or fabric ( dark brown) in order to ensure reliable gluing of the scales. 
Take the cones and use scissors to cut off the “scales” from them.
Once you have cut enough material, start gluing the pine cone pieces to the base. You need to glue from the bottom of the cone, with the main element facing down. 
The finishing touch will be painting the pine cone with an aerosol, which is best done in an open space (in the courtyard of the house, on the balcony). We also recommend drying in a well-ventilated area.
Further, at your discretion, you can leave it as is or decorate it.

Option No. 3 - from cones and walnuts:

To create this stylish Christmas tree required:
- a finished foam cone with a diameter of about 10-15 cm. You can also make a cone out of paper;
- bronze paint in powder
- liquid paper glue
- hot glue gun
- flower pot
- plaster
First of all, you need to prepare the “golden” paint, for which you pour liquid glue into a bowl and pour out some of the bronze powder (Fig. 1). Stir.
Place a nut or cone on a thick needle or thin knitting needle and use a brush to cover it with gold paint (Fig. 2). Leave them to dry, turning them over occasionally. 
Next, let's create the decor for the pot. Wet the tip of a wide brush with gold paint and paint the ceramic pot, moving the brush in one direction around the pot. After the first layer has dried, apply the second (Figure 3-4).
Glue the colored cones and nuts onto the cone using a hot gun from bottom to top (Figure 5-6). It is advisable to select nuts by size and use smaller ones to decorate the top. Fill the empty spaces between the cones and nuts with acorns and other decor. 
Take the finished star template and apply its outline to the center of the pot (Figure 7).
Break the walnut shells into small pieces and begin to stick them in a mosaic pattern on the surface of the pot, filling the entire star (Fig. 8). 
In order for the Christmas tree to stand steadily and not fall, pour plaster into the pot. To do this, dilute the gypsum mixture in a suitable container, following the instructions on the package.
Leave a small space on top of the pot so that you can fill it with decorations (acorns, nuts, etc.)
If you like the idea, but don’t have time to implement it, you can create a simpler one New Year's composition from candles, as in Fig. 12
Option No. 4 - baby Christmas tree): 
ideal for joint creativity with the baby.
To make a Christmas tree from a pine cone you will need:
- cones;
- thick cardboard for the stand (you can come up with something else);
- thermo gun;
- beads, sequins, seed beads, wool balls for decoration;
- acrylic paint;
- PVA glue + brush (synthetic flat);
- napkin.
Take a pine cone and a small piece of cardboard packaging, which will serve as the basis for the Christmas tree. Cut a circle out of cardboard and glue the pine cone onto it using hot glue (Photo 1). Apply golden acrylic paint to the surface of the pine cone (photo 2). 
You can glue pieces of napkins to the cardboard, gathering them into folds, thereby giving the cardboard texture, creating a certain snowy effect (photo 3-4).
Leave the work to dry, then coat the cardboard with water-based/acrylic paint white(photo 5). Take some gold acrylic paint onto a synthetic flat brush and lightly touching, tint the cardboard base (photo 6). Then start decorating the Christmas tree from the pine cones. Here, decorations in the form of balls and gifts were pre-fashioned from plastic (photo 7). You can also use various beads, sequins, beads and other shiny and multi-colored decor (photo 8). 
Glue the beads and balls to the pine cone using a hot glue gun. Gifts need to be painted and also glued to cardboard. The pine cone Christmas tree is ready!