Origami planes are super cool. How to make a paper airplane that flies well? Three simple ways to make a “long-flying” plane
Peculiarities: a model capable of covering a decent distance at good speed. It only takes five steps to fold the plane.
Difficulty level: short.
2. Flying Hunter

Peculiarities: the plane has a weighted nose, due to which the flight range will increase. To set a record, you need to launch the “hunter” with maximum force.
Difficulty level: average.
3. Sprinter

Peculiarities: This plane can be called a “jet”; it flies very fast. There is room for experimentation: try folding the wings at different angles.
Difficulty level: average.
4. Spear

Peculiarities: a model designed for long-distance flights, like a spear. Requires precision when folding.
Difficulty level: average.
5. Phoenix

Peculiarities: An excellent plane that can be launched with any force. If you follow the instructions exactly, the flight will always be easy.
Difficulty level: average.
6. Dart

Peculiarities: a model of complex design, similar to a dart. The additional bend in the nose gives it more weight and increases its flight range.
Difficulty level: high.
7. Bird

Peculiarities: original model, resembling a swift or swallow. It flies very fast.
Difficulty level: high.
8. Fighter

Peculiarities: model repeating appearance Navy fighter. It's difficult to fold, but it's worth it.
Difficulty level: high.
9. Starship

Peculiarities: This space-looking airplane is suitable for performing acrobatic performances in the air. If you throw it straight, it will flip over.
Difficulty level: expert.
10. Sea wind

Peculiarities: this plane will glide through the air due to its raised wing. You can start the model even with little effort.
Difficulty level: expert.
For more instructions on making original paper airplanes, see.
Probably everyone knows how to make a paper airplane. Of all the toys that have ever existed on earth, these products are the most popular. The cost of making them is minimal - you just need a sheet of paper and a minute of time, and they bring a lot of joy.
Winged origami from childhood
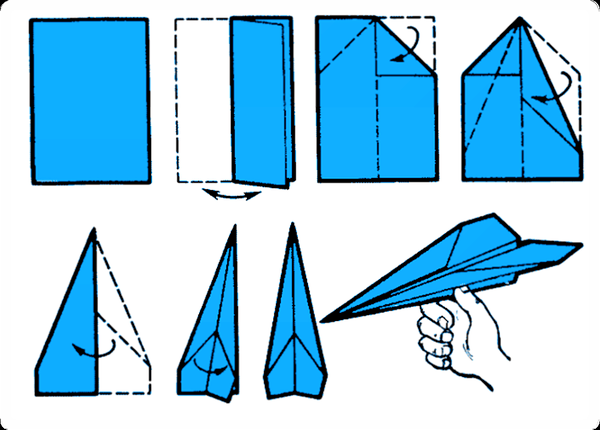
We bet that you already want to remember your childhood. You just have to start, fold a sheet of paper in half, and then your hands will remember what and how to do. For those who have forgotten how to make a paper airplane, instructions are included.
- Take a rectangular sheet of paper, fold it in half, iron out the bend, return it to its original position and turn it over.
- Now you need to bend the top corners towards the center, and then bend them again, as shown in the picture above.
- We make the airplane along the existing bend line, fold the wings in half, each in its own direction.
- The craft is ready.
This classic airplane model is called a glider; it can be made either with a sharp nose or without it (by bending the corner down at the stage shown in the fourth picture in the diagram above). By following the instructions above, you will make a plane that flies well.
It would seem like a simple children's game, so why complicate it? But there will always be people who, as they say, do not look for simple ways. You will be surprised how many fans this paper friend from childhood has, how much imagination and perseverance people show when trying to create the perfect airplane!
We'll build the plane ourselves
A whole area of origami that describes how to make paper flying airplanes is called aerogami. We will talk about airplane models a little later, but for now we will try to combine the experience accumulated by users and answer the question of how to make a good paper airplane.
The main function of an airplane is, of course, the ability to fly. The lighter the paper it is made from, the better it flies, but this is a relative rule. If, for example, you run very light airplane in windy weather, it will simply be blown away by the air flow, and if it is too heavy, it will fly, but not far. It all depends on where you are going to run it, so you will have to connect the logic.
In order for the airplane to fly smoothly, both parts must be a mirror image of each other. If the wings different shapes or size, then, you know, it won’t fly far. To make the airplane more stable, its wings need to be slightly bent at the edges. Real aircraft use flaps for similar purposes.
By the way, for paper airplanes, both A4 sheet and a piece of paper from a notebook, a newspaper page and any other paper are suitable, the main thing is that it is square or rectangular in shape.
The paper airplane must be made using the origami technique, which means no staples, tape or glue. All of this will add unnecessary weight that will make the plane unable to fly.
Fantasy inspires
Paper airplanes are real assistants to the designers of real airplanes, so their modeling and launching have become a whole science. They were first used for such purposes by aeronautical engineer John Northrop in 1930.
Some airplanes are prototypes of real ones, others are simply a figment of the imagination of their creators. For example, the Delta airplane is reminiscent of the legendary Flying Triangle, invented in Germany in the 1930s.

A popular paper model of the Soviet supersonic reconnaissance aircraft Igla is popular. The Russian drones “Korshun”, “Scat”, the French waterborne “Canard” and the fighter “Mirage”, the British bomber “Mosquito” and many others also have their paper copies. All possible models of fighter aircraft are very popular.
How to make a paper fighter plane
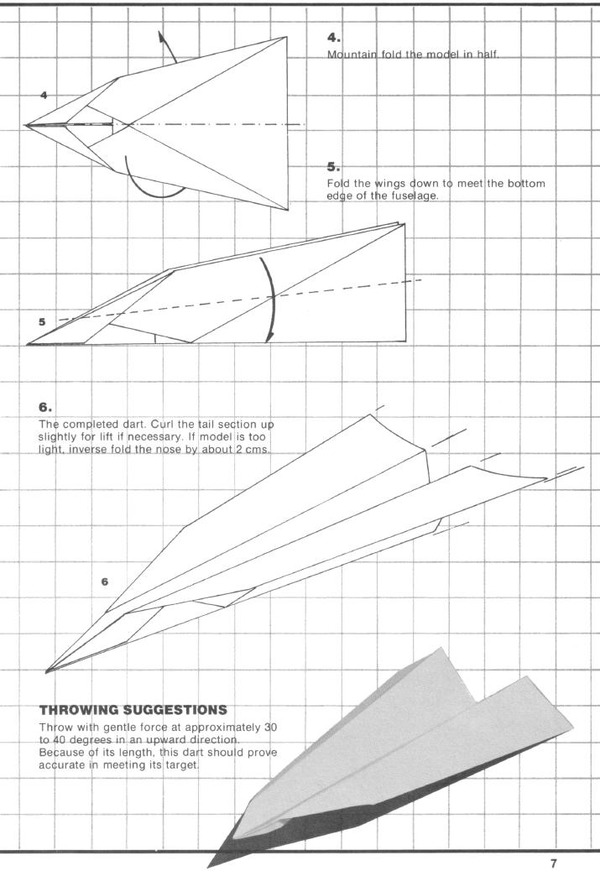
We offer instructions for creating a paper model of the Piranha fighter plane.

- Take an A-4 sheet, fold it in half, carefully work out the bend line, return the sheet to its original position and turn it over. Fold the top corners as shown in the picture.
- Bend the nose.
- Fold the edges into a triangle towards the center, you will get a workpiece like in picture 3.
- Fold the wings again, but now along the entire length.
- For convenience, turn the airplane horizontally. Now you need to bend part of the tail along the line indicated in the picture. We bend each part in its own direction.
- Along the line indicated in picture 6, we once again bend each part in its own direction.
- We bend the indicated bow parts in both directions.
- Straighten the tail.
- We bend the corners on both sides of the tail section symmetrically.

We get an unusual fighter model, which is much easier to make than it seems, the main thing is to try it.
Upgrade for paper airplane
An airplane made from a white piece of paper is somehow boring. You can use your imagination and figure out how to make a cool paper airplane that you’ll want to keep or give to someone as a souvenir. Why not, for example, use colored paper, because this will make the aerogami brighter. Only in this case, the colored side of the paper must be placed down so that the uncolored part ends up inside the finished airplane.
And the plane can be “upgraded” with various inscriptions, painted with pens or pencils. It is better not to use paints, as the paper will get wet and the plane will hardly be able to fly.
As a gift, you can give an airplane made from a dollar bill.

This product is sure to make an impression. If you want to impress, ask yourself how to make a paper airplane out of money.
Flight to the record
Airplane launching is considered a sport, and even international competitions are held in it. The founder of one of these competitions called Red Bull Paper Wings was Briton Andy Chipling. In 1989, it was he who founded the Paper Aircraft Association. As a founder, he established the rules for creating and launching airplanes at the competition. To make the model, you could use an A-4 sheet; it was forbidden to make cuts or glue the paper together.

Participants still compete in three areas:
- whose plane will fly farthest;
- whose plane flies longer;
- whose flight is the most spectacular.
The achievements of some participants even made it into the Guinness Book of Records. Japanese participant Takuo Toda set the record for the longest flight, his paper plane stayed in the air for 27.9 seconds. Another record holder, Joe Ayuba from America, knows how to make a paper airplane that can fly the longest distance. The record he set is 69 meters 13 cm.
A paper airplane will help you get closer

Let's say a banal phrase, but times change, and we change with them. Our children prefer to spend hours on their gadgets; they have little interest in the activities that we loved so much as children.
One day a funny situation happened at a children's camp. Poor children, separated from their phones and computers, had absolutely no idea what to do with themselves. In order to somehow improve the situation, the counselors decided to teach them games that they themselves played in childhood. Just imagine two women doing rubber band jumping and teaching 10-year-old girls how to do it! Now go up to your child and ask if he knows how to make a paper airplane with his own hands?
We sincerely hope that the answer will be positive, but even if not, it can be taught very quickly and easily. Offer to compete to see whose plane will be the most beautiful, fastest, brightest, biggest, or whatever you want. Spend quality time together, your child will definitely appreciate it!
On the wings of love
On the wing of a paper airplane you can write a declaration of love to your soulmate or just kind words friends or parents.
Here it is, it would seem, an ordinary piece of paper, but in fact it is a valuable artifact that stores our memories of childhood, capable of giving us positive emotions, and for some it can become an exciting hobby or even a lifelong pursuit.
Paper airplanes are easy to make, and most importantly, they actually fly. This process is so interesting that any adult will be happy to make light paper structures and, to the delight of children, send them flying. Well, older children will be able to take up aircraft design themselves.
You can master making paper airplanes by studying the video tutorials we offer. Each of them provides step-by-step instructions with a video, and it is impossible to make a mistake: you just need to carefully repeat the actions of the narrator so that in the end you have a real flying model in your hands.
In order to make a simple airplane that can fly far, up to 100 meters, you need:
- take a sheet of ordinary writing paper and fold it in half along the long side, which will give us the marking of the axis of the structure;
- Next, we unfold the sheet and apply its two corners to the center line;
- then bend the corners twice to the side of the resulting triangle;
- lay out the sheet and, using the resulting lines as markings, bend the corners towards the middle;
- We fold the sheet along the bends and open it again.
This completes the marking of the bend lines. Using the markings, we bend the corners, following the video instructions.
Video lesson:

To make a model aircraft resembling the famous F15 fighter, a sheet of paper is folded several times to create marking fold lines, after which you can begin making the model. The video tutorial explains in detail how to make a paper airplane; all you have to do is carefully follow the actions of the person demonstrating the manufacturing process.
The instructions are quite complex and require increased attention, otherwise the model will turn out sloppy or will not work at all. With the right steps, you will get a neat model that can be placed on the table using a leg made from a paper clip.
Video lesson:

This airplane model, made from a sheet of paper, is capable of flying long and far. To begin with, several bends of a sheet of paper are made, which will serve as markings for further actions; all bends must be done very carefully and carefully so that the airplane turns out strictly symmetrical and can fly confidently.
Some bends result in pockets that are turned inside out and laid out in a different plane. The aircraft has a strong fuselage and wide swept wings with high lift. The ends of the wings are bent upward; these bent elements ensure straight flight.
Video lesson:

This is a model of the beautiful F15 Strike Eagle aircraft. To make it, you will need a sheet of writing paper, which is folded several times in accordance with the narrator's instructions. All bends, including the smallest ones, must be done very accurately and carefully to ensure that the model turns out beautiful. The finished airplane can simply be placed on the table as a decoration, or you can send it flying - the wings are quite capable of lifting it into the air.
This good paper airplane will appeal to everyone, both children and adults, because it is beautiful and can fly. These are its main advantages.
Video lesson:

A sheet of paper is folded transversely along the short side, then along the long side, the corners are bent to the center along the resulting fold lines, the ends are folded inward. Several more folds of the paper sheet are performed, which must be done with great care.
The airplane must be strictly symmetrical, then it can stay in the air well. All folds must be carefully ironed. The finished airplane has a swift appearance and good balance, allowing it to fly confidently.
Straightness of movement is ensured by bent rudders; there is a special protrusion at the bottom, which is convenient to hold the model before launching.
Video lesson:

This airplane model flies really well, and you can have competitions to see whose airplane can fly the farthest. The work begins with several folds of a paper sheet, as a result of which marking lines are formed. All further paper folds offer an easy way to create a paper airplane.
The airplane has two small triangular wings and a neat tail that ensures flight in a given direction. Getting the tail involves cutting off a certain part of the paper, and the finished model can be glued together so that its halves do not fall apart and the airplane stays confidently in flight.
Video lesson:

The master class talks about how to make airplanes from a sheet of paper that can fly long distances:
- the sheet is folded in half lengthwise;
- the tips of the sheet bend towards the middle;
- This is followed by another bend, giving the structure an arrow-shaped shape;
- Another longitudinal fold forms the wings, narrow but long.
The body of the airplane is pierced with a paper clip, which prevents the wings from falling apart. The resulting airplane is simpler than all other designs, but is capable of flying far and smoothly. The direction of flight can be adjusted by bending the tips of the wings slightly upward.
Video lesson:
It is difficult to pull modern children away from the computer or TV. Even if parents manage to send them outside, in half an hour any child will be home. He has no idea what or how to play. In this case, the initiative should come from the parents - you need to keep the child busy with something interesting.
Paper airplanes will help diversify your vacation. All models can be completed independently. To do this, you only need a sheet of paper, desire and clear instructions. Origami is a completely safe activity that develops imagination, spatial thinking and fantasy. Children actively work with their fingers.
Many people know how to make a plane, but here’s how to make 10 different models, few people know. The given diagrams and step by step instructions will help fill in the gaps. If the child is creative personality, then he can color with pencils or felt-tip pens new toy.
General information
Every adult will remember how he loved to do and play paper airplanes with friends. All the guys in the yard tried to launch their device as far as possible in order to win. The models were constantly modified to increase their flight range. These were the first steps in the study of aerodynamics. But times have passed, parents have grown up and not everyone remembers how to make even the simplest models.
Paper airplanes are popular all over the world. For some adults they are a real hobby. These craftsmen not only know how to fold a beautiful paper airplane, but also take part in real competitions.
How and when was the airplane invented?
Paper airplanes were known more than 2 thousand years ago. However, then these were not “airplanes”, but birds. Their popularity gradually faded. Only ardent lovers of paper modeling managed to regain recognition of these simple but entertaining toys.
Paper plane is a common form of aerogami. Origami is the Japanese art of paper folding.
The date of creation of the airplane is considered to be 1909, but 1930 is considered more popular. Then the founder of the famous aerodynamics company Lockheed Corporation, Jack Northrop, became interested in how to make an airplane out of paper. Why did an adult man have such a desire? The inventor decided to test his new ideas on it. The use of a fake in the air helped to select the correct shape for future aircraft.
Modern designers of paper modeling hold international competitions on the flight duration of airplanes. The winner is the one whose plane stays in the air the longest. In 1998 it was installed new record- 27.6 seconds of indoor airplane flight. He was included in the Guinness Book of Records.
Hobbies for paper aircraft modeling are safely classified as a kind of sport. We recommend organizing mini-competitions with children and friends. An exciting activity that will not leave you indifferent.
Types of paper airplanes
There are paper airplanes different types: from simple to quite complex models. Even a beginner can fold an airplane using the diagram. IN simple options contains 5-6 actions, but in complex ones there are no restrictions.
The folding algorithm significantly affects the behavior of the model in the air and its landing. Some airplanes are made from soft, thin paper, while others are made from cardboard. Some models fly straight, others fly along a winding trajectory.
What is required for a paper airplane?
A paper airplane is a budget toy and does not require much spending. It can be made from any sheet of paper, but it is more convenient to use A4 format. The main condition is rectangular or square shape. Previously, they used newspapers - it came out quite well.
Many children love to be creative. Then you can decorate the new toy with pencils or felt-tip pens. Your favorite stickers and others are also suitable for decoration. original jewelry, which will give individuality to the paper product. Children love origami and enjoy folding paper. Little ones will be happy to decorate and play with their new toy.
Creating a long-flying airplane is not only an exciting activity, but also useful:
- folding paper develops fingers;
- imagination develops, the child thinks creatively;
- concentration of attention on one subject, collaboration disciplines and brings together.
For your first origami lessons, it is better to choose simple models. Kids love to work with paper and will be happy to help create new “masterpieces.”
Basic principles of paper modeling
Paper is considered a malleable material that bends easily. If you follow the folding algorithm of the model, you will get a realistic and durable shape. The main thing is to strictly follow the scheme. All curves are ironed several times so that the shape is clear. Rushing in origami is not appropriate - the more carefully you do everything, the better the airplane will be.
Flight range and duration will be determined by many factors. If a long-flying model is required, then special attention pay attention to the following elements:
- tail - the irregular shape will not allow the plane to soar;
- wings - flight stability is increased by the curved shape;
- sheet thickness - the lighter the material, the longer the flight;
- control symmetry.
If you follow the assembly diagram and take your time, everything will turn out well.
Simple models
Girls and boys of any age love folding airplanes. A story about the benefits of launching aircraft will help increase interest in paper aircraft modeling. Children will be interested to know that adults are seriously involved in launching paper airplanes and actively participate in competitions. After this, the child will definitely want to make an airplane and launch it. You should start with simple models, gradually moving to more complex ones.
Classical
This is the simplest model, familiar from childhood. To do this, follow the following assembly algorithm:
- Take a landscape sheet. Place the short side facing you.
- The leaf is folded in half and the middle is marked. There is no need to smooth out the fold.
- Unfold the sheet and fold the top left corner so that it touches the center line.
- Performs the actions from the previous paragraph with the left corner at the top of the page.
- Expand the sheet. Now fold the upper corners again, no longer reaching the center. They should go slightly obliquely, without closing the triangle that formed earlier.
- We bend a small corner to fix all the folded corners.
- We bend the product in half so that the triangle comes out. Each side is folded to the central fold and the technique is launched.
Arrow
First let's look at classic version“arrow”, then we will describe the process of creating an airplane, similar to the “arrow”, but with minor modifications.
Classic arrow
- Place a sheet of paper with the long side facing you and bend it lengthwise in the middle.
- Bend the corners 3 times towards the edges so that each new bend angle is 2 times smaller than the previous one.
Sometimes a protractor is used. But if you constantly fold the corners to the bottom edge and the lines match, then you won’t need it.
- At the last fold, the corners are bent 90 degrees to form the wings of the airplane.
- This simple model will be possible even small child gender guidance from parents.

"Strela-2"
This option will be similar to the classic model, but it is done a little differently.
- Fold the sheet in the middle along the long part. The two upper corners are folded twice towards the middle.
- Bend the sharp end towards the edge of the wings.
- The workpiece is folded in the middle.
- Form the wings: bend towards the center in a straight line.
Airplane made of paper and cocktail tubes (pens)
The plane is very easy to make. It looks more like a fake than origami. It can be used in racing, land a paper pilot and have fun launching.
You will need:
- paper;
- scotch;
- plastic tube;
- felt-tip pen for decoration.
- Cut a strip from A4 sheet. The width should be 1 cm less than the length.
- Twist the strip tightly and wrap it around the tube.
- Take out a plastic tube and secure the end of the paper tube with tape.
- The wings are cut out to the desired shape and attached with tape to the plane.
- We insert the plastic tube back and launch the plane.

Unusual models
When simple models are conquered, you can proceed to more serious aircraft models.
Glider
The model has excellent flight characteristics.
- Take a piece of paper and fold it in the middle. Then they unfold it and place it with the fold up.
- It is easy to make an even triangle along the marked line. The smoother you make it, the better the plane will turn out.
- Visually divide each side in half and bend the corners along the line. The sheet is not turned over! A sharp and long nose should form. It is bent so that it extends slightly (2-3 mm) beyond the edges of the bent corners.
- Fold in half to back side went inside. To do this, use the old label from point 1.
- Bend the wings to the desired width.
Hawkeye
This complex model, but if the previous ones came out, then it will definitely come out.
- Use a thick sheet of paper. Place the short side towards you.
- Fold in half to create a center line.
- Bend one of the top corners so that the top part matches the side. Do the same with the other angle.
- You should get something similar for the crosspiece. The side parts are folded towards the middle and everything is folded well. The upper right corner is folded to form a single level with the top line. There should be about a centimeter between the middle and the fold. The same is done on the second side. The gaps left are required to accommodate the horns at the front of the aircraft.
- The resulting horns are bent in half. The excess is wrapped inside.
- The lower corner part is folded back (away from you) reverse side). The fold line should reach the point where the horn comes out.
- The blank is folded in half and wings are made. They should consist of two parts: the inner one - parallel to the floor, and the outer one - slightly directed upwards.
The model is painted and launched. She has a rather sharp nose, which is not recommended for playing with small children.

airplane boomerang
This aircraft will return back after each launch.
- Fold the sheet in four and press on the corner with your finger.
- Bend half of the cut towards the center, press the corner on the quarter.
- Fold inward a quarter to the corner at the top. You should get a triangle.
- Straighten the triangle. Having lifted it, insert your fingers between the parts - the folds should be folded perfectly.
- Turn the workpiece over and bend the other side of the triangle inward. The wide end is bent in the opposite direction.
- Repeat on the reverse side.
- The formed “pocket” is lifted up and bent. The edge should lie evenly along the length. Place the corner in the “pocket” and bend the top one down.
- Do the same on the second side. The two parts must be symmetrical.
- The parts on the side of the “pocket” are folded upward on both sides.
- Open the workpiece and place the leading edge inside. Bend the protruding parts at the front, and also remove the rear fin-shaped parts.
- Turn the workpiece and bend the front part, bend everything in half and iron it.
- To decorate the fuselage - bend each side down along a line parallel to the central fold.
- Bend small pieces of two wings. Unbend the workpiece. There must be a base, flat wings.
- Run your fingers along the front.
For origami, only flat sheets are used. All lines are smoothed well with your fingers or a hard object.
Boom glider
- A4 sheet is laid horizontally.
- Make the necessary lines: bend in half along the vertical axis, along two diagonals. Visually it should turn out isosceles triangle with a bottom base.
- Fold the bottom corner so that the side is on the edge (diagonal line). The same is done on the second side.
- Along a horizontal line below the middle, bend the workpiece inward and then unfold it. There should be 3 sectors on the sheet.
- The middle is bent inward, lowering the right and left parts down. Straighten and turn the long side down.
- Bend the upper corner and straighten it on both sides parallel to the lower base.
- Bend the lower part to the resulting line.
- Bend your nose 135 degrees.
- Everything is also done from the reverse side.
- The workpiece is turned to the left. Bend one part of the nose so that the line is perpendicular to the base, and bend the wing.
- Open the pocket and insert the nose part.
- They do everything from the other side.
- The workpiece is opened, fixing the motor with a piece of paper.
- Bend at the center and form wings.
Airplane for 100 meters
- Fold the sheet in half lengthwise.
- Unfold and bend the upper corners to the formed line.
- Fold the corners again.
- Bend the top triangle down in half.
- Fold the folded triangle 2/3 up.
- The workpiece is bent in half and wings are formed.
- It is good to smooth out all fold lines and corners.
The aircraft is ready to set new records for flight range.
For range, the aircraft must have a well-modeled tail. It is made from lightweight materials and is well balanced.

A paper airplane may turn out to be a complete and exciting toy. Paper can be used to make many different models that children can compete with. Origami helps to develop a child comprehensively, and will also become his new hobby.
Hello guys! In this material we will talk about how to make paper airplane for 100 meters flight . Generally speaking, almost any aircraft can fly quite far - it all depends on the altitude from which it was launched. The design features of paper airplanes affect their ability to glide. So an airplane that can glide for a long time will fly for a very long time and far from a height, for example, the 16th floor. The wind will additionally help speed up and prolong the flight of such a paper craft. Let's start our rating of the farthest flying aircraft.
5th place - the simplest paper airplane models
In this place there are all the simple models of airplanes that even a child can assemble and which we all assembled in class and taught to the girls and teachers. For such tasks, ordinary blunt-nosed airplanes and gliders are quite suitable. Here are 10 of the best easy-to-assemble paper airplanes.
This is the simplest and most popular paper airplane - almost all people know it because they have been collecting it since childhood.
The following aircraft model has a fast and smooth flight. Due to the front supporting wings, the nose does not collapse, providing stabilization, lift and long flight.
The next one will be a blunt-nosed aircraft with increased collision resistance.
The fifth will be assembling a modified plane with a blunt nose. The circuit is simple, but requires careful assembly.
Now I propose to assemble a good airplane from paper with nose wings and vertical rear stabilizers. The shape of the wing of such a glider allows you to fly longer in a straight line.
The next plane has a sharp nose and flies rapidly forward. The fins on the wings stabilize and prolong the flight of such a paper fighter.
The following design has good piercing abilities - the craft looks like a space fighter. It seems that it was created to exterminate enemy personnel.
The largest wings are those of a glider, which has a rather ridiculous appearance. But this does not prevent him from flying very long and far.
The amazing design of this airplane makes it look like a space shuttle or a Boeing. He flies not far, but effectively.
4th place - paper plane "Albatross"
We bend a sheet of A4 paper in half and draw it with our fingernail so that the fold is perfect.
We bend the edges of the paper inward towards the central axis.
After this, we bend the edges at an obtuse angle again towards the center. The edges of the paper should lie symmetrically on the central axis of our craft.
Then we bend the nose of the paper airplane towards the tail and align the centers of symmetry.
Add corner folds so that the left side is parallel to the right side.
We bend it back and bend the sharp nose of the plane back along the flight path. We iron all the seams with our nails.
We bend the wings so that a large area of the wings remains load-bearing. We do everything extremely symmetrically so that the plane can fly further.
At the end we form the tail. In principle, the bend of the tail can be done as in the photo of any size.
We straighten the resulting bends upward so that it ends up in the space between the wings.
We bend the vertical stabilizers upward parallel to the main axis of symmetry of the paper airplane. This is the plane we have - try to fly it quickly.
If you still have any questions about assembling this aircraft, then take a look detailed video with comments.
3rd place - diagram of an airplane made from paper “Hawk”
Now we will assemble another complex aircraft.
First step. Fold the sheet in half exactly in the middle. The quality of the flight will depend on the evenness of the folds. All stages of the aircraft are done in a mirror manner - left and right.
Second step. We bend the left and right sides towards the center.
The third step is to once again take the left and right edges of the paper and bend them towards the central axis of the plane.
The fourth step is to bend the sharp end of the workpiece towards the tail. In this case, the bend line of the sheet should pass through the point of intersection of the edges in the middle of the paper craft. Centering is checked by matching the central bend along the long side of the sheet.
Fifth step. We bend the edges of the paper on the left and right again towards the center, as in the photo. It is important here that the inner layer of paper does not bend or form wrinkles.
Sixth step. We grab the outer fold and open it, and then wrap it inward as shown in the photo. We do the same from the other side of the plane. We take the formed pockets and bend them inside out.
Seventh step. The pointed nose needs to be bent in the opposite direction about 1 cm deeper than the logical fold line. Pockets are formed there, which we bend inside the nose from approximately the middle.
Step eight. We also wrap the tip opposite the sharp nose.
Ninth step. We bend the paper airplane wings parallel to the keel. If the wings of your paper craft match, then the base of the airplane is assembled symmetrically.
Tenth step. We bend the edges of the wings parallel to the main axis of symmetry to form flaps. The plane is ready.
A detailed video on how to assemble such an airplane with your own hands from paper is given below.
2nd place - diagram of an airplane made from paper “Thunderstorm”
We will continue to assemble a paper airplane that will fly for a long time according to a highly complex assembly scheme. We will need, as always, a sheet of A4 paper. This can be plain white or colored paper. You can also take sheets from magazines with medium paper thickness.
The first step is to bend the sheet in half. We remind you that depending on how smoothly and symmetrically your plane is assembled, it will fly in exactly the same way. After bending the sheet in half, unbend it and then move on to the second step.
The second step is to bend the corners to the center - on one side and the other. It turns out to be such a preparation.
Third step. The edges of the paper that formed an obtuse angle on the left are correctly bent again along the line of the nose of the aircraft to the right angles of the paper blank. See how it looks in the photo. Straighten the folds of the paper near the nose especially carefully so that everything is symmetrical.
Fourth step. We see a point at the intersection of the bends of the left and right edges of the workpiece. Along the line through this point you need to fold the airplane in half, as shown in the photo. You can check yourself by matching the lines of the central fold. After bending, unbend, turn over and bend in the opposite direction.
Fifth step. Turn the plane over again and fold the sides on the left and right towards the edge of the inner sheet. See photos and videos for more details.
After this, turn the plane over again and bend the nose forward again.
We turn it over again and turn the strip of folded paper towards the tail of the aircraft blank.
Sixth step. We bend the plane along the central longitudinal axis. It is convenient to bend the stabilizers on the wings in this position parallel to one and the other side.
Seventh step. We bend the wings to the base. Here you can bend it in different ways and experiment, but it is considered optimal to bend it from the nose to the fender liner.
Everything should fit together smoothly and be symmetrical. Then the paper plane will fly exactly 100 meters or more and not lean left or right.
If the plane is flying downwards, then you need to bend the back of the wings slightly upward. Thus, the flow of oncoming air will lower the tail of the aircraft and raise the nose up.
1st place - paper airplane diagram “Falcon”
This is probably one of the most beautiful paper airplanes that you can make with your own hands, because it is very similar to the real thing. To fold such a long-flying airplane with your own hands, follow detailed instructions with photos and video at the end.
1 – take a sheet of medium-weight A4 paper and fold the sheet in half to make a paper airplane.
2 - fold a sheet of paper in half for the longest-flying paper airplane.
3 - fold the paper along the edges to make a cool airplane with your own hands.
4 - we also bend the second side of an airplane made from a sheet of paper.
5 - iron the resulting corners of the paper airplane in half again.
6 - open each wing of the plane and turn them around.