Make a model of planet earth. Globe made of plasticine. The creation process itself is not at all complicated
Ekaterina Dmitrieva
Before the day astronautics we were given a task - from each group layout planets to decorate the hall for the holiday. I chose Zelmlya. In general, while we were on sick leave with our child, we also made the Moon and a rocket)
My hands are itching, just give me something make)
So we will need:
Here's a ball with a rubber band (when inflated it turns out perfectly round)
PVA glue (preferably a bucket at once, because a lot of glue is wasted)
Brush
Toilet paper
Plasticine (For Moon)

We're ready to start!
First, cut the newspapers into strips and inflate the balloon the right size. First, coat half of the ball with glue and glue the newspapers.

So, layer by layer until you get 5-6 layers. (you don’t need to dip each piece in glue, you just need to lubricate each subsequent layer with glue).

Then we can move on to the second half. Again we glue 5-6 layers. After the second half is ready, turn it (crosswise) and make another 2-3 layers. (In total, I got about 10 layers, and hang it by the elastic band to dry. PVA glue dries quickly enough, so everything dried out overnight .)

So, when everything is dry, you can pop the ball. We still have 2 holes left that also need to be sealed and dried.
Now we cover everything with toilet paper in 1 layer. I took the cheapest gray paper, i.e. because it is single-layer (3-layer will not work, then the planet turns out to be embossed and the seams from the newspaper are no longer visible. Let it dry.

Don't forget to make the fastening, I made 2 holes and inserted a bent pin.
We draw the contours of the continents and paint with gouache. This is such beauty!


For Moon we do the same thing, just take into account the size - the moon is smaller Earth. We make craters, I made them from plasticine. I just rolled sausages of different lengths and widths and laid them out in circles. Cover everything with toilet paper (I forgot about this, so it didn’t turn out the way I wanted) and dry it. First, I painted everything with a silver spray can, and on top with yellow gouache, except for the craters.

Well, I made a rocket from two 2.5 liters. bottles Connected, covered with paper, attached rocket launchers from bushings from toilet paper and foil, colored it to your liking and, voila! My crafts will decorate the music room along with the crafts of my colleagues. I think the kids will like it)
Good luck! After the holiday I will post photos of the finished hall)

Perhaps such an original globe made of paper can be useful not only for schoolchildren to teach them geography, but also for interior decoration unusual crafts made of paper it will fit perfectly. And the main thing is that you can make it yourself from paper by simply downloading the globe diagram.
And this one interesting craft– a paper globe was developed by French designer Joachim Robert and posted for public use. Now anyone can download the diagram of this globe, print it on paper, cut it out and assemble it according to the diagram. We will show you how to make such a globe out of paper in today’s post.
How to make a globe out of paper
First of all, print it on your printer. By the way, you can print it on colored printer paper to make a craft in any color.

Then we take and cut everything along the lines. To make the parts bend better, the author creases them with a regular ballpoint pen along a ruler at the bends. That is, he simply presses with a pen along the ruler at the folds - thereby forming a groove along which it will be easier to bend the paper evenly.

The entire map on the globe is attached to the internal frame. Octagonal parts with three horizontal lines need to be cut out, holes cut at the bottom along the inner three lines and folded in half along the dotted line.

We cut out the remaining three octagons, cutting all the lines around the perimeter. And then we connect all the parts into the slots made as shown in the figure. We connect all the folded octagons with three, placing the largest in the center and the smaller ones on the sides, filling the entire perimeter.

Then we simply insert the parts with the map into the folded parts of the octagons as shown in the photo.

Collect carefully in accordance with the terrain, although the diagram contains all the identification marks - pay attention to them.

It is difficult to overestimate the lessons of modeling from plasticine. The child studies colors, shapes, sizes, and consolidates knowledge in practice. In order for the intended model of the Earth to be made from plasticine, you need to knead the material well, give it the desired shape, and maintain proportions.
In the process of classes, the child learns the joy of creativity, and from timely praise and seeing the results of work, he becomes more confident in himself, his self-esteem rises. Hand massage and intensive finger work contribute to the development of those parts of the brain that are responsible for fine motor skills.
Classes help strengthen fingers and hands, make movements more accurate and coordinated.
What to say during class
In the process of sculpting a model of the Earth from plasticine with your own hands, you can tell your preschooler a lot of interesting things about how our planet works inside and out. During the lessons, he will understand that most of its surface is occupied by the ocean, learn what continents, archipelagos and islands are, as well as where the north and south poles are located. Depending on the age of the child, you can offer different ways how to make a model of the Earth from plasticine.
How to sculpt a model of the Earth
The easiest way to convey to your child how our planet works is to help him make a small copy of it with his own hands.
For the lesson you will need:
- Modeling board.
- Set of plasticine. Preschoolers are recommended to purchase wax plasticine bright colors, since it is softer than usual, which sometimes even needs to be warmed in hot water.

In order for the child to understand the goal, for the lesson you need to prepare a ready-made model of the Earth from plasticine or have before your eyes a drawing of what you should end up with.
Model of the Earth on a hot air balloon
You can make a model of the Earth on a balloon. Her large sizes will help the child more accurately examine how our planet works from the outside. This is a longer process that can keep a child occupied for more than one day.
- At the first stage, you will need a small balloon, which needs to be inflated.
- The unwanted newspaper is torn into pieces measuring approximately 2 x 2 cm.
- The surface of the ball is greased with sunflower oil and covered with the first layer of newspaper pieces.
- Coat them with PVA and cover the surface with another layer of paper, repeat the operation three to four times.
- Now you need to let the workpiece dry thoroughly, and then you can deflate the ball and carefully remove it through the specially left hole, then seal it, or you can tie a beautiful cord and decorate the children’s room with the resulting model later.
Continents made of plasticine
Having made a papier-mâché base, using pencils or felt-tip pens, you need to draw on it the contours of the continents, the north and south poles. Plasticine is applied to the marked areas in small portions by spreading it over the surface.
The surface of the oceans and seas is filled with blue and blue colors; for the continents you will need yellow, sand, brown, green plasticine, and for the poles you will need white blocks. For clarity, you need to have a geographical map or globe before your eyes.
This method of making a model of the Earth from plasticine is suitable for classes with schoolchildren and older children. to school age.

This method is good because the planet you created yourself can be supplemented with mountain ranges, volcanoes, forests, cities, create a travel route, etc.
Structure of the Earth
Using seismic, topographic, gravimetric and other data, an idea of the structure of the planet was obtained. Acquaintance with the surrounding world, with a model of the Earth made of plasticine, will help you firmly grasp the sequence of its layers.
You should stock up on enough plasticine. First, a red block is kneaded and a round ball is rolled out of it - this will be the inner core, which is located in the center of the planet.

Next, you need to take yellow or brown plasticine, roll out a thick cake and wrap the core in it, carefully leveling it and giving it a round shape. If we take the radius of the inner core as one, then together with the outer core it will be three. The next layer, representing the mantle, made of silicates and oxides, may be slightly thicker still. For it, you can choose a green color, roll out a flat cake and carefully wrap a plasticine model of the Earth in it.
You need to pay attention to ensure that the layer has a uniform thickness; for rolling, you can use a rolling pin, which is placed in modeling kits.
Next comes the earth's crust, which in reality has a thickness of 5 to 70 km, so you can roll out a thin pancake and wrap the resulting ball, leveling the surface. A hand-made plasticine model of the Earth can be cut with a fishing line, cut into quarters with a knife, and then all the layers of which it consists will be clearly visible.
Other methods of making a layout
How to quickly make a model of the Earth from plasticine? For work, you can take a medium-sized ball made of polystyrene foam, plastic, or a regular orange.
This is an excellent option for activities with kids who cannot yet hold attention on one thing for a long time, but will be happy to take part in transforming an ordinary object into a real planet.

You can make all the planets this way solar system, picking up certain colors, balls of different sizes.
By threading a thread through the balls and decorating the planets with sparkles, you can make decorations for Christmas tree. Visible results labor will bring joy to the child, you will show him how to make a model from plasticine, and in the process of creativity his own ideas will definitely appear.
Perhaps the child will want to settle cartoon characters, aliens, favorite cats and dogs on the planet, build his own house or plant flowers. Parents and educators should support him, help him realize his fantasies and show him different ways to make a model of the Earth from plasticine.
The word globe comes from the Latin globus, which means “ball”. For modern people Of course, it is no secret that the earth has a spherical shape. But it wasn't always like this. The history of the origin of the model of our planet and how to make a globe from plasticine with your own hands will be discussed in this article.
Globe history
Back in the 3rd century BC, ancient Greek scientists established that the earth has a spherical shape. The first globe is mentioned in history around 150 BC. Its creator was Crates of Mallus. His model was depicted as a single continent, furrowed by rivers. The oldest globe that has survived to this day is considered to be the globe of the German cartographer Martin Beheim. He made his model by stretching tanned calfskin over metal ribs.
Of course, the New World had not yet been discovered in 1492, so it was not on Benheim's world map. They used Ptolemy's maps as a basis. Taking this model as a basis, cartographers subsequently made changes related to new geographical discoveries. After this, the globes spread throughout Europe. They were given to high-ranking persons and even monarchs. Actually, in our country the globe appeared as a gift to Alexei Mikhailovich Romanov from the Dutch ambassadors. Later this globe passed to Peter the Great. Nowadays the globe is considered a symbol of enlightenment.

Citrus option
Try making a model with your child globe from plasticine. Why plasticine? This material is ideal for children's crafts. It is very flexible, convenient and safe to work with. Modeling classes help train fine motor skills of the hands, which contributes to the development of speech, because the speech center and the center responsible for coordinating the fingers are located nearby in the brain. Thanks to modeling, attention and memory are trained, and making crafts that are close to real models helps to better understand the essence of things. And of course, the child’s imagination develops and the child’s creative potential is realized.
The master class with photos below will help you create a globe with your own hands.
So, to make a three-dimensional model of the globe, you will need:
- Grapefruit or large orange;
- Ballpen;
- Plasticine of various colors;
- Stack;
- A real globe.
Prepare the base by thoroughly washing and drying the fruit. With the help ballpoint pen draw the outlines of the continents onto the orange. This can be done by attaching tracing paper to a real globe and redrawing the outline of the land onto it. Then cut out the pattern and trace it on the orange with a pen. Or you can draw continents from the globe by eye.
Most of the globe is occupied by oceans. This is where you need to start making the model. Next, mark the continents in green.
Don't forget that Antarctica and Greenland are covered with snow, they will be white.


Now you can apply the hills. Looking at the actual map, apply yellow clay where needed.


The next color to apply is orange. Don't forget to check the map.

Mark the highest places on the globe in brown.

Add deep areas in the ocean with dark blue clay.

Look how bright and beautiful the globe turned out.

On a stand
The next master class is perfect for children.
To make a globe on a stand, you only need plasticine and a real globe. It is necessary to correctly position the continents and mountains in the vast expanses of the oceans of our planet.
Make a large ball out of blue plasticine.

Draw the poles using white plasticine.

Then, after carefully looking at the world map, make cakes from green plasticine and, using a stack, give them the shape of the continents of the Eastern Hemisphere - Eurasia, Africa and Australia. Don't forget to add the island of Madagascar.

Place them in the right places on the layout, focusing on the real globe.

Let's move on to the Western Hemisphere. North and South America are located there. Form them from plasticine and place them on the model.


Now you need to put deserts and mountains on the globe. Make them using orange and brown plasticine.

To make a footrest, make a ball and flatten it. The second part can be made by forming a roller from plasticine. Flatten it slightly and bend it into a crescent shape. Place the globe on a stand. The craft is ready.


On a stick
For another option for making a globe, see the next master class.

To make such a model of the Earth you will need:
- Plastic or foam ball;
- Thick wooden skewer;
- A glass of sour cream;
- Plasticine;
- Colored paper;
- Buckwheat and semolina;
- A real globe.
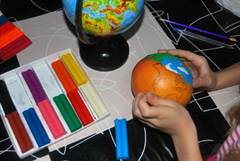
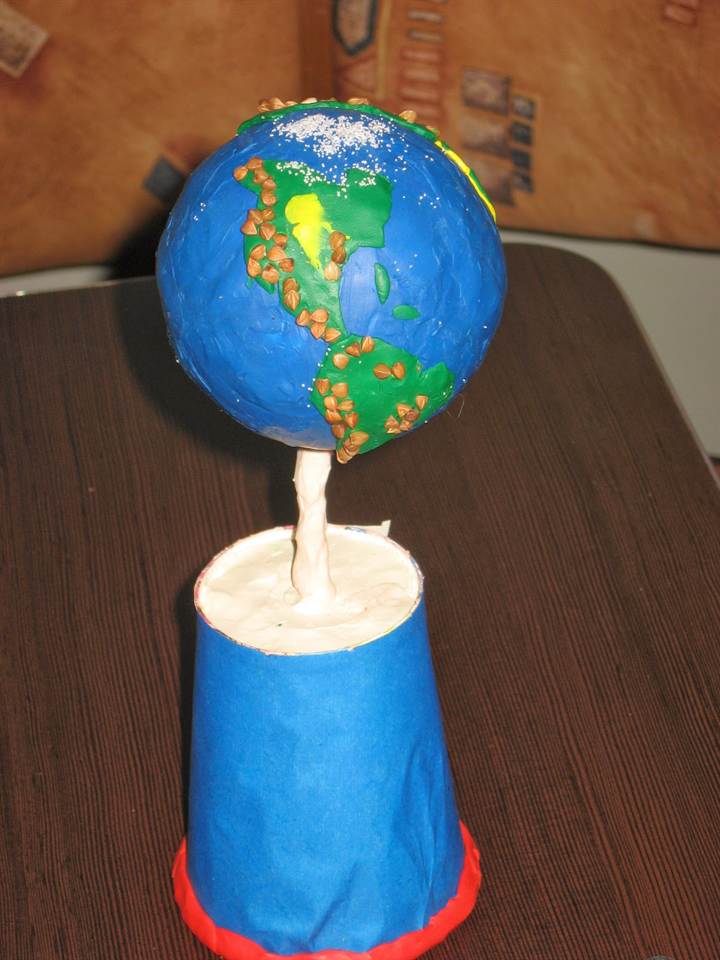
You need to make a hole at the base of the ball and connect it to a wooden skewer using plasticine. The lower part of the skewer needs to be strengthened in the cup also with plasticine. The side walls of the cup can be covered with colored paper or painted acrylic paint. Apply blue plasticine to the ball in an even layer. Coat a wooden stick and the bottom of the glass with white plasticine. Based on a real model of the Earth, make continents from rolled out green plasticine. To do this, you can use their patterns. Using yellow and brown plasticine, mark the hills and mountains. Sprinkle the places where the glaciers are located with semolina, and the places where the highest mountains are located, encrust with grains of buckwheat. The globe on a stick is ready!
Master class. Globe "Planet of Knowledge"
Making a globe with your own hands using the “Spiderweb” technique. Master class
The master class is designed for children of secondary school age, as well as their parents and teachers.
Every year on the first Saturday of October we celebrate such a wonderful holiday as Teacher's Day. And every year the same question arises: “What gift should I give to my favorite teacher?” Every child wants to please their teacher with something special. Children love making homemade gifts for their teachers. And that's right! Someone will write a poem, someone will draw a still life, and someone will make a postcard with tender wishes. And for those who could not decide which gift is best to make, we present our master class on making a globe with your own hands, using the “Gossamer” technique. First, let's remember what a globe is?
The ball on the stand is a miracle,
Colorful and beautiful.
You can’t count all the colors,
What is on the ball?
There are mountains and seas there,
The ball is magic, they say
Oceans and forests
Such miracles!
And there are many other miracles
I saw it on the ball.
For example, if you want,
You can spin the ball!
On the magic ball
We all have our own home,
Everyone has a route.
The ball's name is GLOBE.
So that you could imagine,
The globe is a copy of the earth!
Well, now I propose to proceed directly to making our miracle gift.
For this we will be needed : crepe paper (blue, green), velvet colored paper, threads (blue, light blue, green), a cup of sour cream, a ball, “Crystal” glue, PVA glue, skewers 6 pcs., alabaster, cotton pad 2 pcs., button 2 pcs., padding polyester.

To make the “body” of our globe, we will need PVA glue, an inflated ball (medium size), a needle and thread of three colors. We thread a thread into a needle (first blue, then blue and green), pierce a bottle of glue, and stretching the threads through it, we begin to wrap our ball (previously lubricated with Vaseline or any other cream).

After which we need to let our “ball” dry thoroughly.
While it's drying, we'll start making the mount for our globe. To do this, we will take the wire and form it into a frame of the shape and size we need. And then wrap it tightly wool thread.

Our base is ready, which means it’s time to make an “axis” around which everything will revolve. To do this, we will need 6 skewers glued together with “Crystal” glue and wrapped with woolen thread to match our mount.

After complete drying, you can start making the “body” of our globe. The first thing we must do is to remove the ball we do not need, to do this we pierce it and carefully remove it. Next, fill the “ball” with padding polyester as tightly as possible. We glue the “continents” cut out of velvet colored paper using “Crystal” glue.

Glue the cut out ones to the places of the supposed “poles”. cotton pads. We also use Crystal glue.

So, all the parts are almost ready, you can start assembling. We put the “body” of the globe on the “axis”, fasten it to the base and secure it at both ends with previously prepared buttons.

Now let's start making the base in which we will subsequently secure our globe.
To do this, wrap a sour cream cup in crepe paper and decorate it with woolen thread.


Well, our wonderful globe is ready!
You can proudly give it to your favorite teacher!!!