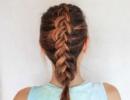
Schemes describing how to crochet a summer beret. Crochet summer berets to complement the finished look. Beret with crochet visor: diagram and description
The beret began its history as a headdress intended for various branches of the armed forces. Over time, the soft cap gained unprecedented popularity and began to be used as fashion accessory. Crochet summer berets have a special femininity. Such a headdress will not only protect your head from the scorching sun, but will also help create a unique romantic image, because berets are typically worn by sensual people and people of creative professions.

We invite you to learn how to knit an openwork hat for the summer for girls, women and babies. In the article you will find useful tips by calculating the size of the beret, and the abundance of provided patterns will help you choose a pattern that suits your desire and level of complexity.
History of the hook
They knew how to knit with knitting needles already in Ancient Greece and Rome, but the crochet hook began to be used as a handicraft tool only centuries later. The Middle Ages are considered the time of the birth of craftsmanship. They began to use crochet hooks only in the 16th century, when manufactories appeared. The instrument itself was borrowed by needlewomen from a related craft - tambour embroidery.
The Industrial Revolution made it possible to create mechanisms for processing the materials from which yarn was made. So far it has been used for this manual labor, even knitting could only be afforded by noble ladies, and what can we say about crochet, for which the thread consumption is 1.5-2 times more. Gradually, simple fabrics gave way to the finest openwork, and lace knitting was born. Only minor changes made to any scheme could completely transform the final result.


Once I picked it up crochet hook, the needlewoman will make it her companion for many years, using it to create fantastically beautiful objects. The tool can be used to finish furniture, accessories, wardrobe and interior items, and toys. But this is not the only reason why the hook is popular - it is very easy to master both in childhood and in adulthood.

Knitting Basics
Thanks to the round shape of the bottom of the beret, you can use circular knitting, which is simple. It is enough to have a basic knowledge of crochet to make a luxurious hat. Just choose a pattern and work in circular rows. When the circle reaches the required diameter, make decreases to shape the side of the product according to the size of your head.

The second, no less common option is to create a hat from motifs. In this case, individual motifs are knitted according to the chosen pattern, which are connected into a round fabric during knitting or by stitching. Along the edges of the bottom, 2-3 circular rows are performed without increments. Then reduce the diameter of the beret until it fits comfortably on your head.


Taking measurements and calculating diameter
If you decide to knit a lace beret, you need to decide on the size of the cap. It consists of a base, called the bottom, and a side. The volume of the beret depends on the difference between the diameter of the bottom and the decrease in the formation of the side. The height of the side is also important, on which the overall height of the product depends.
To knit a beret, you can use almost any pattern, but you need to decide on the size of the product in advance. To do this, take measurements and calculate the diameter of the bottom.
The approximate dimensions of this part of the cap can be taken from the following table:


Description of calculations. The length (L) must be divided by the number π*2 to calculate the radius. The radius R (inner circle) is used to calculate the circumference of the side so that the cap fits normally around the head. The second radius (of the outer circle), indicated in red in the figure, should be 3-7 cm larger than the first, thus, it is possible to obtain a more magnificent cap.
Let's look at a specific example. Let’s say the circumference of the head is 50 cm. Using the formula, we calculate the size of the inner circle, it will be equal to 8 cm. To get a voluminous product, add 6-7 cm to the value, we get the radius of the outer circle 14-15 cm. First you need to knit an openwork “pancake” "with a diameter of 14-15 cm, and then reduce the number of columns so that the radius of the inner circle becomes 8 cm.
Female models
So, you know how to tie a beret, let's get to work. We invite you to practice knitting a beret cap with a flower pattern. The work is very simple and suitable for beginner craftswomen. To make a beret for a head with a girth of 52 cm, you will need:
- hook No. 2;
- fine yarn 250 m/50 g.
It is better to choose cotton threads, as they “breathe” and practically do not shrink. This product will last a long time.
The work is performed according to the following scheme:

To start working, close five air loops into a ring. Further knitting is carried out according to the attached pattern. In the process of work, a pattern is formed in the form of a flower of 6 petals. When the warp is tied, check its outer radius. If you need to increase it, work several rows with double crochets.
Each petal at the end of knitting consists of 24 double crochets. To decrease evenly, work 8 rows, removing 1 stitch in each section (distance between petals). The result will be 16 loops in each section. If necessary, continue to decrease the loops until the required size is equal to the circumference of the head. Knit the last row with single crochets or crochet steps.
The beret with a flower pattern is ready.
Other summer hats are made similarly. At the same time, the side can be made not only with double crochets, you can use any openwork pattern and even come up with it yourself! We offer you several patterns of adult hats in the photo; you will definitely choose an option that will help you create a unique image.


Beret for baby
Let's consider another option for knitting a beret, when the work begins not from the top of the head, but from the side. Beretik for girls is knitted from thin cotton yarn. It is better to use a hook with a small head No. 1.5-2.
The work is carried out according to the following scheme:
Crochet is almost like lace. This tool is used by needlewomen when they need to knit a beautiful thing for the home: a napkin for a table, a tablecloth, a bedspread. Even curtains are crocheted when there is enough time, patience and desire.
It’s easy to make a beautiful beret with your own hands. The main thing is to be good at crocheting. If you have started to master the tool, do not deny yourself the pleasure of tying the first thing - a beret.
The first beret is difficult to knit openwork, but dense, warm and elegant - certainly. Leave some more thread for a scarf, mitts, and mittens to complete your look. When you get a warm beret, you should take on the openwork version.


Crochet hats are usually crocheted from the top of the head. You need to pick up two or three loops, close them in a circle and knit in a spiral. In each loop, five single crochets are knitted. The new row is knitted like this: in each loop, after 1 - 2 single crochets. It all depends on the threads: sometimes you start to get something like a shuttlecock. Then the number of columns needs to be reduced. Does the knit tighten? Enlarge! You need to get an even circle. Make sure to keep it even as you knit and add 6 to 8 stitches on each row. Continue knitting several rows without increments. Then start rows with decreases of 6–8 stitches. You need to try on the beret to understand when to stop decreasing. Having reached the desired parameter, knit the band in simple rows without decreasing.


The simplest beret is a summer version of the mesh type. You can knit it like a cobweb consisting of chains. Knitting begins from the middle: a chain of air loops is knitted. We make three to five loops and close the circle. Next, from each loop, knit several stitches, between which make an air loop. In the next row, knit a chain - seven loops, attaching to the resulting circle through three loops. A row is knitted with such chains, after which you need to knit chains of greater length, for example, from eleven chain stitches, attached with a single crochet to the middle of the chains of the previous row. This is how the circle should be connected. After this, we do not increase the chains, but knit them to the same length.


If you are good at crocheting, then it will not be difficult for you to find beautiful openwork patterns for knitting a beret. For example, a fan pattern. For beginners, you can take a simpler scheme. Cast on 5 chain stitches, from them we knit 2 chain stitches for lifting, and then alternate 3 chain loops and a double crochet from the base of the row - five times. The series closes. The next row again begins with two lifting loops and consists of repetitions of three chain loops and two double crochets. You need to do 11 repetitions, after which – 2 air loops. The third row is done in the same way, only 1 single crochet is performed. Next, the beret is knitted in the same way, only you need to add a column in each of the forming petals. Try on the job. When you realize that there is no need to increase the size, knit the petals straight and try them on again. Then you need to knit 7 rows in each petal with decreasing stitches. The bottom edge of the beret is knitted from two rows of single crochets.


Crochet beret for autumn for women - diagrams and description
Autumn berets should not be airy, like lace, because their task is to warm. Such a product needs to be made from thick threads, but it is not necessary to use wool and, especially, down yarn, because these are options for winter. For September and early October, you should choose acrylic yarn.
Crocheted berets - options in pictures
What do berets look like? crocheted, look at the pictures. Openwork knitting used for summer items, and thicker for winter items.


Knitting patterns
Crochet products are sometimes easier to understand if you see a diagram in front of you rather than a row-by-row description. After all, most of the work is knitted in a spiral, so it is not always possible to understand where the row ends and the next one begins.


How to knit a warm beret for the winter
It is better to knit warm berets for winter from down threads. This will give them a stunning look and make them as warm as fur hat. In addition, when knitting a beret, not a single animal will be harmed, since the yarn is made from sheared wool from goats or sheep of specially bred breeds. This type of wool is found under the name “Angorka” (more often referred to as goat wool) or “Mohair” (this name refers to sheep or even camel wool, which does not exclude its advantages). You can knit a beret from wool both by knitting and crocheting. A seamless product comes out either by crocheting or using circular knitting needles.
Winter beret “Snowball”: diagram and description

1.) Make 1 loop.
2.) We knit 12 single crochets from it.
4.) Again 24 stitches - one from the loop. We get a “snail”.
5.) We begin to knit this row differently: 1 tbsp. single crochet from the loop, from the next one - 2 similar stitches, 1 chain stitch and so on until the end of the row.
6.) 1 single crochet - from 2 loops, 2 tbsp. single crochet - from 1 loop, chain stitch - and continue until the end of the row.
7.) Next, make single crochets from each loop 3 times, 2 tbsp. – knit from 1 loop, knit a chain loop and continue until the end of the row. At first, the work will turn into a flounce, but do not worry, because the tails are included in the style of this beret. In addition, after this row you have to make decreases through the row. As a result, the resulting wedges will begin to wrap.
8.) So, we knit 2 single crochet stitches together, knit 1 stitch twice from a loop, and from the next stitch – 2 stitches, a chain loop and continue until the end of this row.
9.) 1 tbsp. Single crochet is performed 4 times, then 2 of the same stitches and an air loop. We do this until the row is completed.
10.) We knit 2 single crochets together, perform 1 such stitch three times, then 2 single crochets and a chain stitch until the row is completed.
Reductions are made until the work reaches the desired diameter.
The last two rows must be knitted with columns in each loop. The third row is special: you need to put an elastic band and tie it.


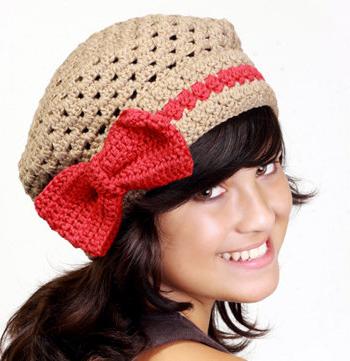
Today, berets and hats with braids are gaining popularity. Sometimes even an ordinary felt beret is found with braid-type clips. Such patterns are very good to make on knitting needles using a special pin. If it is not in your toolkit, then you should use a regular hairpin, an additional knitting needle or any other wire product that has a smooth surface from which the loops will not come off. Such a device allows you to overlap loops, which allows you to get the structure of a rope or braid.
If you only have a crochet hook in your arsenal, you should be smarter and make your work profitable using yarn. Learn to crochet with bouclé yarn. Even if you perform the beret using ordinary single crochets, the knitting will not look smooth precisely due to the special texture of the thread. In addition, the beret hat will be warm. You should initially make a pattern for the beret so that you can check your work against it. But if you knit without a pattern, then you need to make an even circle of at least 30 cm in diameter, and then think about decreasing. A simple fitting will show when to stop making them. Don’t forget to tie a band: it will allow the beret to fit well to your head and not stretch from wear. When the product has stretched, it is worth saving the work by knitting a row on the band, where to pass the elastic.
If you want to get good practice in knitting berets with different patterns, then you won’t find a better model than a child. The largest number of options can be selected for girls, since boys are unlikely to wear elaborate openwork headdresses. While a girl—sister, daughter, niece or granddaughter—grows, both the size of the product and the style change. What a little girl can wear is not always appropriate for a younger “lady” school age, and even more so for a teenage girl. While you practice - your model small child. In addition, a small item can be knitted very quickly.

For little fashionistas, openwork crocheted berets are more suitable, as they are not very rigid. If you are knitting tightly, it is better to do it on knitting needles.

For an older child, it is good to knit a “Snowball” beret, because it looks great on both adults and children. Beginning knitters should make the petal beret described in the “Summer beret” section. You can also find many patterns on the Internet and create an original work of art based on them, if you are fluent in crocheting.
How to choose the right beret pattern and knitting method
You need to knit a beret not only as an abstract product, but as a wearable item. You must initially take the choice of pattern seriously. Do you prefer a solid color? Select relief pattern, capable of decorating your beret! If you are a minimalist by nature, then make do with plain knitting. Fans of African motifs should take a closer look at Kenyan berets. They usually follow the colors of the African country's flag. You can search for a pattern of the product on the Internet using the query “Bob Marley Beret.”
Openwork berets of the summer version are suitable for sophisticated natures. Do you want something airy in winter? It is worth choosing the “Snowball” beret pattern described above. It fits well on the head. Knit a beret from pastel-colored threads, which will definitely benefit you. It is worth knitting a tight pattern if the beret is knitted for the winter. The work is done both with crochet and knitting.
In addition to the pattern, it is important to know what color beret to choose. The color of the threads should be in harmony with your clothes, complexion and eyes. And you don’t have to think that green eyes Only orange or green colors are suitable. Everything is decided near the mirror.
Summer beret in fillet technique
Taken from here http://stranamasterov.ru/node/164124
Summer openwork beret with fillet technique is knitted from "Pelican" yarn (composition: 100% double mercerized cotton, 330 m, 50 g.)
It took approximately 60-70 gr.
Hooks No. 1.5 (main part of the beret), and No. 1 (band)
Based on MOD Magazine No. 535
Something has come to change, because... the original is crocheted from thicker threads with crochet number 2

The beret is quite simple, even a novice craftswoman can do it


Diagram of the main part of the beret.
Tie 8 vp, close them with a ring connection. Art. Next, knit 12 double crochets into a ring, the second row - 24 double crochets. Etc. according to the scheme

After the main part of the beret is ready, you need to make a band about 3 cm wide

Summer is ahead, and I really want something bright, airy, positive! Somehow, in one breath, this beret got in touch. Although I planned completely different things. Probably, the coming spring is taking its toll. Well, I can’t knit warm scarves, vests, etc., and that’s it!
When I first learned to crochet, I tried my hand at fillet knitting. At home, many napkins, collars, and even a lampshade were preserved. I still like the technique, I remembered it with pleasure.
The beret as a headdress appeared in the 15th century. Initially, it was rectangular in shape and was worn exclusively by clergy. In the 16th century, European citizens could show off a headdress made of velvet, corduroy, silk, decorated precious stones and embroidery.
Now this model is in great demand among women, men, and children. Let's take a closer look at how to knit a summer one yourself. openwork scheme and descriptions of the models will be selected for beginning craftswomen.
A little history about the beret
When many people mention this headdress, they have an image of a round-shaped Soviet beret with a ponytail on the top of the head. Now famous fashion designers Agnes, Oscar de la Renta) offer a wide range of berets that are suitable in shape, material, and color for wearing in any season.
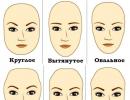
This headdress is worn in different ways: tilted to one side, pulled over the ears, pushed back, hidden under it, or, conversely, straightened. It all depends on the type of face, time of year, type of beret.
Now fashion designers are creating berets in the form of caps, hats, “pill” models, “transformers”. Knitted hats are especially popular, since nowadays craftsmen shape unusual patterns(voluminous, openwork), thanks to which this or that image is created.
Beginners should pay attention to the openwork crochet beret. The diagram and description of such a model are quite simple and do not require extensive experience. The simplest option is to create a mesh beret. You can go the route of knitting a hat from arches with air loops. Decorate the side of the mesh cap with a huge flower. And you knit a model in the form of a “bag” from an elastic band, then alternate double stitches and air loops.
Simple and original beret
For knitting you will need (240 meters in 50 grams) two hooks - the first and fourth numbers. By changing the hook numbers, you get a tight or loose pattern. Crochet an openwork summer beret, starting from the center of the circle.

- Close six air loops into a ring.
- Start each row with three lifting loops. Knit nineteen double crochets (dc).
- Next, alternate 2CCH and three air loops. You should get ten pairs of “cap” posts.
- Knit the next row in the same way, only cast on five loops between the two double stitches.
- Now you knit paired columns (meaning 2DC) over similar elements of the previous row, and on an arch of five loops you form the following pattern: *2 loops, 1DC * - repeat twice, 2 loops.
- You knit the paired stitches without changes, and in the arched pattern you cast on three air loops, 3Dc, three loops.
- The next row is knitted almost the same way as the previous one, only instead of 3 dc you knit a slingshot (2 dc in one base), 1 dc, slingshot.
Formation of a flower
We continue to knit the openwork headdress from the 7th to the 13th row:
- Now in the arched pattern the air loops at the edges are reduced to two, and the number of slingshots is doubled (2 slingshots, SSN, 2 slingshots).
- You knit four chain stitches, 7DC in an arched pattern, and the paired stitches go unchanged.
- Next in the pattern, increase the loops to six, and reduce the number of stitches to five.
- Knit five loops and 3dc. In the paired DC of the previous row, knit two pairs of “cap” stitches with an arch of five loops between them. It is from these columns that the formation of a sharp petal will begin.
- Then you knit paired columns with two arches of five loops, and in the arched pattern you cast on five loops along the edges and a slip stitch between them.
- In the arched pattern, you knit five loops, and between the paired columns (petals) you make three arches of five loops.
- The next row is knitted almost the same way, only in the arched pattern you cast on three loops, and between the paired columns you knit four arches of five loops.
Formation of second petals
We continue to create an openwork crochet beret for the summer. Scheme from 14th to 19th row:
- Now each arched pattern (petal) ends with two DCs, and between them you cast on five arches of 5 loops.
- Next, from the paired dc of the previous row (the tip of the petal), knit 6 dc with 3 loops between them. Between these elements, cast on 4 arches of five loops, which begin to form the second row of petals.
- Now in the petals you form three arches of five loops, and between the leaves above the 3 DCs of the previous row you knit a slingshot, 1DC, two arches of five loops, 1DC, a slingshot.
- In the next two rows, the elements of slingshots and columns remain unchanged. The number of arches changes. In the 17th row, add two arches between the slingshots, and three similar elements in the leaves. In the 18th row, on the contrary, the pattern contains two arches, and between the slingshots there are three arches.
- Above the slingshots of the previous row you knit 7dc. Between the leaves you make five arches of five loops.
Finishing knitting a headdress
We finish knitting summer scheme and description from the 20th to the 30th row:
- The next row consists of six arches between the leaves, five columns in the pattern.
- Next, you knit seven arches and three double crochets that form the top of the sheet.
- Now you knit six rows completely with arches of five loops.
- From the 28th row, proceed to forming an elastic band. Knit each arch with a connecting loop.
- Next, knit by decreasing two elements every five loops.
- The last row is knitted in the same way as the 29th. If you want more elastic, then knit the required number of rows without decreasing.
As you can see, the result is an airy beret. Its advantage lies in its seamless knitting. By experimenting with the colors of the threads, you can get bright images. Especially pay attention to the color of which smoothly transitions from one shade to another.

Beautiful openwork crochet beret: diagram and description
The “floral” beret can be tied differently. First, make a separate motif, and then tie the base of the headdress to its petals. For work, use cotton, thin hook (No. 1,4). The flower pattern consists of 13 rows.
- Close a chain of ten air loops.
- In the first row you knit 20 dcs.
- Next, alternate between the dc and chain stitch.
- Then you knit each stitch over a similar element of the previous row, and between them you knit three loops.
- From the fourth row you form the petals. From the first to the third column, knit an arch of eight loops.
- Knit a petal in each arch: half stitch, 1dc, three double crochets, five double crochets, three double crochets, 1dc, half double crochet.
Please note that the floral motif can be knitted with different threads or in one color. The main thing is to remember the color combination. The openwork white crochet beret looks especially elegant.

Knitting the base of a floral beret
Scheme of the headdress from the 6th to the 22nd row:
- The next row starts from the middle of the petal to the third stitch with three crochets of the next sheet. Cast on arches with nine loops each.
- In each arch you knit 18 single crochet stitches.
- From the eighth row, knit “sheaves” (three “cap” columns with one top and different bases) with three loops between them. Only between the petals do the “sheaves” go without air loops.
- The next row begins from the middle of the arch of three loops of the previous row.
- Now in each arch of the bottom row you knit 3Dc (there are 12 elements for each petal).
- The remaining two rows follow a similar pattern.
- Next, you knit the beret according to the pattern from the 8th to the 13th row, that is, you start with “sheaves” and end with double crochets.
- Approximately at 18-19 rows you begin to decrease in every 8-9th loop.
- In the 20th row, alternate between dc and stitch.
- Knit the last two rows with single crochets, decreasing the required number of stitches.
Unusual openwork crochet beret with diagram and description
Thanks to modern models, berets can be worn by women and men with any type of face. Particularly interesting are headdresses with a stand. Some of them are starched, others are combined with regilin or rigid fishing line, and others are created in parts. Let's take a closer look at how the beret is created using the latest method.

Crochet patterns with description of the bottom.
- Close a chain of eight loops.
- The row is entirely made up of double stitches (there are 9 stitches per petal).
- On 9 columns of the previous row you knit *“sheaf”, an arch of five loops* - 2 times, “sheaf”.
- Knit the next three rows in the arches of the previous row: 3DC, two loops, 3DC. Do not place air loops between the elements.
- Next, add another similar element. It turns out that on the 9 columns of the first row there will be three “fans”: 3Dc, two loops, 3Dc.
- Knit the next row without changes.
- Next, in each fan of the previous row, knit a triple element: *3DC, 2 loops* - 2 times, 3DC.
- In the next row on the arches you knit regular fans.
- In the last row, alternate a triple fan with a regular one.

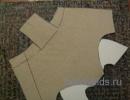
Connecting parts
The beret can be two-color or one-color. In the second option, choose bright colors. For example, a summer openwork orange crochet beret looks catchy on young girls.
Knitting pattern for the side part of the headdress.
- Cast on a chain equal to the circumference of your head, adding another seven centimeters.
- Knit all rows with double slingshots (2DC, two chain loops, 2DC) with one base.
- The next slingshot goes through two loops of the bottom row.
- The elements go strictly one after another.
- In the 3rd-4th row between the slingshots you knit one chain stitch.
- In the 5-6th row, increase the arches to two loops.
As soon as the parts are ready, place the bottom on the side part, using arches of six loops to connect them. Then knit ruffles according to the following pattern:
- cast on arches of six loops;
- in each arch you knit a half-stitch, 7dc, half-stitch.
Next, move on to the band. You knit it in single crochet stitches, and create “holes” by alternating 3 DCs and two loops. After three centimeters, knit a picot (three air loops in one base). The beret is ready, you can decorate it with a flower.
Beret is a stylish headdress. You can knit it yourself using a knitting tool such as a crochet hook. This article offers many interesting schemes knitting a beret using different techniques.
Crochet allows you to create products of incredible beauty. The hook is a tool of “fine work” and therefore every loop connected with it is very skillful and neat. Crochet beret Even novice craftsmen can do it. All you need is yarn and knitting.
Video master classes from experienced craftsmen, of whom there are many on the Internet, will help you master the art of crocheting.
Beret - very feminine headdress, which will not only warm, but also decorate the head of its owner. The beret can be worn at any time of the year, even in summer, hiding your head from the sun's rays.
Simple scheme
Crochet summer beret for a woman: diagram

Scheme simple knitting № 2

Simple knitting pattern No. 3
Beret with crochet visor: diagram and description
Beret with visor- this is a stylish headdress that can complement the look modern woman. You can knit a beret like this from light or heavy yarn, decorate with various patterns and decorative elements (flowers, ribbons, brooch).

Scheme No. 1

Scheme No. 2

Scheme No. 3
Crochet a snowball: diagram and description
Takes a “snowball” - this is voluminous headdress, which will warm you up in the cold season. It is not difficult to knit, and the result is a “lush” product that can fit well on the head of any woman.
You can decorate the “snowball” beret using a bubo or any other decorative element.

Example of a finished product

Detailed diagram
Crochet winter berets: diagram and description
Beret - warm headdress, if worn correctly, it will cover the ears, back of the head and temples. Moreover, he is so looks impressive on the head, which always successfully complements a woman’s image, adding elegance and sophistication to it.
A winter beret should be knitted from coarse yarn, which contains wool thread.

Scheme No. 1
Scheme No. 2

Scheme No. 3
Crochet from thick yarn: diagram and description
A beret knitted from thick yarn will help keep your head warm during the cold season. This product looks very voluminous on the head. It is easy to knit; knitting does not take much time due to the creation of large loops.

Warm crochet beret: diagram and description
Warm beret can be knitted from large or wool yarn. Its knitting is distinguished by a fairly dense arrangement of loops. You can also decorate a warm beret with curly knitting: braids, cones, columns.

Scheme No. 1

Scheme No. 2

Scheme No. 3
Crochet from sectional yarn: diagram and description
Sectional yarn is different in that one thread can have several color shades, radically different from each other. As a result, the product is bright, colorful and very effective.

Scheme No. 1

Scheme No. 2
Takes with embossed crochet posts: diagram and description
Knitting in a column will help create a product that will sit tightly on the head and look very voluminous. Stitch knitting is basic and not difficult for a beginner to master.

Knitting in a column

How to knit a stitch?

Relief column, beret
White crochet beret: diagram
White takes skillfully decorates a woman's head. A white headdress can be combined with almost any wardrobe. You can knit a white beret from any thread for spring or winter.

Simple circuits

More complex openwork pattern
Crochet with cones: diagram and description
Knitting with cones allows you to create a headdress that will look very voluminous and impressive. Mastering the knitting technique is not difficult, relying on detailed diagrams.

Scheme No. 1

Scheme No. 2
Simple classic crochet beret: pattern
The classic beret has magical property making a woman a sophisticated person. This beret goes perfectly with a coat, short coat, raincoat and jacket. It can be worn at any time of the year, combined with stoles or scarves around the neck.

Classic scheme
Volumetric crochet beret: diagram and description
A voluminous beret will definitely attract the attention of others, as it can, without crimping the styling, sit tightly on your head and keep warm. You can knit a voluminous beret from large yarn and even from ordinary threads.

Volumetric bret, diagram
Takes a crochet star pattern: diagram and description
Star pattern- one of the most beautiful, with which you can also knit a beret. Such a product will not only be beautiful, but also original.

How to knit a star pattern?


Beret with a star pattern
Crochet beret and snood: diagram and description
Snood is a modern scarf that sits like a collar on the head. It matches perfectly with the beret, creating a wonderful, sophisticated look.

Beret pattern with snood
The beret is a universal headdress that is little subject to the whims of fashion. It can make the whole image sound new, which is why fashion designers willingly use this detail in their collections. However, it is not at all necessary to buy a haute couture headdress: even those who are just learning the basics of needlework can knit an original piece.
And crocheted berets, the patterns of which are clear even to a beginner, will become a great addition wardrobe
Features of beret knitting technology
The birthplace of berets is France. Moreover, initially it was a headdress for male citizens, and then a mandatory part of the military uniform. Over time, women picked up the tradition of wearing berets, appreciating their convenience: in the cold season they warm their heads, and in the summer heat they protect them from the sun's rays. In addition, such headdresses look great on little girls, making them look like dolls. Thus, there are many reasons to master the technology of knitting this wardrobe item.
If you want to know all the features of knitting berets, then first you should take into account some of the nuances of choosing yarn:
- for berets, as a rule, synthetic threads are used: they hold their shape well and do not stretch;
- on average, a beret takes about 200 g of yarn;
- depending on the pattern of the model, the thickness of the yarn is selected: than more voluminous pattern, the thicker the threads should be;
- openwork patterns on berets look better if the yarn is not too thin;
- band (the part that holds the headdress on the head) from thin threads It’s better to make it double;
- For a baby beret, you can use cotton threads.
Before you begin to scrutinize how to crochet a beret, you need to choose not only the model, but also the hook itself. Its thickness depends on the thickness of the yarn, but hook No. 4 is considered optimal - it is convenient to knit with both thin threads and denser ones.

Things knitted with openwork are always at the height of fashion, and berets are no exception in this sense. Such airy, light patterns look especially good on hats. In addition, they are very functional: in autumn and spring bad weather it is already hot in a warm hat, but a beret is quite appropriate. The most universal model is the “track” pattern. If such a model is knitted from thin threads, then the product will turn out to be “in a hole,” but on denser threads it looks quite dense and convex. In order to knit such a beret, we need:
- 50 g wool threads;
- hook number 4.

- We start working with 16 double crochets closed in a circle.
- We knit the second row with connecting loops.
- Add 4 air loops evenly. We knit 2 more rows. We close each row with a connecting column.
- We start the next row with two connecting stitches, then yarn over the second of these stitches and add 2 stitches. We also knit all the loops of the row. Next we follow the diagram.
- In the following rows, we knit not 2, but 3 loops with a connecting post, so that the connection points are not visible in the figure.
- After knitting 14 rows, we begin to lower the loops.
- When finishing knitting, we make 3 single crochets - this is our band.
- We close the last loop and hide its end on the wrong side of the product. The beret is ready.
Read also: We make a chain of 6 air loops. We close them in a ring.
Other crochet beret models

Openwork drawings are good because they practically do not limit your imagination. The only thing you should not forget about is scrupulous stitch counting. Don't rely on the extra stitch being hidden in the next row. This will make the drawing “float”. Therefore, there is a universal beret model for those who do not like to work with numbers, which negates the likelihood of extra loops appearing. The pattern consists of alternating stitches with and without double crochets (1X1). We need to prepare:
- 80 g yarn;
- hook No. 3.5.
- We close 16 loops into a ring, knit them with single crochets.
- We start the next row with 3 lifting loops. Subsequent rows will also begin with lifting loops.
- We alternate double crochet and single crochet. We get a mesh.
- On the 25th row we begin to decrease the loops. 5 in every other row for 10 rows.
- We knit 3 cm of the band with single crochets. The beret is ready.
This model can be decorated with embroidery or a brooch, which will add elegance and elegance to the headdress.


One of the most popular hats for girls is the summer beret. It is most convenient to crochet it, as it takes a round shape. And circular crochet is easy. Crocheting berets for girls is a fascinating activity. In just a couple of evenings you can knit a beautiful beret for either spring or summer.
Summer berets are lighter, openwork. Berets for spring are knitted with a denser pattern and warmer threads. The beginning and middle of spring are often cool, which means you can sew a lining for such a beret.
Before you start knitting a beret, you need to learn the basics and features of knitting this headdress. As we have already said, the base of the beret is a circle. It is called the bottom. In the table you can see approximate dimensions for the beret.

But before crocheting a beret, be sure to check the head size of the child for whom you will crochet it. To check the diameter of the beret, you need to place it on a flat surface. Knitting in the round is achieved by uniformly adding stitches throughout the knitting pattern. Then the product will naturally expand.
The next part of the beret is called the walls. They are knitted without adding stitches and usually reach a height of 3-10 cm.
After the walls, part of the decreases begins. It is smaller than the walls - from two to four centimeters.
And the last part is the band. Its height is from 1 to 10 cm. This part of the beret must correspond to the size of the head and thanks to it the beret will fit well. If your band turns out to be too wide, then you can knit it with a crochet hook of a smaller number and, conversely, if it turns out to be too narrow, then use a crochet hook of a larger number.
You need to take measurements correctly. To do this, the measuring tape should pass 2 cm above the eyebrows, just above the ear and through the most protruding point of the back of the head.
Beretik for a girl for the summer, diagram with description
 You can knit a very beautiful one for the summer openwork beret crochet It is knitted according to the pattern. Even for beginner knitters, there will be no questions. This summer beret in the photo is designed for a 2-year-old girl. To knit a larger summer beret for the summer, you need to cast on a larger number of loops.
You will need:
- Holly threads or any other, preferably cotton (200 g/50 m);
- hook No. 2.5 and No. 2.
Size: head volume 45-47.
Description
We start knitting with a set of loops - 90 pcs or another number, but a multiple of 6. You can cast on with an elastic set. The diagram is below.
 Then one row of double crochets. We knit the next four rows in a circle with relief stitches, alternating knit and purl stitches.


To do this, you need to knit the pattern according to the pattern about 3 times. Then we reduce according to the scheme.

We thread the needle, go through the loops of the last row and tighten the crown. A beautiful summer beret for a girl is ready!

![]()
Beret for a girl for the summer with a floral pattern
 The knitting pattern for such a light beret is very simple and will suit even a beginner knitter. For knitting summer berets, it is better to use natural threads, such as cotton.
You will need:
- cotton yarn;
- hook.
Description
We start knitting with a set of air loops in multiples of 6. This is necessary for knitting rapport. If you knit according to the pattern, then you only need to knit one row with a single crochet. If you want a taller band, knit a little more. After you have tied the band, you need to knit the next row with arches of 3 VPs. That is, there are 2 arches for 6 loops. The next row is RLS and arches of 3 VPs (diagram).

Openwork summer beret for girls
 Such an openwork summer beret will come in handy for any little girl and even her mother)
You will need:
- cotton yarn (400 m, 100 g);
- hook No. 1,3.
Description
You need to start knitting from the bottom. To do this, we collect 6 VP. 1st row - tie air chain 16 dc and knit according to the pattern, taking into account what diameter of the bottom is required. The diagrams are shown below.


Openwork beret – video master class
Beret and scarf for spring or autumn for a girl
 In cool spring weather, a warm beret will come in handy. In addition to it, you can knit a scarf to make a beautiful set. When you read the diagram, this kit is knitted very simply.
You will need:
- Vita Brilliant yarn (380m/100g);
- hook No. 1.75.
Description
Let's start knitting the bottom. To do this, focusing on the diagram, we knit a circle of the required diameter. If the head circumference is 50 centimeters, then the diameter is 25 centimeters (50/2).
We collect a chain of 12 VPs and close it in a circle.
1st r. – 3 VP lifting + 11 SSN.
2nd r. – 3 VP lifting + 22 CCH (2 in 1 CCH of the previous row).
We continue according to the scheme.

Having reached the desired diameter, we knit two rows without increases or decreases. Then we begin to decrease - in each wedge we knit two double crochets together once. After approximately 3-4 rows of decreases, the size will become equal to the circumference of the head. Then we begin to knit the band. We knit, alternating convex and concave DCs, like an elastic band. Knit as much as you think is necessary - 3-7 cm. The beret is ready for spring!
The scarf is knitted according to the pattern.

Beret for a girl for spring or autumn
 A beautiful and easy-to-make beret for a girl. It is knitted according to the pattern and can be decorated with a knitted flower.
You will need:
- yarn “Semenovskaya” (392m/100g);
- hook No. 2.
Size: for head circumference 48 cm.
Description
We knit the bottom according to the pattern - diameter 24 cm (about 16 rows). We knit the next 4 rows without any additions (these are the walls). We begin to decrease - we knit 2 dcs together in each wedge 1 time. Reduce to the desired head circumference. We knit the next row with dc. We knit the next few rows with sc to the desired height. The edge can be tied.

Initially, headdresses shaped like berets were worn by tribes living in Central and Western Europe. Until the 17th century, berets were actively used to create an image that was fashionable at that time. Women decorated them with feathers, rhinestones and embroidery. For men, the beret has become part of military attire. Nowadays, this headdress can be sewn or knitted. It is appropriate to wear it at any time of the year. In summer, a beret knitted with thin threads will protect from the sun. In spring and autumn it will protect from the cold. How to crochet a beret? The diagram and description of the sequence of actions are given below.
How to determine the size of the future beret?
Just as with any thing, before starting to make a beret, it is necessary to clearly determine its initial dimensions. If for sewing clothes you need to find out the circumference of the waist, chest, hips and other things, then here you need to measure:
- head circumference;
Using a polymer centimeter, measure the widest part of the head. To do this, the tape is wrapped from a point on the forehead (on the bridge of the nose) to the most protruding bone on the back of the head and back.
- depth of the headdress;
It is measured across the top of the head from the lobe of one ear to the lobe of the other. The measured value is divided in half.
Preliminary preparation for knitting
Beginning needlewomen are always eager to get to work quickly in the hope that the result will surprise you from the first minutes. Will surprise. Just not from the best side. All the work will go down the drain if you don’t first determine the degree of stretch and shrinkage of the yarn. The threads that will be used for knitting may have different properties. If you do not take them into account, the finished headdress may be two sizes too large. Therefore, before crocheting a beret, you need to make a sample. Sample photos of what they look like are below:


The sample should be a small copy of the knitting pattern for the beret itself. With its help, the needlewoman will understand how many loops are needed to adjust the width and diameter of the product. The size of the resulting piece should be 10x10 cm or larger. After knitting, the sample is washed, dried and ironed. With such processing, it will become clear how a product knitted from such yarn will behave. When the sample takes its final shape, you need to calculate from it how many loops fit into a piece measuring 1x1 cm. By multiplying the resulting number by the value of the head circumference and the depth of the headdress, you get the estimated number of loops for knitting.
Patterns that are used when knitting berets can be found in any thematic magazines or catalogs. Here are some of them:


How to crochet a beret?
As soon as you have a suitable pattern on hand and all the measurements have been taken, it’s time to start knitting. The beret is knitted in four stages:
- knitting the bottom (the part that will cover the back of the head and crown). All the work will consist of tying the base ring in a circle with the gradual addition of loops and increasing the diameter of the product;
- knitting a flat part that will smooth out the bend of the beret;
- decreasing the loops to the size of the head circumference. Now everything happens in the reverse order, the number of loops is reduced at the same points where they were added while knitting the bottom;
- knitting elastic bands. As soon as the lower edge of the beret begins to fit the head and forehead, an elastic band is knitted, thanks to which the headdress will not slip off.
The resulting product can be decorated to your taste. Beads, buttons, ribbons, knitted “donuts” and so on can be used as decoration. But even without additional decoration, a beret can look very elegant.
Is it possible to knit a beret for a child?
On girls, berets look very neat and interesting. Many mothers independently knit beautiful headwear in which the child will be comfortable. Crocheting a beret for a girl is no more difficult than for an adult woman. All stages of knitting are followed in the same sequence as described above. The result may be something like this:


Usually mothers use soft yarn for knitting, which will not irritate the baby’s skin. Children, especially small ones, are very particular about their comfort. If the head and ears itch from the hard thread, it will be impossible to force the child to wear even the most colorful and fashionable of all berets. The feminine “I’ll die, but I’ll still wear it” doesn’t work yet. If possible, you need to pay attention to the composition of the yarn, which is indicated on the wrapping paper.
If half of the contents are wool and the other half are acrylic, you can safely take the yarn. Products made from it are warm, do not stretch and look great in any pattern.
By the way, it is not necessary to crochet a baby beret. For those with the right skills, there are knitting patterns available. The result in this case is no worse.
Video on the topic of the article
Summer has come! This means that we will face a huge number of hot days, with scorching sun and cool, sometimes rainy nights. But no weather should be an obstacle to looking stylish.
In the summer, you want to not only look beautiful, but also feel comfortable in your clothes, and especially in hats. Designers from many countries use berets in their collections. Now women's summer berets are very relevant. In fashion boutiques you can find a huge number of summer berets different styles and colors. But nothing beats something made with your own hands. With the help of yarn and your limitless imagination, it is possible to create your own individual and incomparable summer beret.
Knitting an original summer beret is very simple. Due to the variety of materials, knitting and patterns, a women's summer beret will complement your look with a bright and matching component of your wardrobe. A crocheted beret is a beautiful element of the image that makes the outfit whole and complete. It will draw attention to you and emphasize your individual style.
Crochet summer beret, models from our website

The classic, black and white version of a large beret and a small shawl will allow you to use the beret both as protection from the sun and as a detail of an evening dress. The shawl can be used to cover your shoulders from the sun or the evening cool, or use it as a pareo

To make the dress and beret, 400 g of black cotton thread “Kable” 400m/100g, a skein of braid with glued beads, and a 2.0 hook were used. For a product according to this description, you can use any yarn, thin and thick, cotton and synthetic,

Hello, dear craftswomen! What a drug this is - knitting! I wanted to take a little break from knitting and direct my energy in a different direction, but I couldn’t switch. I saw the beret and couldn’t do anything, again

I think that this white beret is known to almost everyone who crochets. It was published in Fashion Magazine. So I didn’t pass by. Crocheted number 1 from thin threads, so it turned out to be slightly smaller in diameter than

Hello, dear needlewomen! Ah, summer, summer...... it's time to show off your work on your body! New job mine is a summer beret in the style of Irish lace. Idea by Zoya Leporskaya from Fashion Magazine No. 541. Knitted from leftover yarn. Flowers,

Hello, dear needlewomen! I tied the beret. He waited a long time for his time. I have had a series of such berets. I took the idea from Fashion Magazine No. 535. Author Tatyana Prokhorenko. Yarn: 100% mercerized cotton 280 m in 50 grams, hook 1.0

Summer beret "Lily", 100% cotton. Knitted according to the attached pattern. The work begins from a chain of 6 chain stitches and is tied with 16 double crochets, then according to the pattern. Hook No. 2, Yarn Art Violet thread. Beret knitting pattern:

Summer beret made of thin cotton for a girl. The beret is made according to the presented pattern; the last rows in the pattern can be adjusted by yourself (knitted or not depending on the desired circle). I didn’t make the border according to the pattern - I liked it that way.

For knitting, use 100 g of Yarn Art cotton yarn, hook No. 1. I knit the bottom of the beret according to the pattern up to a diameter of 30 cm, then without adding arches from 6 vp. 4 cm, then decrease to the required size - head circumference.

Good afternoon I bring to your attention a light openwork beret. Summer is coming, and such a beret will protect your head from the burning rays of the sun. Knitted from Turkish yarn "Violet" - 282 m / 50 g, hook No. 1.75. I used 1 skein -

Warm beret knitted using the Irish lace technique. The threads used were Alize (gold batik), Linete (angora). The motifs were knitted according to the following patterns: leaf, caterpillar, flower: 1st row: 7 ch. in the ring, 2p. 1 v.p. rise, 17 st.b.n. knit into a ring, 3 r. 4 inch rise, *

Beret made using Irish lace technique. Made from "Iris" threads using crocheted size 1.0. It took 50.0 grams. Before this item, I had never knitted Irish lace, so I decided to start with a small item. Then curiosity got the better of me. And after that, I

The summer beret is crocheted from mercerized cotton "Pelican" with crochet size 1.25. A white hat elastic band is tied into the headband for better fixation on the head. Artwork by Nina Kolotilo. Crochet beret pattern:

All berets are knitted using the Irish lace technique. The yarn used is mainly "Diamond" 50% wool + 50% acrylic - 380m/100g, and "Alize" 100% microfiber - 300m/50g, hooks - "Clover" - 0.75; 0.9; 1.0. All elements can be found in the Journals

Crochet beret - the work of Nina Kolotilo. The dusty rose beret is knitted with Irish lace. Size 56 - 58. Yarn for the elements - Anna-twist 500m/100g, for the mesh - also Anna-twist, but untwisted and the resulting thickness is 1000m/100g.

The author of the work is Elena Nikolaevna Trofimova, place of residence Perm region, Berezovsky district, village of Zaborye. I work as a teacher of additional education - I lead the association "Magic Ball" - this is knitting and crocheting. Beret knitting pattern:

I am Kartoeva Milana Amirkhanovna, I study at school No. 12 in the 7th grade, I learned to knit in a club. I have been knitting for 8 months and have gained a lot of experience on this site. I live in the village of Inarki. I'm now

Due to numerous requests, Reseda sent a diagram for the beret. She knitted the beret to the end of the pineapple pattern, reduced the number of loops, and knitted the headband around the circumference of the head with a single crochet. I used hook number 2. Beret knitting pattern: See the handbag knitting pattern at
Good afternoon My name is Guzel Fattakhova, I have been crocheting for myself and to order for a little over 2 years. Once I already sent my work - a sexy tunic with a spider web. This time I decided to show my 
My name is Trunova Irina. I live in the city of Michurinsk, Tambov region. I am 21 years old. I am a student at Michurinsky Agrarian University. I have been interested in knitting since childhood, as my grandmother was a dressmaker and knitter. Also

Takes from floral motifs - the work of Marina Milokumova. The non-trivial beret model is very relevant for the upcoming cold weather. Schemes from a Japanese magazine. Marina writes that connecting motifs takes some time and requires care. But she liked the result

This beret is crocheted based on the pattern from Mod magazine No. 470. Please note that the main motif is repeated twice by Tatyana. Yarn - iris, hook 1.25. The diagram is given for head size - 56. You will need about 100
Knitted berets are suitable for any age, be it a little girl, a girl or a woman. The beret is considered a classic in the world of hats and an element of French style.
A knitted beret looks very elegant on a little girl, especially if it is knitted from thin thread. This beret not only does not cause any discomfort to the child, but also perfectly protects against overheating and hypothermia. Also, by decorating the beret with beads, ribbons or other jewelry, you can combine it with different outfits and accessories.
Winter, summer, autumn. . . You can crochet a beret for any season. It will not be difficult for you to knit a beret from fluffy and thick yarn for the winter or thin and soft for the summer. Our product will help you vary the knitting density, patterns, size and color detailed description and diagrams. Even a beginner can cope with this task. You just have to be patient and be confident in your results. You can turn a skein of yarn into a work of art. We will make every effort to help you with this!
Crochet summer beret, models from the Internet
Summer openwork beret Ripe strawberries

Work by Irina Kachukova. Hook No. 1.75. The front side of the beret. Beret diameter = 28 cm. The diameter of the beret should be approximately equal to 1/2 of the head circumference, i.e. for size 56 (56 cm), the diameter of the pancake should be somewhere around 27-28 cm.
Beret pattern:

Summer Beret Rainbow
Work by Irina Kachukova. The beret is crocheted No. 1.5. Threads are mercerized cotton.

Summer beret Surf

Summer beret with daisies
Beret size: 56.
You will need: 100 g yarn white(100% cotton, 530 m/100 g), 10 g yellow yarn for the centers of flowers (100% cotton, 565 m / 100 g), 15 g light green yarn (80% polyamide, 20% metallic, 340 m / 90 g) hook number 1 ,2 for flowers and No. 0.9 for grid; polystyrene foam (4 cm wide) covered with tape; pins with a bead at the end, knitting machine 7th grade “Brother”.
Crochet summer beret, job description
Before starting work, make a beret pattern; the outer circle (bottom) with a diameter of 28-30 cm and the inner circle with the diameter of the outer circle 28-30 cm, the inner circle - 16-18 cm. The diameter of the inner circle is calculated as follows: the circumference of your head minus 2 cm for a tight fit, divided by 3, 14. If this is a standard head circumference (56-2): 3.14 = 17.2 cm.
So, the diameter of the small circle is about 16-18 cm. Tie together the elements: flowers (diagram 24, 24 a), leaves (diagram 24 b), leaves on branches (diagram 24 c). Lay out the finished elements on the pattern with the wrong side up, making bouquet compositions (for an option, see cx 24 g), secure with pins. Use polystyrene foam as a backing. Connect the bouquets together with an irregular grid in a circle (this is important), especially along the edge of the circle. Try to ensure that the mesh along the edges does not stretch into a line, but is in the form of rounded arches. Inside the circle, the knitting direction can be arbitrary. Thread the ends of the threads into the elements. Similarly, assemble the inner circle part.
Add two finished parts facing each other and connect them together as follows: RLS with loop grip (under the arch), both parts, 5VP.
The seam should be movable and not tighten the fabric.
Knit the headband on a machine (“Braer” 7th class on density 4) 20 stitches in stockinette stitch 230-240 rows from “Iris”. It can be knitted on thin knitting needles by calculating the density yourself.
Tie the headband in the same way as you connected the beret parts. Sew the ends of the headband using a knit stitch. The rim itself will curl beautifully into a roll. You can fix it at the place where the ends are sewn together.


Beret pattern:

Summer crochet video
Summer openwork beret for beginners part 1
Size: 56-58.
Yarn: baby cotton gazzal (225m/100g).
Hook No. 2.5.
Summer openwork beret for beginners part 2
A very simple crochet beret pattern
Beret size: 56-58. Yarn Pekhorka Pearl (425m/100g), 50% cotton, 50% viscose. Hook No. 1.5-2.