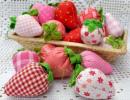
DIY felt strawberry hairpins. Strawberry pincushion made of felt How to make a strawberry from felt
Tell me please, do you like strawberries? Then you understand why modern, newfangled designers very often introduce into the interior design such a decorative element as a plate with strawberries, picturesquely laid out on the table...

As you may have guessed, THIS strawberry (for decoration) is not real and can delight home owners all year round with its delicious barrels, thereby bringing a “piece of summer” even to the most severe winter cold.

A strawberry can be sewn from a variety of fabrics, but we will now start “sculpting” a strawberry from pieces of red and green felt in order to bring the felt strawberry as close as possible to the real one.
Felt strawberries step by step instructions
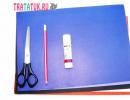
To begin the process of turning ordinary felt fabric into a “strawberry”, you need to acquire the following materials and tools:
- A sheet of paper, pen or pencil;
- Compass;
- Needle and thread;
- Pieces of red and green felt;
- Filler type holofiber, or more affordable synthetic winterizer;
- Transparent beads of a yellow or golden hue;
- Glue;
- Pins;
- Scissors.

As you can see, there is nothing complicated
Using a regular compass, draw a circle on a piece of paper and cut it in half.
We draw another circle nearby, somewhat smaller in size, draw four straight lines through its center and draw a star like this with a pencil - this is the future bract.
Cut out the patterns with scissors.

1. Place the pattern on the fabric: a semicircle (strawberry body) on red felt, and a star-bract on green, pin together and carefully cut out the parts using sharp scissors:

2. Fold the red piece in half and carefully sew one side, coming from the sharp corner, with a blanket stitch

Stuff the future “berry” tightly.
4. Take a needle with a red thread and use a basting stitch to sew around the top edge of the strawberry, then pull it carefully to completely close the hole, tie it with a strong knot:


6. There are two blanks in front of you:


7. To ensure that the bract fits tightly to the berry, pin these two parts together with pins at the place where the glue is applied, this will allow the glue to dry and securely glue these two parts together:

Small, funny, juicy and almost real strawberries, sewn from felt, can easily become an element of kitchen decor, a holiday table decoration, a keychain or toy food for a child. Sewing these strawberries is not at all difficult, but you will need the following materials:
- Red and green felt.
- Filler (sintipon or halofiber).
- White threads.
- A sheet of paper for the pattern.
Draw a pattern on a piece of paper. Its size depends on what kind of strawberries you want - large or small. On one side of the semicircle you need to make a small cut, as shown in the photo.


Attach the pattern to the red felt and cut out the pieces for the strawberries. Cut out future leaves of any shape from green felt.
Sew three mini cones from red felt, leaving them open. Then each of them must be filled with halofiber. Quilt the upper part along the contour and immediately pull it off so that you get a product that resembles the shape of a strawberry. Using white thread, sew the strawberry so that dots appear on its surface, which give it a natural look.


Using green thread, sew the leaves to the strawberries. If you want to make a keychain or pendant, you need to sew a satin ribbon or braid in the form of a loop to the leaves.

Step-by-step master class with photos on how to make a felt hairpin in the shape of a strawberry
Like most girls, my two-year-old daughter is already eager to decorate herself. But for now she has very short hair and store-bought hairpins are too big and heavy for such hairstyles. So I decided to make her little elegant felt hairpins myself.
I bought a set of the smallest hairpins at a fixed price; their length is only 3 cm and they hold well on a small amount of hair.
Set of strawberry felt hairpins
We print out the strawberry template which is located at the very bottom. Cut out 3 parts from felt: two halves of a berry and a sepal.
We make a cut in one part of the berry and thread part of the hairpin into it.

Then we drip a lot of glue onto the felt and secure the stationary part of the hairpin. I used dragon rubber cement, but a glue gun will work.

Add a green felt sepal and cover with the other half of the strawberry. It’s better to do this before the glue has hardened, then you won’t have to do any additional pinning before sewing the parts together.

We wrap red thread in a circle and thereby fasten the parts of the hairpin.

We decorate the felt hairpin with beads or beads that will imitate strawberry seeds.
These hair clips are very light in weight and hold even on the smallest amount of hair.

Sew a ladybug hair clip with your own hands
The ladybug hairpin is sewn using the same principle. First, cut out three pieces of felt according to the template.

We embroider the wings with beads and sew them to the upper part of the ladybug. Then we sew all the parts together and stuff the ladybug with padding poly for volume.

Today we will conduct a master class on creating such beautiful and juicy strawberries from felt and beads. Such a strawberry can become a decoration in the house or a decoration for children's clothes, let's start creating our strawberries quickly.
What we need to create strawberries:
- Paper and pencil;
- Scraps of felt (felt) in red and green colors;
- About twenty balls of beads;
- Strong thread and regular sewing thread;
- Needle;
- A small piece of padding, such as padding polyester or cotton wool;
- Glue;
- Compass;
- Ruler;
- Scissors;
- Pins;
- Pencil.
How to make strawberries from felt, step by step instructions:
To make the body of the strawberry, draw a circle with a diameter of 10 cm on paper with a compass, cut it out, fold it in half, straighten it, and then cut the circle in half along the fold. Then draw a part of the strawberry on the leaf in the form of a multifaceted star, you don’t have to try too hard to draw it, so the leaves will turn out more like real ones, and then cut it out.

Place a semicircle on red felt and cut out the same semicircle along the contour of the paper. Also place the second part of the strawberry on the green felt and cut along the contour in the same way.

Fold the semicircle in half and machine stitch the edge in a straight line, stepping back a little from the edge.

We turn the resulting cone inside out so that the seam is inside, take a small lump of padding polyester and put it inside.

We take a strong thread and stitch it through the top edge of the strawberry and, pulling the resulting ends of the thread, pull the top together like a bag and tie it in a knot. At this step, we check whether there is enough padding polyester inside; if not, then add a little more until it’s completely tied.

It's time to sew the seeds on our felt strawberries; for this we take beads and red sewing thread and a needle with a narrow eye. We pass the needle through the top of the strawberry and bring it out in the place where the first bead will be, somewhere on the side, put the bead on the needle and then insert the needle back into the strawberry approximately in the place where it came out, and bring the needle out again in the place where it will be new bead. We continue to sew on the “grains” at approximately equal distances from each other until the entire strawberry is completely covered with beads.


On the top of the strawberry, where the thread holding the top is hidden, apply glue in a circle and glue a green piece of felt.

In order for the felt to stick well to the top and cover it, you need to secure the top with pins while the glue dries.

That’s it, our felt strawberry is ready, now you can make a few more of these things using the same principle and you can admire this beauty by decorating either your interior or children’s clothes, the kids will surely love this decoration!