DIY children's hair ties. DIY hair bands. Master class with step-by-step photos. Fabric hair tie
The original hair decorations are elastic bands that you make yourself. They will highlight your hairstyle and allow you to quickly put your curls in a ponytail or braid. Thanks to the detailed master classes in this article, you will learn how to create beautiful hair jewelry.
How to make a hair tie from fabric
New is well forgotten old. Fabric elastic bands are becoming increasingly popular. It turns out that sewing them is very simple, you just need to carefully follow each step in the instructions.
Prepare the following materials:
- a blank in the form of a simple elastic band;
- a strip of fabric measuring 90 cm by 10 cm;
- needle and thread to match the material.
Progress:
- Fold the piece of fabric lengthwise, right side inward. Take the rubber band in your hands. With the ends of the material, grasp the workpiece from the inside.
- Fasten the thread to one of the corners of the strip. Start sewing two opposite edges together, making small stitches as you go.


- Sew the entire piece of fabric in this way.


- For convenience, fold the strip along the inside of the elastic.


- When you have completely sewn the edges of the fabric, secure the thread with a knot.

- Slide your thumb under the material.

- Gradually turn the fabric right side out. At the same time, help yourself with your fingers, but do not pull the workpiece sharply, as the seam may come apart.


- You will get this base for the elastic band.


- Fold the edges of the cuts inward and sew them with a hidden seam.


- That's all, the hair elastic made from the material is ready!


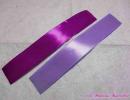
How to make a hair tie from a satin ribbon
Another easy material to work with is tape. They have finished edges, which means the fabric will not fray.

Prepare:
- satin ribbons of different widths;
- scissors and thick thread;
- decor in the form of a button;
- candle or lighter;
- glue gun;
- regular rubber band.
Stages of work:
- Cut the widest tape to a length of 45 cm. Make cuts of the tape at an oblique angle. Now cut each subsequent ribbon 2 cm shorter. In total you need to prepare 5 elastic bands.


Advice. To prevent ribbon cuts from becoming frayed, treat them with fire or a soldering iron.
- Gather the ribbons together. Arrange them as the width of the fabric decreases. So your widest one will be at the bottom, and the narrowest one will be at the top. Visually mark the middle along the longest strip and place the thread.


Advice. If there is no twine to match the color of the ribbons, then use the narrowest ribbon.
- Pull the tapes tightly. Tie the thread tightly into several knots.


- Turn the workpiece over to the reverse side, stretch the thread and tie an elastic band to the central part of the ribbons.


- Glue the decor on top. Don't use it too large as it will look out of place with hanging ribbons.


How to make an elastic band from threads
You can get voluminous hair bands if you knit them from thick threads. To create such an original elastic band, you only need a hook and yarn.


- Make the first loop on the thread. To do this, thread the hook through the loop and tighten it.


- Cast on 12 chain stitches. They will serve as the basis for the entire knitting.

- Thread a braid of thread through an elastic band and connect its ends with a simple stitch.


- Cast on three air loops, then connect to the main part. Continue tying the elastic in columns. You can choose any other crochet pattern that is convenient for you.

- The first row of work should be done in a circle. In this case, tie the last column together with the first.


- Tie the elastic band along the entire length in a similar way.

- Finish the work when you knit to the first row. Tie the edges together, make a knot and cut the thread.


- No one will have such an elastic band!


How to make a hair tie from fluffy wire
If you don't know how to knit or sew, then the following instructions for creating hair ties are just for you. The basis for decoration will be chenille wire. It is often used to decorate bouquets.
Materials:
- fluffy wire pink and green;
- the workpiece is an elastic band.
Master Class:
- Take six pink blanks. Thread them through the elastic band and gather them together.

- Make one revolution around the axis in the central part of the wire. This way you will fix the decor with an elastic band.

Thanks to such detailed master classes, you will be able to make your own hair jewelry. The main thing is to follow every step in the instructions.
For another option for creating a hair tie from buttons, watch the video:
Do you like original and inexpensive? Then these four master classes on creating stylish hairpins are for you!
Every mother of a little princess has to constantly buy hair clips and elastic bands. They endlessly tear and stretch, decorative bows come off and lose their attractiveness, and sometimes such important accessories are completely lost. Don’t rush to take out your wallet, because you can make beautiful hair ties with your own hands from old things. My daughter will be happy with the new thing and will be happy to participate in the process!
To make elastic bands with your own hands, as in the photo, you will need:
- elastic band for sewing or unnecessary accessories;
- scissors;
- threads with a needle;
- scraps of fabric.

Let's look at four examples.
For a budget hairpin that is strictly an accessory, secure the edge of the ribbon with a rubber band, as shown in the photo. Gradually sew the ends of the ribbon along the contour of the elastic band and move it so that the hairpin becomes more voluminous. Finally, sew the two edges of the ribbon together.


For the second example, take a sewing rubber band and a strip of fabric. Fold the fabric in half and sew along the edge. Then thread the elastic through the fabric and sew the ends together, and then bring the ends of the fabric together.


In the third example, follow the same steps as in the second option, and at the end decorate with beads strung on a chain. Simply wrap the base in a circle and connect the ends of the chain.


In the fourth example of how to make a hair tie with your own hands, wrap a strip of fabric around the base, sew the edges and connect the ends of the ribbon. You can complement the accessory with a bow, felt flower or other decor.


As you can see, handicrafts do not require much time or waste. Masterpieces can be made from nothing, giving life to old things. So don’t rush to throw them away!
A hair tie is an indispensable accessory for most girls whose hair at least slightly reaches their shoulders. Some use them daily, others prefer to collect their hair extremely rarely. But absolutely everyone, faced with a modern assortment of hair ties, may experience difficulty in choosing.
Our article will help you understand the types and purposes of elastic bands that are found on the shelves of beauty stores.
Features and purpose
Without hesitation, an elastic band can be called the most popular hair accessory. It looks like an elastic ring, most often made of rubber, and is essentially a special device for securing a hairstyle.
It has been used since childhood - as soon as a little girl’s hair grows a few centimeters, the mother is already trying to give her daughter a couple of funny ponytails.

photos
The purpose of such an accessory is to gather hair into a hairstyle and remove it from the face so that it does not interfere. Many girls use them every day, at least in the process of washing and during household chores, when loose hair is not only inconvenient, but also unhygienic.

In everyday life, they are used to create beautiful hairstyles and secure styling. Some modern models are multifunctional - they can also act as a bracelet on the wrist, thanks to their stylish appearance.

Types and models
With hooks
For many girls, such a hair accessory raises a lot of questions, although in fact, it is an ordinary elastic band. Its only difference from all the others is that the ends of this clamp are separated and there are small hooks on them.
This elastic band allows you to securely fix your hairstyle for the whole day, you don’t have to redo it during the day. It is enough to figure out how to use an elastic band once, and no problems will arise in the future.


To properly fix the elastic, separate a strand of hair, fix the first hook in it and twist the elastic around the ponytail, holding the strand. Then attach the second hook, making sure they are both at the bottom of the tail. Additionally, the retainer can be disguised with a decorative accessory.

Knitted
These elastic bands look very interesting and go well with knitted dresses and voluminous sweaters. It can be a knitted elastic band or a thin elastic band with a decorative knitted element - a flower, a bow.

Frivolite
The tatting technique is weaving lace by hand. For work, a special shuttle or needles with a blunt end are used. Elastic bands are decorated with ready-made lace elements in the form of snowflakes, flowers, and butterflies. Additionally, the lace is decorated with rhinestones, beads, seed beads, and sequins.


Elastic bows
Rubber bands with bows are suitable for children and young girls; on older ladies they look too childish. Most often they are made from satin ribbons and fabric, and there are bows made from polymer clay.
Children's models are especially varied - they can be decorated with a scattering of beads and rhinestones, complemented with appliqués and brooches.


Elastic band-wire
In the last few years, there has been a real boom in cool silicone rubber bands in the form of a telephone wire. They are called differently - springs, spirals, wires. One thing remains unchanged - reliable fixation of hair, absence of headaches and damaged hair.


They are transparent, matching the hair color - black, beige, brown and multi-colored. The diameter is also different - small ones are suitable for creating complex hairstyles and for children, standard ones are suitable for everyday wear, and models marked Power are created specifically for very thick and curly hair.

Greek
A Greek elastic is an elastic hair band sometimes called a headband or athena. With its help you can create a Greek style hairstyle for hair of any length.
The elastic band is put on the head like a bandage, and then the curls are twisted under it. The result is a comfortable hairstyle for every day and for going out. Additionally, it can be decorated with a beautiful hairpin or flower.


Elastic sponge
In order to make a neat and uniform bun, girls use voluminous elastic bands that look like sponges. It is very simple to use: you need to tie a ponytail, and, starting from the ends, wrap your hair around the sponge so that it is evenly distributed over it. Then all that remains is to secure the finished bun with hairpins and bobby pins.

Elastic mesh
This accessory is used to create a bun on the head; the mesh cap securely holds the hair in place. In everyday life, such an elastic band is rarely found; most often it is used by gymnasts or dancers so that the curls do not get out of their hair while performing complex elements.

Kanzansha style
Most often, this Japanese technique is used to create flowers. First, many multi-colored petals are made from fabric, which are then collected together, then the finished flower is attached to an elastic band.
If you use your imagination, you can become the owner of a unique accessory. However, there are a variety of rubber bands made using the kanzashi technique on sale, so you can safely purchase a ready-made one.


Sports
A ponytail is one of the most practical hairstyles for long hair. It can be fixed with regular elastic bands, or you can buy special ones - offered by sports brands. These are strong, seamless elastic bands of good quality that gently collect hair without any pain.

Size
You need to choose the size of the hair clip based on your hair volume and the type of hairstyle you are going to do. A large elastic band is suitable for those with thick, curly, long hair; it will securely hold a ponytail, bun, or braid.
Small elastic bands are suitable for those with thin hair, little girls, and they can also be used to create several ponytails.


Thin elastic bands are invisible on the hair; they are suitable for everyday and festive hairstyles. As a rule, they are strong, so they reliably fix strands of any thickness.


Fashion trends
- Elastic bands with leather inserts in the form of flowers are trendy. They go great with a slightly messy tousled ponytail or braid.
- Also, hairnets, which previously could only be seen on ballerinas, have come back into fashion. To create a hairnet style, tie a low ponytail, twist your hair into a bun and secure it with a net. This styling can be for the office - paired with a white shirt, evening - with a cocktail dress, or even for a wedding.
- Rubber bands with flowers are especially relevant in the spring and summer. Choose large roses or carnations that complement the dress or light sundress. However, they will also look good paired with blue jeans and a simple white T-shirt.
- An elastic cord will always be relevant. A laconic thin strip of black color will allow you to quickly create a ponytail, bun or secure a braid. It looks stylish and goes with absolutely any look.


Material
From foamiran
A modern artificial material called plastic suede. It is great for creating decorative elements with elastic bands, as it holds its shape well, does not wrinkle or deteriorate when exposed to moisture. Most often, all kinds of flowers are made from it, which look very natural.


From satin ribbon
Craftswomen make elastic bands from satin ribbons in several ways. The technique of weaving, folding and collecting ribbons into one large pattern is used.
Satin ribbons of different colors are used as a basis; beads, seed beads, and other decorative elements are additionally used. The most popular models are elastic bands using the kanzashi technique, satin flowers, and bows.

From felt
This material is very often used in needlework. It is especially successful in making a variety of decorations and appliqués. It can serve as both a base on which beads, stones, and sequins are sewn, and as the actual material from which the decoration for the elastic band will be made. Most often, a variety of flowers are made from it, which will complement a dress or sweater in the cool season.

Fur
Another good option for the winter season. An elastic band with pieces of fur will look appropriate and stylish. To create it, both artificial and natural materials are used - rabbit, arctic fox, mink fur.


From beads
Beads are an inexhaustible material for creativity; it is difficult to name a type of needlework where beads cannot be used. Decorative elements are made from it - flowers, butterflies, bows that decorate elastic bands. Beads are also sewn onto voluminous fabric elastic bands, creating a beautiful option for every day.


Made from artificial hair
Allows you to create a beautiful hairstyle in a matter of minutes, even on sparse or unruly curls. A large selection of shades will allow you to choose the option exactly for your own hair color.

From fabric
Elastic bands are made from a wide variety of fabrics. Recently, voluminous velvet ones have come back into fashion - these were popular in the 90s. Models made of guipure, satin, silk and other materials are also popular. This is a great everyday option for long and thick hair.


Rubber
Today everyone knows about hair elastic bands. Depending on the manufacturer, they can be silicone, plastic, or latex. The spiral elastic band reliably fixes even very thick hair, does not injure the strands and does not cause headaches.

Leather
The leather elastic band looks very stylish and is great for everyday wear. You can choose a contrasting color or match your hair color if you want it to be invisible on your hair.


From polymer clay
This material is used to make various decorative elements that decorate elastic bands. It can be not only flowers, but also berries, fruits, insects, and animals. Little girls will especially like these hair decorations.

Color
Modern hair clips amaze the imagination with a variety of colors. There are options exactly to match the hair color - black and white, all shades of brown and beige.
Multi-colored elastic bands are also popular - yellow, pink, red, green, blue. Metallized models - silver and gold - look impressive.


Decor
Ready-made rubber bands are decorated with a wide variety of decorative elements: embroidery, weaving, beads, beads, sequins, stones, rhinestones. For a special occasion, a spectacular hairpin with pendants is suitable.
Hair clips with buttons look original, especially cool if you have the same button on your clothes.


Children like unusual decorative elements - rubber bands with balls, ears, and cartoon characters. This could be Barbie, Winx fairy, Disney princess, Winnie the Pooh and many others.


How to choose?
When choosing hair ties, you first need to consider their purpose. Each girl has her own requirements, so it is extremely difficult to name one that will be universal for everyone.
Wide soft elastic bands are popular and have been popular for decades. They are made of textiles that are pleasant to the touch, but are not suitable for everyone - some girls complain that such retainers pull their hair.
The thing is that such elastic bands can get twisted into strands, and there may be discomfort when removing them.


To create a strict bun, it is better to choose a thin elastic band. And the wide one, which we talked about above, will securely fix the finished “bun”. You can choose a beautiful model with rhinestones, beads and other decorative elements, so the hair accessory will become a full complement to the image.
Master class “Hair bands, multi-layered flower in Tenerife”
Karaeva Tatyana Aleksandrovna, teacher of additional education MBOU DOD "CDOD" s/p "Rovesnik" Prokopyevsk, Kemerovo region.Description: This master class is intended for children of middle and high school age, additional education teachers, educators, parents and simply creative people.
Purpose: gift for goddaughter.
Target: Making hair bands, multi-layer flowers with your own hands in Tenerife.
Tasks:
introduce the technique of making flowers on round Tenerife flowers of different diameters;
consolidate the skills and abilities of working with a needle and a burner;
teach how to use a glue gun;
develop creativity, fantasy, imagination;
develop artistic and aesthetic taste.
Preface to the work.
What is weaving in Tenerife and in the Tenerife style?
In the 16th - 17th centuries in South and Central America, Brazilian and Bolivian craftsmen wove their famous lace called “Sols” (Spanish sol - sun). In the initial version, these laces were made on the basis of linen and were considered a type of openwork weaving products on linen with pulling out threads along the mesh. Gradually, the weaving method changed and improved, and began to be called Tenerife lace knitting in Europe. These laces are no longer woven on linen, but are now a separate method of weaving various motifs with a multi-row position of threads.
The Tenerife style includes weaving on templates, weaving on frames, knitting on a fork and a ruler.
Tenerife is the name given to devices on which individual elements are woven, which are later assembled using a hook into a single whole. Templates are round, square, hexagonal. Ancient openwork patterns, which have centuries-old traditions, acquire special elegance and sophistication from modern needlewomen. The beauty of such products is timeless - this can be said about clothes knitted in Tenerife. In terms of complexity and sophistication, these laces have no equal. We can say about such clothes that they are woven-knitted, since they consist of individual motifs made in Tenerife weaving and crocheted into one single fabric, for example, the back of the product or a shelf. In the Tenerife style you can make clothes, clothing accessories, bags, blankets, stoles and other products. We will use templates (Tenerife) to make hair bands in the shape of a multi-layered flower.
Tools and materials:
It is very important that materials are given per two flowers.
Silk ribbons (0.6 centimeters wide) in two shades of pink, differing by one or two tones for a smooth transition from one tone to another.
light pink – 0.3 centimeters wide and 1 meter long;
pink - 0.6 centimeters wide and 1 meter 80 centimeters long;
slightly darker pink - 0.6 centimeters wide and 2 meters 50 centimeters long;
A burner for trimming the edges of ribbons so that the edges of silk ribbons do not unravel and making a flower on a template with a diameter of 3 centimeters
Templates (Tenerife) for making flowers in three sizes (diameter 7 centimeters, 5 centimeters and 3 centimeters)
Pink threads and a needle for sewing ribbons on templates with a diameter of 7 centimeters and 5 centimeters.
Glue gun for flower assembly
Glue stick for glue gun
Flower center - 2 white half beads in the shape of a small flower
Pink rubber bands.

Safety precautions when working with hand needles and pins
1. Make sure there are no rusty or bent needles or pins
2. If possible, sew with a thimble.
3. Do not put needles and pins in your mouth, do not stick them into clothes.
4. Do not leave needles and pins on the work surface of the table
5. Upon completion of work, remove all needles and pins into special boxes and pads
Safety precautions when working with an electric burner.
1. The electric burner can only be connected to the network if it is in good condition.
2. When working, do not press the needle too hard.
3. Do not lean close to the burning area.
4. Keep your hands, clothing and wires away from the touch of a hot needle.
5. Do not leave the electric burner unattended, plugged in, as the needle is hot, this may cause a fire.
6. You cannot determine the degree of heating of the device by touch.
7. Do not allow the electric burner needle to overheat.
While working with the electric burner, periodically unplug it from the network to cool (30 minutes of operation; 15 minutes of break).
8. After finishing work, the electric burner must be disconnected from the electrical network.
Safety precautions when working with a glue gun
1. When heating the gun, be sure to place a ceramic, glass stand or saucer under the nozzle so that the glue does not drip onto the table.
2. It’s good if the table has a smooth surface, but if not, it will be difficult to scrape off the glue, even a drop;
3. The pistol has a stand, which is usually removed during operation, and when the pistol is placed, it is pulled out.
4. Make sure that when you place the gun on the table, the stand is extended. Otherwise, the gun will stick its nozzle into the stand or into the wooden table and may burn or damage both;
5. Do not grab the nozzle or hot glue with your hands. The temperature of the nozzle and glue at its exit from the nozzle is 200 degrees. You will be burned, even if you just touched the nozzle or glue. Especially for glue, since it (the glue) will remain cool on your fingers;
6. Do not forget to turn off the gun from the mains, after work and even during work, so that the glue gun does not overheat.
Work sequence
1. Our flower will be multi-layered, consisting of three parts - flowers made on round Tenerife flowers with different diameters. We take a template (Tenerife) with a diameter of 7 centimeters. Take a thread with a needle and a ribbon of the darkest shade of pink. At the end of the tape we make a loop so that the end of the tape is located exactly in the middle of the template. We sew one or two stitches with a hand needle and thread. We put a loop of ribbon on the nail of the template.

2. Lower the long end of the ribbon down and wrap the nail around the opposite side of the template, so that the ribbon passes exactly through the middle of the template. We go up and wrap the ribbon around the next nail at the top of the template, going clockwise to the right of the previous wrapped nail. We twist 2 pairs of carnations (two on top and two on bottom). In this case, the tape always passes through the middle of the template. We secure the ribbon in the middle with a needle and thread with two stitches; the thread and needle remains on the wrong side of the template so that it does not interfere with wrapping the ribbon around the carnations.

3. We wrap the next two pairs of nails with ribbon, not forgetting the clockwise direction and securing the ribbon in the middle of the template with a needle and thread with two stitches, the thread and needle remains on the wrong side of the template.

4. We wrap the next two pairs of nails with ribbon, not forgetting the clockwise direction and securing the ribbon in the middle of the template with a needle and thread with two stitches, the thread and needle remains on the wrong side of the template.

5. We wrap the last two pairs of nails with ribbon, not forgetting the clockwise direction and securing the ribbon in the middle of the template with a needle and thread with two stitches, fastening the thread from the front side.

6. Cut the remaining end of the ribbon using a burner so that the end of the silk ribbon does not unravel.

7 The lower part of the flower, made on a template with a diameter of 7 centimeters, is ready.

8.In the same exact way we make the next part of the flower on a template with a diameter of 5 centimeters.

9. The two lower parts of the flower are ready

10. We make the upper part of the flower according to a template with a diameter of 3 centimeters using a burner, since there is no hole in this template. At the end of the tape we form a loop so that the end of the tape is located exactly in the middle of the template. Using a burner, we burn the place where the tape is attached in the middle of the template.

11. We wrap three pairs of nails in a clockwise direction and burn them again with a burner, securing the ribbon to the nails of the template.

12. We wrap the next three pairs of nails in a clockwise direction and burn them with a burner, securing the ribbon to the nails of the template. We cut the end of the tape using a burner.

13. Remove the top part of the flower from the template

14. Three parts of the flower are ready.

15. We begin assembling our multi-layer flower using a glue gun. Squeeze a drop of glue onto the bottom largest part of the flower, made on a template with a diameter of 7 centimeters.

16. On top we glue the middle part of the flower, made on a template with a diameter of 5 centimeters.

17. In the same way, glue the upper part of the flower, made on a template with a diameter of 3 centimeters.

18. We glue the middle of our flower in the same way; it’s a half-bead in the shape of a small pearl flower.

19. The flower is ready.

20. From the remaining tape 0.6 centimeters wide, cut two pieces of 2.5 centimeters each for gluing the hair elastic to the flower.

21. Squeeze two drops of glue onto the underside of the flower and glue a hair elastic.

22. Now we glue one piece of ribbon on top of the hair elastic for better attachment to the flower.

23. Glue the second one next to the first piece of tape for better attachment to the flower. I could take one piece of wide ribbon, but unfortunately I didn’t have a pink wide ribbon.

24. One hair tie in the shape of a multi-layered flower is ready.

25. In exactly the same way we make the second hair tie. The hair bands are ready.

Hairpins can also be done in Tenerife. Options for hairpins with leaves.