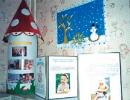
DIY felt panel for the nursery. DIY felt panel. Materials for felt toys
Quick navigation through the article
In this article, for the attention of creative parents, we present 3 master classes on how to make wall panels to the children's room with your own hands literally in one evening.
- Decoration made of felt or fabric in the form of a cloud with a garland of drops;
- Canvas panel depicting the silhouette of a child;
- Interior wall letters made of fabric and cardboard.
In addition to the instructions, we have compiled a selection of other interesting ideas, which awaits you at the end of the article.
Master class No. 1: How to make a felt panel in the shape of a cloud
This cute felt panel can decorate a nursery for both a boy and a girl, and a schoolchild. You can hang it anywhere: above, above the crib, in the play area, etc. And you can make it yourself in just a couple of hours.

Materials:
- White felt;
- Pieces of colored felt;
- Sewing supplies (thick thread, needle, scissors)
- Ribbon for loop.
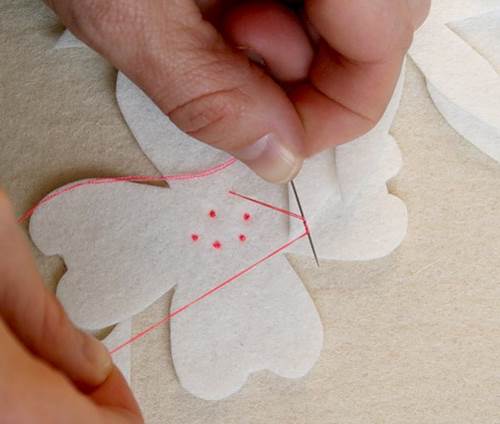
Step 1. Transfer this or a homemade template from paper to white felt, for example, using a remnant that will not be noticeable on white material. At this stage, also cut out drops of colored felt for the garland. By the way, instead of droplets, you can cut out stars or hearts.

Step 2. Cut out the cloud along the contour. If you want the panel to be voluminous, then you need to cut out two blanks, sew them together, leaving a small hole, then fill the cloud loosely but evenly with padding poly, helping with some kind of stick. Then, sew the product until the end.
Step 3. Now we will make the garlands. To do this, first calculate in advance:
- how many garlands will hang from the cloud;
- how long should they be;
- how many droplets need to be attached to each and at what distance from each other.

Next, we begin to sew and at the same time form the garlands according to this principle: we attach the thread to the edge of the cloud, sew the first droplet (on top) to the thread, cut off the thread. Then we attach a thread to the bottom of this droplet and sew the next droplet to it, then we cut the thread and sew the next part. We continue until you have a garland of the desired length, after which we begin making the next one.
Step 4. Now all that remains is to sew a loop to the back of the panel and hang it on the wall.
The following selection of photos presents alternative ideas for wall decor made of felt or fabric that you can come up with based on this master class.


Master class No. 2: How to make a panel depicting the silhouette of a child
Here is another master class on how to make a simple but very original panel for a nursery with your own hands.

Materials:
- Canvas on a stretcher (in this lesson we use a square canvas measuring 30x30 cm);
- Acrylic paint (red, white and blue colors are used here);
- Any Oracal vinyl self-adhesive paper;
- Foam rubber or any other brush.
Step 1. Buy a ready-made canvas on a stretcher in the desired size or make it yourself. If desired, the canvas can be repainted in the color you want, for example, acrylic paint water based.
Step 2. Decide on a photo that will become a template for the future image.
Step 3. Using Photoshop, Corel Draw or any other photo editor, resize the photo so that it fits on the canvas. You can also use a program (for example, the Magnetic Lasso tool, Pen tool, or eraser) to remove the background and leave only the desired image. How to do this, see the following video tutorial:
Step 4. Print the photo on regular office paper, cut out the silhouette and secure it to the canvas using pins or masking or double-sided tape (which will peel off easily and will not leave marks).

Hint: you can also transfer the outline first to the back of vinyl self-adhesive paper (copy paper will help here), then cut out the silhouette, glue the resulting template onto the canvas, paint it (more precisely, the background part of the panel) and only then peel off the paper. The result will be neat and the process will be quick.

Step 5. Carefully and very lightly trace the outline of the silhouette with a pencil.
Step 6. Now paint over the background and leave the silhouette unpainted. Or vice versa - paint the silhouette and leave the background the same. The third option is to paint both the silhouette and the background with different colors.

Silhouettes can be placed not only on canvas, but also on any paper (wallpaper is perfect), and then frame the picture with a beautiful frame, as in the following examples.


However, such a panel in a nursery cannot necessarily be made based on a photo of the owner of the room, but also on images of his favorite cartoon characters or animals.

Master class No. 3: How to make wall letters from cardboard and fabric
Interior letters have long been in fashion, why not make up the child’s name from such letters and decorate the walls of the children’s room with them?

Materials:
- Cardboard;
- Pencil;
- Scissors;
- Several pieces of beautiful fabric (if you don’t have fabric, you can use paper wallpaper);
- PVA glue.
Step 1: Select beautiful font and type the baby's name (or any word) into large size so that each letter fits on a separate A4 sheet. If you don’t have a printer at hand, you can simply place a sheet of office paper on the computer screen and trace the outline of a translucent letter. To make the letter shine through better, you need to increase the brightness of the screen and turn off the lights in the room so that it becomes dark enough.
Step 2. Now you need to transfer the outline of the letters onto the cardboard. You can do this in two ways:
- Carefully cut out each letter of the name/word using scissors or a utility knife, then place the resulting templates on the cardboard and trace them.
- Use carbon paper.

Step 3. It’s time to cut out the same blanks, but a little larger in size and from fabric. To do this, place a cardboard blank on the material and, making an indent of 1-2 cm from it, draw the outline of the letter by eye (right photo above), and then cut it out as shown in the next left photo.

Step 4. So, we have “patterns” made of fabric with allowances of 1-2 cm. All we have to do is “cover” the cardboard letters with them and fix the folds with glue, and then attach small loops and hang the panel on the wall.

Here is a selection of photos of other examples decorative letters, including: letters cut out of plywood, cardboard letters with soft filling under the fabric, letters wrapped in thread, decorated with ruffles, pom-poms and other materials.


Other ideas
And finally, we present to you a selection of other ideas for children's panels that you can make with your own hands in 1 evening and use available materials for this, say, wallpaper, lids from under cardboard boxes, toys, fabric scraps, etc.


Content
A panel is almost a painting, but more intricate, original, and unusual. I want to examine every detail of it, admire it, and abstract it. Modern interior decor often includes a variety of panels, of which there are a great variety of styles and options. Therefore, many needlewomen try themselves in this type of creativity, creating small masterpieces, enjoying the process and the result.
A felt panel is one of the most common variations of such needlework for many reasons. Firstly, felt is a simple and pliable material that is easy to work with even for novice craftswomen or children. Secondly, the combination of multi-colored felt always looks beautiful and impressive, attracting attention and catching the eye. Thirdly, it retains its appearance, does not deteriorate over time and does not fade.
It’s not difficult to make a felt panel with your own hands. To do this, you just need to select everything necessary materials and tools, as well as arm yourself with good detailed master class. Step-by-step execution simple steps will help you achieve the desired result and create a beautiful, original panel. Moreover, even if you follow the instructions, it will still turn out different, different and unique.
Personalized panel for a children's room
Recently, personalized panels for children, which are hung in the children's room, usually above the crib, have become increasingly popular. They are decorated with different animals, flowers or other attributes of childhood, which are easy to make with your own hands.
You can make a circle and letters from felt in any way you want and at your own discretion. How to choose the color of such a panel. It will be more difficult to sew animals, but if you have good and detailed patterns, the process will also not take much time and effort. The advantage of animals is that they can be used for panels of a boy or a girl.
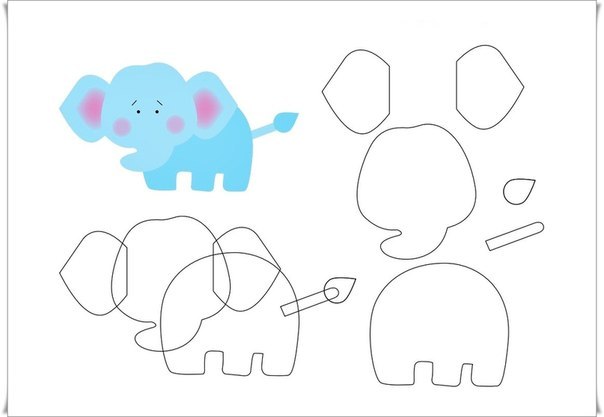
You can sew a funny elephant.
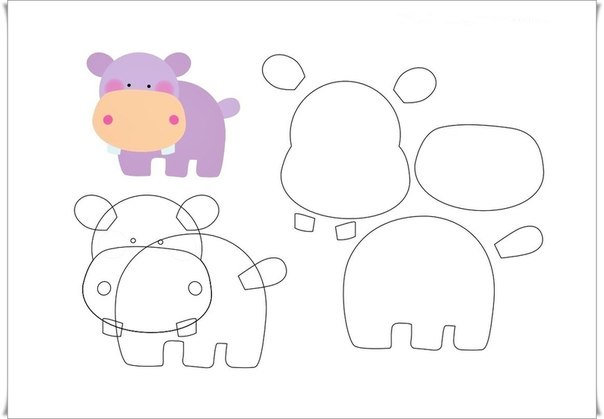
And place a cute hippopotamus next to the elephant.
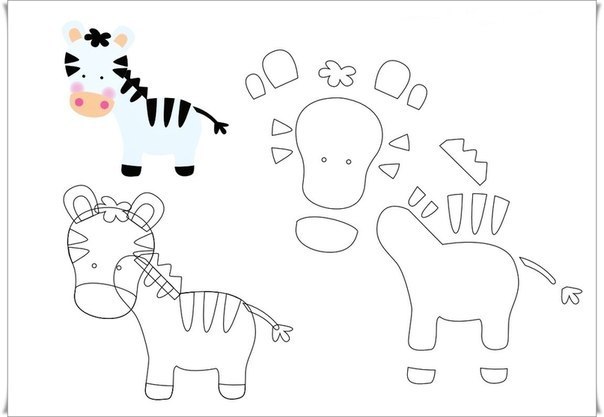
The zebra looks more complex because it consists of many small parts. But accuracy and consistency of work will allow you to make a beautiful striped horse.
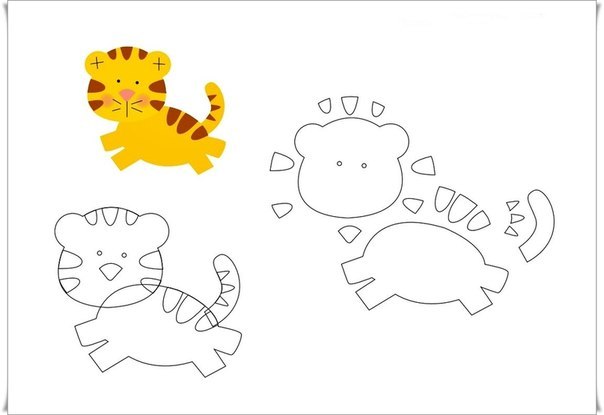
A small tiger looks just as fun and playful on a children's panel.
You can find or even come up with many other animal options that are easy to make from felt yourself. Children's panels are different bright colors and joyful pictures, so even the process of creating such a small masterpiece will bring pleasure. The sequence of actions using felt includes the following steps:
- Preparation of material and tools.
- Create a pattern on paper and transfer it to felt.
- Cutting everyone out components future panel.
- Fastening them with threads or glue.
But perhaps the most important factor that will help you make a beautiful and unusual panel is the imagination of the needlewoman. After all, any pattern can be supplemented and changed according to your own taste and discretion, so that the result is even better. The main thing is to start and give free rein to your creativity.
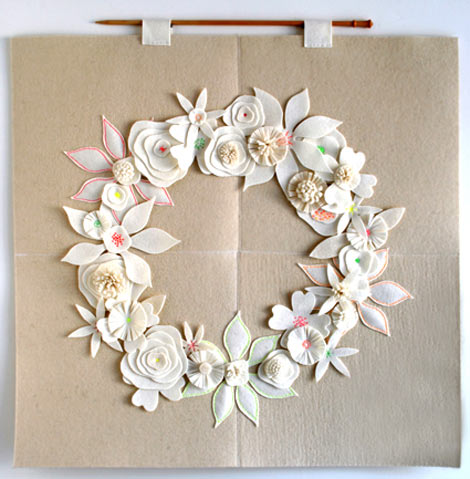
Delicate panel of flowers
The beauty and advantage of the panel is that simple, uniform elements, decorated in different ways, create an overall attractive picture. Of course, creating such a small masterpiece is a painstaking process that requires perseverance and the right attitude. But the result always exceeds any expectations, so it’s worth the effort.
To decorate a bedroom or living room, you can make a floral panel from felt. Thanks to the light tones of the fabric, it looks gentle and unobtrusive, and it’s easy and quick to do.
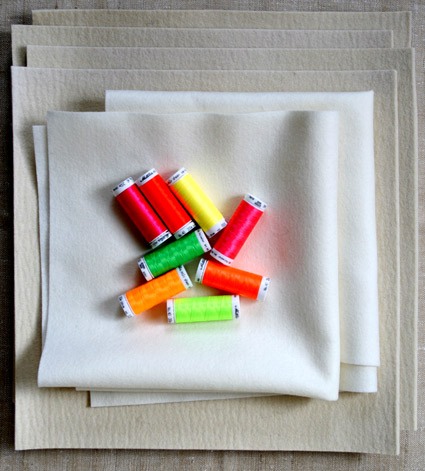
To create such an unusual picture you need to prepare:
- light felt in two shades;
- multi-colored threads for decoration;
- scissors, needle.
You can draw diagrams of flowers and petals yourself, it’s not so important what they look like. It should be noted that the panel consists of many similar and identical elements, but different decor creates a feeling of richness and variety. The sequence of its manufacture includes the following steps:
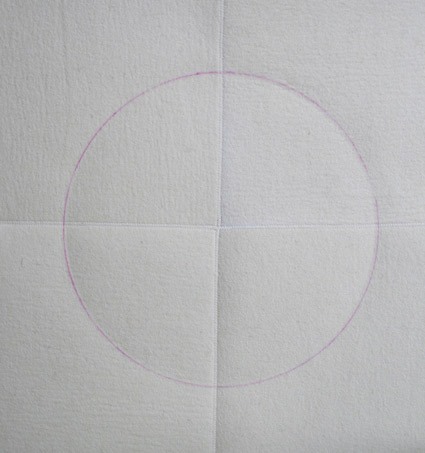
On a darker sheet of felt you need to draw the approximate diameter of the future flower wreath. Depending on the size of this sheet, it can be solid or sewn from several pieces. You don’t have to worry about the drawn line; after sewing on all the colors and elements, it won’t be visible.
The next stage is preparing paper patterns. You can draw flowers directly on the fabric, but if you want to make identical elements, you need patterns. Therefore, first all the details are drawn on paper, then cut out and transferred to fabric.
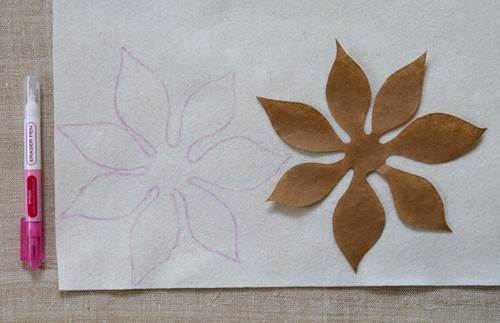
After the stage of transferring the patterns to felt, all elements need to be cut out. At this step, it is important to be careful and take your time so that the flowers have beautiful, smooth edges. Moreover, thin felt can tear, and then the work will have to be redone.
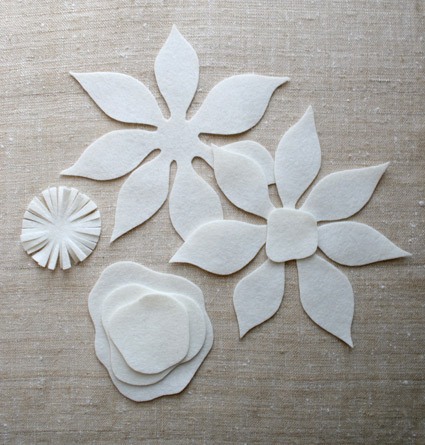
To create three-dimensional flowers, you need to take separate strips of felt. The picture shows how to fold and cut them correctly to make several convex buds.
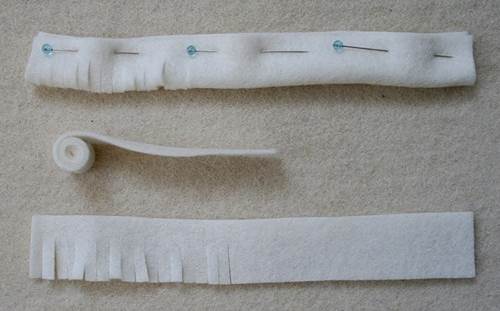
When finished, they look original and really resemble small white flowers.

When all the elements are prepared, you can begin the process of assembling the panel. However, before sewing on the first flowers, you need to lay out the entire picture, check whether there are enough flowers and petals cut, and whether all the elements look harmonious together. If necessary, you can add something, but be aware of a sense of proportion.
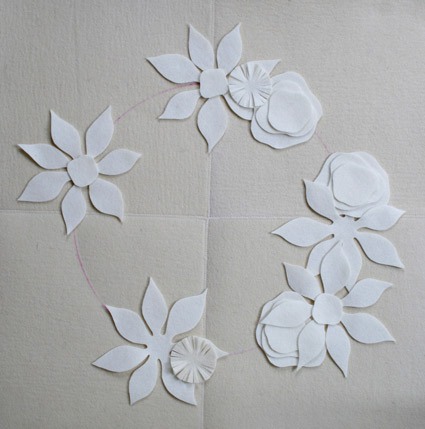
The final picture should be rich, but harmonious, so that every flower is in its place.
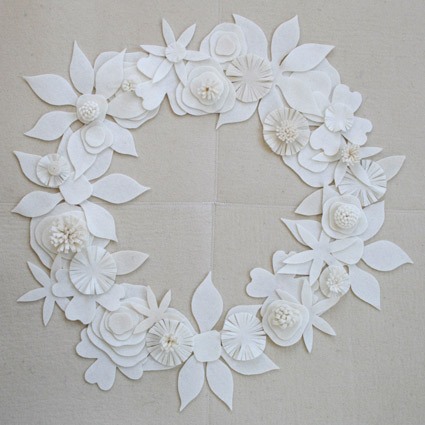
The process of sewing flowers and petals coincides with decorating the panel. That is, colored threads are used not only to secure all the elements together, but also to decorate them with small touches.
Decoration is much simpler than you might imagine. On one flower you can make small stamens, on another - several barely noticeable stitches.

Some flowers need to be attached only in the middle, others need to be sewn completely around the perimeter of the petals. Here you can use your imagination and do as your creative imagination wants. The freer your thoughts and actions, the more original the final result will be.
Relatively recently, an excellent material for making crafts with your own hands has appeared on sale - sheet felt. Handmade lovers immediately appreciated the advantages of this material. It is not friable, dense, holds its shape well, has a wide variety of color shades, and the color of the felt is the same both from the face and from the back of the material. Felt practically does not wrinkle or deform.
Using these qualities, with the help of felt, craftsmen and craft lovers began to bring to life their most daring and fantastic projects, demonstrating the highest class and creating real masterpieces.
Of particular interest are DIY felt panels. They are so beautiful that after seeing them at least once, you will definitely be inspired by the idea of creating something similar at home, especially since even a beginner can easily cope with this work.
Starting work on the panel
So, to work on the panel you will need:
- multi-colored sheet felt;
- threads in the color of felt;
- scissors;
- needle;
- paper template and pencil.
To understand the essence of the process of making felt panels, it is advisable to review the publicly available master classes on working with this material. Here you can also find the necessary patterns, which you can use by printing them on a printer.
However, it is much more interesting to come up with a plot for a felt panel yourself. After all, work made with your own hands and according to your own sketch will be exclusive. Such a panel will transform the interior of the room beyond recognition, creating a feeling of celebration and home comfort.
From simple to complex or how to make letters for a personalized panel
Having mastered a number of intricacies, you can easily make a personalized 3D (volume) panel from felt. Such a panel, in the form of letters attached to a cord, will look great in a nursery and contribute to the development of the child.
Ready pattern Place it on felt and trace the contours of the future letter with a soft pencil. The pattern is then turned over reverse side and again outline the outlines of the same letter. Thus, each letter will consist of 2 parts.
The parts are placed on top of each other and stitched together hand stitch. But not completely. To give the letter volume, a small piece of felt is left unfinished. Subsequently, the letter is filled with holofiber through it and only then the letter is finally sewn together.
In some master classes, it is recommended to use silicone balls, padding polyester, small scraps of fabric or ordinary cotton wool as filler. It is advisable to avoid using the last two, since after washing, a product with such a filler loses its shape and falls off.
Assembling the composition into a single whole
Having made the letters of the personalized panel, in addition to them, you can also make hearts or flowers from felt, since the Internet is replete with master classes on this topic. By placing these details between the letters, or even on the letter itself, you will make the composition more interesting. You may like the option of decorating the letters with round polka dots in a color that contrasts with the color of the letter itself.
In general, until everything is finally fixed, you can experiment and choose the most optimal option. Having decided on the composition, all that remains is to sew all the details to a piece of cord and the panel will be ready.
When mounted on a wall, due to the flexibility of the cord, the panels are given the desired configuration, which can be modified over time.
Ideas for felt panels
As you can see, making a panel with your own hands is not difficult even for those who do not know how to make patterns on their own. By taking advantage of ready-made master classes, you will definitely gain additional ideas in this area of creativity.
Have you ever tried working with felt? Its advantages are that this material is very diverse in colors, simple and pliable to use and easily accessible. And the ways of using it are so diverse that it would be difficult to list them: toys, dolls, jewelry, book covers, pincushions, educational aids for children, covers and cases. And besides, they make unusual designer panels. Our master class with photos and patterns is dedicated to their creation. A felt painting will add coziness to your home with your own hands, and is also suitable as a gift for loved ones.
Creating applications will be useful for children, will help them develop imagination and fantasy, a sense of beauty, fine motor skills hands But adult needlewomen will also find that this is a fascinating activity. Creating such a craft with children usually involves the use of glue, but for “adult” work it is better to stitch it with threads. You can complement your work with beads, ribbons, buttons and other decorative elements. In addition, felt can be combined with other fabrics.
Making a simple felt painting with your own hands in a master class
Felt is a non-woven textile. Simply put, felt made from rabbit or goat hair or synthetic materials. The choice of wool is based on its properties, which ensure strong adhesion of the fibers. Felt can vary in density and thickness. It is easy to find in craft stores, and the richness of colors makes it a favorite material for many needlewomen.

In our master class you will need:
- thick cardboard
- scissors
- beads
- thread and needle or glue
- patterns (you will find them in our master class)
- buttons
A painting with flowers can be bright and colorful. Or you can choose a delicate pastel color scheme for her. It depends only on your taste and desire, because felt is available for sale in all sorts of shades, and it can also be ordered online.

Step by step guide:
- First you need to prepare the background. Cut out a piece of felt to the desired size. You can cover a cardboard frame with it for strength and reliability.
- From felt of selected colors and shades, we cut out the elements of the future composition using patterns. For convenience, you can trace the patterns on felt with crayons.
- Think about how the details of your composition will be arranged. Start sewing starting with those that will be located in the background.
- Flower cores can be decorated with beads or buttons.
Paintings with voluminous flowers look very beautiful. Quite simply with your own hands from plain felt make voluminous roses. To do this, you need to cut a circle with a diameter of at least 10 cm. Along its edges, leading the cut in a spiral to the center of the circle, “waves” are made with scissors, which will represent petals. Then the spiral is twisted, forming a flower, gradually gluing and securing it. For clarity, we offer you the photo below.

Having mastered this simple technique You can create various decorations with felt flowers. Headbands and elastic bands with roses look especially good on little girls, so you can make them as a gift for your princess daughter.
Tips and ideas.Modern needlewomen often use ordinary hoops as a frame for felt panels. It looks very cool and stylish.

The felt parts can not only be sewn or glued, but also felted, if that is more convenient for you.
When making felt applique for children, choose subjects that they understand. It could be animals sea creatures, toys or products. Sew Velcro onto the parts and you will get an educational game. For example, in this way you can make a bed with vegetables or a bowl of fruit, a tree with apples and much more. Participation in the creation fun game will especially please the child. The photo below shows options with felt applique patterns for children.

And now personalized panels for children are very popular. They look like paintings or wreaths with a children's story and the baby's name. Often the date of birth, weight and height of the child are also written on them.
If you thought that felt paintings made quickly and easily with your own hands could only be used for home decoration, then we will tell you about other possibilities of these wonderful things. If you make a pocket in such a picture and hang it next to the table, you can put little things there, like in an organizer. Felt is perfect for storing earrings, just secure it in a frame without a cardboard wall. And if you fix the picture on a cork stand for hot food, you will get an original planning board.

Video on the topic of the article
At the end of our article, we invite you to watch the video master class. It clearly presents all the features of working with such a material as felt, and you definitely won’t miss a single important detail.
Panel "Duckling". DIY felt applique. Master class with step by step photos
Stepanyuk Olesya Aleksandrovna, teacher of the Children's Educational Institution "Kindergarten No. 3, Shimanovsk, Amur RegionThe master class is designed for older children preschool age, students, teachers and parents, as well as everyone who is interested in needlework!
Target: making felt applique.
Tasks: Introduce the properties of felt. Develop aesthetic perception, creativity, attentiveness, fine motor skills. Cultivate neatness and artistic taste.
Purpose: the panel will decorate the group kindergarten, children's room, and can also become a wonderful gift for the holiday.
Technique: felt applique.
Application - this is cutting out and gluing various shapes, patterns or entire pictures from paper, fabric, cardboard and other materials. Basis - the background for the application is selected depending on the texture and color of the materials used.
Felt (ojlyk - bedspread) - dense non-woven textile material made from felted wool. It is usually made in the form of panels that have different thicknesses, depending on the purpose. Types of felt made from the fine down of rabbits or goats are known as felt(feutre). Felt with short, thick and soft pile is called velor.
The only one natural material The material from which felt can be made is wool, with sheep's wool being the best. Wool fibers have an upper scaly layer - the cuticle. Thanks to it, the fibers can adhere to each other under the influence hot water and a couple. The principle of felting is based on this. (Wikipedia)
I bring to your attention a master class on making a “Duckling” panel from felt.
M. Korneeva
Naughty duckling Ut
Doesn't want to rest.
Then he cleans his belly with his paw,
Then he catches a fly with his beak,
Then he gets lost in the garden,
Then he runs to dive in the pond,
Then suddenly he hides behind the booth,
Will scare the mother duck
Or he'll steal a worm
At the neighbor Turkey's.
Strict Uncle Cockerel
Locked Utya with a padlock,
And now at least five minutes
Everyone will rest peacefully!
Required materials and tools:
Felt (white, yellow, green, dark green, red, orange, crimson)
Templates
Scissors
Cardboard
PVA glue
Pastel
Frame
Landscape sheet
Felt pen (black)
Decorative needles

Step by step description works:
1. To start working, you need to decide on the topic of work. I found and printed out a picture I liked on the Internet.

2. I prepared templates from cardboard.

3. We begin work by preparing the plants.
We place the grass template on dark green felt, secure it with a needle and cut it out.


4. Cut out leaves and a bush from green felt.


5. Using one template, cut out three tulips from raspberry felt.

6. From red - a flower.

7. Prepare the shell and eyes from white.


8. ...the body and wings are yellow.


9. Orange beak.

10. And this is what should happen.

11. Glue a landscape sheet onto the base from under the frame and tint it with pastels as desired. We are not putting it in the frame yet.

12. We begin assembling the panel from the grass using glue. Glue on the shell, the body and the shell again.


13. Attach the beak, eyes and wings.

14. Lastly, glue the leaves and bush, then the flowers.


15. Using a black felt-tip pen, draw on eyebrows, eyelashes, and beak.

16. Insert it into the frame and add a decorative butterfly. Our panel is ready!


Using this technology you can make an applique from colored paper.

Templates and plot used.