Composition for the New Year in kindergarten. DIY winter crafts for kindergarten and school from natural materials (photo). DIY New Year's compositions
Quick navigation through the article
Has a kindergarten or school announced an exhibition of winter-themed crafts? Or do you just want to keep your little one busy with creativity on these cold days? In one material, we have collected for you 6 ideas for winter crafts from natural and scrap materials with step-by-step master classes, a selection of 60 photos and videos.
Idea 1. Tabletop diorama with a winter theme
A tabletop diorama will allow you and your baby to show off all your talents - from modeling to design. Moreover, using the most different materials and objects: branches, cones, toys (for example, from Kinder Surprise eggs), plasticine, salty dough, cardboard, cotton wool and much more.
First of all, you need to come up with a plot for your diorama and plan the composition. You can recreate any of your fantasies or be inspired by our selection of topics with photos and small tips on making crafts.
Topic 1. “Winter in the forest”

The craft is made of polystyrene foam and plasticine. A bear can also be made from polymer clay or salt dough

If in kindergarten or school you were given the task of making a winter craft from natural materials, then you can use pine cones. They make excellent Christmas trees, owls, deer, squirrels and hedgehogs for the winter forest. By the way, we just have several master classes on making them

Want to do simple craft more effective? Just light it up with an LED garland! To embed light bulbs in cardboard, you need to make cross-shaped cuts in it.

This winter forest is made entirely of felt. Animal figures can be placed on fingers

Topic 2. “Winter House”
A favorite theme at winter craft exhibitions. The house can be surrounded by a forest or a courtyard with paths, a gate, a rowan tree, a skating rink and a snowman. And the hut itself can be beautiful not only outside, but also inside.

This video tutorial shows a simple and quick way making winter crafts from natural materials, namely twigs and pine cones.
Topic 3. “Christmas in a village/town”
If you build a couple of houses and connect them with beautiful streets, you will have a whole village or town.

The easiest way to make houses is from paper, or rather from printed templates that you just need to cut out, paint and glue. The next video presents step-by-step master class for making such a craft.
Topic 4. “The North Pole and its inhabitants”
Do you want to do more original craft? We suggest making a diorama on the theme of the North Pole.

To make such a craft, download and print the templates (click on the picture to download), transfer them to cardboard, then cut, connect and paint the parts


Topic 5. “Winter fun”
Craft on the theme winter fun illustrates all the joys of winter. For example, sledding, making snowmen or playing snowballs. To recreate winter scenes, Lego men (pictured below), Kinder Surprise egg figurines and any small toys. You can also make little people with your own hands from plasticine or polymer clay.

Topic 6. Winter sports
Another very original idea crafts - a diorama on the theme of skiing, figure skating, hockey, bobsleigh, snowboarding. By the way, the Olympics in Sochi can serve as inspiration and a model for modeling.


To make these ski figures, download, print, color and cut out the templates (click on the picture to download the templates), then glue a toothpick to the hands of the men, and a popsicle stick to the legs.


Topic 7. Scenes from fairy tales
Choose your favorite fairy tale and recreate one of its episodes. For example, this could be the fairy tale “12 Months”, “The Snow Queen”, “Morozko”, “The Nutcracker”, “At the Command of the Pike”.

Everything in this craft on the theme of the fairy tale “At the Command of the Pike” is molded from plasticine and only the mill is assembled from matches

To make such a craft, you need to cut several holes in a piece of plywood and insert tree branches into them

This composition is dedicated to the theme of the ballet “The Nutcracker”. The figures in it are made of... clothespins. Unfortunately, clothespins with a round top are not sold in Russia, but you can order them on the Aliexpress website or use regular ones
From this video you will learn how to make a winter craft with your own hands based on the fairy tale “At the Order of the Pike.”
Idea 2. Skating rink with a controlled figure
The originality of this winter craft is that the skater can be smoothly “rolled on the ice” by moving a magnet along the back of the box.

What you need:
- A shallow tin can for cookies, tea, etc.
- Paper;
- Paints and brushes, pencils or markers;
- Paperclip or coin;
- Glue;
- Magnet.
How to do it:
Step 1. Decorate the tin box so that it resembles an ice skating rink: paint the bottom with blue and white paint and cover clear varnish(glitter nail polish works well), you can place garlands and flags on top of the box, and snow-covered trees on the sides.
Step 2. Draw a figure of a girl or boy skating on thick paper or cardboard, then cut it out and glue it to a coin or paperclip.
Step 3. Attach a magnet to the back of the box. Voila, the skating rink is ready!
Idea 3. Painting made with prints
Drawing pictures with fingerprints, handprints, and even toes is a lot of fun, especially for preschoolers. All you need is imagination, gouache and a sheet of paper! In the following selection of photos you can see examples of such drawings.


Idea 4. Mini Christmas tree made of paper
Another winter craft idea for little ones is paper Christmas trees. They are made very easily and quickly, and you can use them in any way: as decoration for the same diorama, applique for New Year's cards or a panel to decorate a garland or Christmas tree.

What you need:
- A sheet of green paper and some brown paper for the trunk;
- Glue stick;
- Scissors;
- Sequins, rhinestones, beads and other decorations for the Christmas tree.
Step 1. Make a square from a sheet of green paper by folding one corner of the sheet as shown in the photo and cutting out the excess.

Step 2. Cut one of the short sides of the triangle into equal narrow strips, not reaching the fold about 1 cm (see photo above).
Step 3. Now straighten your workpiece and begin gluing the ends of the strips to the center fold line one by one, moving from bottom to top.


Step 4. Once you have secured all the stripes, fold and glue the bottom corner of the tree to the top. Further in the same place, but with reverse side, glue a small rectangle (tree trunk) cut out of brown paper.


Step 5. Decorate the tree with colorful beads, sparkles, buttons and other decor. If you wish, you can make several of these trees, glue loops to them, and then assemble a garland or decorate a real tree with crafts.
Idea 5. Snow globe... or rather a jar
Now we propose to make a real souvenir with your own hands - a variation of a snow globe. True, it will be made from an ordinary glass jar. The child can give the craft to a loved one, present it at a winter crafts competition, or simply leave it on the shelf for beauty.

What you need:
- Glass jar with lid;
- A piece of foam;
- Glue (hot or “Moment”);
- Acrylic paint for decorating the lid (optional);
- Artificial snow or just sea salt, sugar, finely grated white soap or polyethylene foam;
- Figurines that will be placed in a jar;
- Foam balls or any white beads;
- Fishing line;
- Needle.
How to do it:
Step 1: Repaint the lid the desired color and leave to dry. In this project, spray paint was used to remake the lid.
Step 2. While the paint is drying, let's make a “snowfall”. To do this, you need to string several foam balls onto a fishing line threaded into a needle. Use tape to attach the snowflakes to the jar.
Step 3. Trace the bottom of the jar directly onto the foam, then use a knife to cut the resulting circle out of it. This circle will become the basis for the figures.

Step 4. Glue your figures to the foam circle, then glue the resulting composition to the bottom of the jar.
Step 5. Pour artificial or homemade snow into the jar, close it with a lid with snowflakes and enjoy the view of a winter fairy tale.

Idea 6. New Year card
There are never enough New Year cards, so we suggest making a few together with your child.

What you need:
- A sheet of white paper;
- A sheet of colored paper;
- Scissors;
- Glue stick;
- Markers.
How to do it:
Step 1. Fold a sheet of white accordion paper three times so that each top accordion layer is smaller in width than the previous one.
Step 2. Straighten your accordion, cut the sheet diagonally and slightly in waves as shown in the photo above, then assemble the accordion again. You have the slope of a snow-covered mountain.
Step 3. Now take a sheet of colored paper, glue the blank onto it and cut off the excess. Hooray! The postcard is almost ready.

Step 4. Decorate the mountain with Christmas trees, draw snowmen and skiers and finally sign the card.


Using the same principle, but using larger paper, you can make a winter craft in kindergarten.


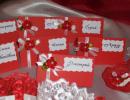
They say that the anticipation of celebration, especially when it comes to preparing for New Year's festivities, is even better than the holiday itself. In kindergartens and schools, everyone is preparing for matinees, decorating classrooms, creating New Year's compositions with their own hands and holding competitions. So what are they? New Year's compositions do it yourself: TOP 10 ideas with photos you can come up with.
NEW YEAR'S CRAFTS IN KINDERGARTEN
Crafts dedicated to the New Year are especially loved by the youngest kindergarten students, because you can use everything that is shiny, beautiful and in unlimited quantities.
Top 10 ideas New Year's crafts for kindergarteners
“Well, where are our pens?”
Let's start with nursery group. It’s hard to imagine what a baby who also has difficulty speaking can do? And these kids will have something to do.
We trace a small palm with a pencil on colored paper or cardboard and cut it out. From such blanks you can make a large Christmas tree on the wall of the group. Each child must glue his own palm or several. Paper Christmas tree can be decorated with cardboard toys. You can paste photos of the group's students onto paper Christmas balls.


The palms will also make a Christmas wreath, which can be decorated with decorative berries and ribbons. White and red blanks will make a wonderful Santa Claus or snowman. 
Do you have a free wall in your band or music room? You can decorate it with your own hands as a large New Year’s composition of palms. From the blanks you can make houses, Santa Claus, Snow Maiden, animals and anything you have enough imagination for.
“The Christmas trees are rushing around the city...”
Roll a sheet of whatman paper into a cone. Then everything happens that the imagination is capable of. Little ones can coat a green cardboard Christmas tree with glue and sprinkle it with sparkles and sequins.
With older kids you can make Santa Claus. Draw a black belt on the red cone, make a beard out of cotton wool, and draw a face. 

Snowman, snowman, appeared in the yard
Kids love to make snowmen and not only from snow... Cotton wool will do, cotton pads, threads, plastic cups.
You can create a winter composition from a family of snowmen with your own hands from cotton wool, cardboard box, glue, glitter, ribbons, pencils and paints. 
You can try making big snowmen from plastic cups. 
Making snowmen from threads is very easy and very fun. The technology can be seen on the Internet. 
Crafts made from salt dough
There is no limit to creativity here. The dough recipe can easily be found online.
Invite kindergarteners to create a Christmas composition from candles with their own hands. To do this, knead the dough different colors. Give kids disposable tubes kitchen towels. Let them roll sausages and make striped candles or completely cover the base of the candle with dough. 
Older children, together with their parents or teacher, can create real New Year's pictures from salt dough. You can use thick cardboard in a frame or a plate as a basis. 
Threads and cardboard
Prepare balls of thread of different thicknesses, cardboard, glue, paints and cookie cutters. Older children can handle this type of New Year's crafts almost independently. We trace the mold on the cardboard with a pencil and cut out the blank. We wind the threads onto cardboard, fixing them with glue at the beginning and at the end. If necessary, we paint the toy and decorate it with sequins, half beads or rhinestones. 
A miracle the size of a button

Buttons different forms, colors and sizes - a great material for creating New Year's crafts with children.
With the guys from senior group, they are no longer afraid to trust needles; you can make exclusive New Year’s balls as a gift to your family. For the toy you will need a foam or rubber ball (any one that can be pierced), a thin beautiful ribbon, and a shaped hole punch with small flowers. Wrap the ball completely with tape. Use a hole punch to cut out miniature flowers. Using a hairpin with a head, we fix the flower to the Christmas tree toy.
Flowers can be replaced with colored buttons. 

With very young kindergarten students, you can make simple but very stylish cards and give them to your relatives or send them to Santa Claus. We will need three buttons, a blank for a postcard or a sheet of beautiful double sided cardboard, bent in half, acrylic paint and a thin brush or markers, glue. The kids will make a snowman out of buttons, and an adult will help complete the drawing of the hat, carrot and hands. 

"I love pasta..."
From pasta you can make not only a hearty dinner, but also a Christmas tree, angels, and everything that the imagination of the teacher and children can handle. 


The second life of damaged CDs
Discs for CD players are an excellent basis for DIY New Year's compositions. Children 5–6 years old can be introduced to the elements of decoupage. This does not require special materials: a disk, a themed napkin, PVA glue and a wide brush.
You can also make Santa Claus, any animals, gnomes, snowman, etc. from disks.


Natural material
Well, what kind of DIY New Year's crafts without natural material. Squirrels and snowmen, made of pine cones, Santa Claus made of acorns, snowman.


Fluffy pompoms
You can also make pompoms from threads and thick paper. From the latter you can make a fluffy Christmas tree, funny snowmen, and animals.
photo of a snowman made of pompoms!
Compositions for the New Year for a competition for schoolchildren
In anticipation New Year holidays Schools usually hold competitions, exhibitions or Christmas markets.
Top 10 New Year's compositions for school competitions
Christmas wreaths
One of the simplest and most effective DIY New Year's crafts. The basis for a wreath is usually a circle made of very thick cardboard or polystyrene foam; you can also cut vine branches and roll them into a circle using wire. Then everything depends on imagination and the presence of decor. The wreath can be made entirely from natural materials: cones, nuts, acorns, dried lemons, cinnamon sticks. Options from New Year's balls are possible. 


Tildomania
Dolls in the Tilda style are a huge success among needlewomen. It is better for beginning craftswomen to sew from fleece or felt. For the New Year, you can sew Snowmen, Santa Clauses, deer and other holiday characters. 


Christmas cupcakes
There are a lot of recipes for small personal cup-sized cakes online. You can decorate them with sugar mastic or cream. The theme of the decorations is, naturally, New Year's. 


Beautiful winter compositions for decorating tables and interiors.
Ekibana is the art of arranging bouquets using various natural materials.
Beautiful compositions help to diversify the interior, decorate a holiday table or give an originally designed gift.
Ekibana from fir branches for the New Year: ideas, compositions, photos
Real spruce branches will become a great addition New Year's ekibana. The forest aroma will add a festive mood, creating the association of a winter fairy tale.
- New Year's spruce branches go well with golden and red tones. A composition decorated with balls, candies, beads and pine cones will become bright accent festive interior.
- The festive table can be decorated with a composition located on a multi-tiered vase

 Natural materials combined with white balls
 - The combination of the smell of spruce and citrus will add New Year's mood. Building such a beautiful fruit ekibana will not be difficult.
 Lemon, orange and fir greens
 - Ceiling decoration will not take up additional space, but will add a special New Year's atmosphere, especially if you add it with a garland

 Original sconce made from natural decorative elements
 - For those who like a non-standard form of composition, an eco-style in the form of a felt boot is suitable. Decorate it with fir branches, dried lemons, bright ranetki and forest cones

 Unusual Ekibana
 Video: Making New Year's compositions
DIY New Year's Ekibana for the festive table
The founders of the art of Ekibana are Japanese. They believe that pine is a very good-natured tree that cherishes all the flowers around it and goes well with any of them.
- You can create a festive atmosphere on the table with one pine sprig placed in a beautiful vase
- If desired, add any favorite flower: rose, gerbera, chrysanthemum, tulip, cyclamen, camellia, etc.
- The New Year's table can be decorated with compositions of any shape and size, decorating not only with flowers, but with fruits, sweets, Christmas balls, tinsel, ribbons
- To create a single composition we put pine branches in a vase with water
- Remove long shavings from the peel of the orange
- We put it in a rosette
- Take a toothpick and secure the flower

 Removing chips
 - Drying the rose

 Drying the workpiece
 - Add ready-made decorative elements to prepared pine branches

 Collecting Ekibana
 Video: New Year's composition of fir branches on the festive table
New Year's Ekibana in a basket
Prepare in advance:
- A beautiful basket
- Floral sponge
- Wire
- Bright roses
- Fresh leaves
- Spruce branches
- Dried fruits from orange and apples
- Christmas decorations
- Place a sponge soaked in water in the basket.
- Beautifully arranged fir branches sponge based

 Fill out the form
 - Decorate with leaves and decorative branches
- We stick roses

 Let's fantasize using any elements
 - We fix dried fruits on a wire

 Additional items
 - Add to Ekibana

 Ready-made New Year's Ekibana
 - Roses can be replaced New Year's balls

 Festive composition in a basket
 Do-it-yourself winter ekibana for kindergarten, school
Even kids can build a forest beauty together with their parents.
- From a sheet of whatman paper we cut out a circle with the radius of the desired height of the tree
- Fold into a cone
- Secure with stapler or glue
- We wet pieces of plaster bandage in water and glue them onto the base.
- Dry well
 Crafts for children
 - We place large cones on the lower part of the base, fix them with glue

 Decorating the template step by step
 - Next, reducing the size of the cones, we lay out the entire tree up to the top
- Then apply glue in places, sprinkle it with salt
- The Christmas tree looks like it's covered in snow

 We can stop here
 - We decorate the resulting space between the cones with tinsel and toys.
 If desired, make the composition brighter
 Video: DIY winter craft for kindergarten or school for a competition
DIY ekibana made from fir cones
The pure natural energy of natural pine cones creates an unusually cozy atmosphere in the house.
Eco style welcomes dry branches. They make the interior dynamic and light.
- Glue cones onto ordinary branches
- Decorate with garland
- Place in a vase covered with birch bark
- Fill the vase completely with cones, insert dry branches with a garland - another composition option
- Make a blank from balloons, cover with natural cones

 Ceiling Ekibana
 DIY New Year's Ekibana made from candies
The composition of sweets and champagne in the form of a pineapple looks original.
- Wrap the bottle in bamboo cloth and secure with threads
- Secure the tails on the candies with glue so they don’t stick out.
- After drying, attach the candies with glue to the bottle
- Start from the bottom
- Then stagger it to the beginning of the neck
- Cut out leaves from green ribbon and glue to the bottle
- Fix some sweets on the cut out leaves
- Tropical fruit ekibana is ready

Just fill the glass halfway with beautiful candies. Decorate decorative ribbon and flowers.

 Simple decor
 DIY New Year's Ekibana made from fruits
Fruit arrangements are most often made for gifts. This kind of ekibana tends to quickly lose its beauty appearance, therefore it cannot serve as a long-term interior decoration. You need to eat it as quickly as possible.
- Cut selected fruits beautiful shape. These can be hearts, circles, stars, any intricate shapes
- Sprinkle apples with citric acid to prevent them from turning black.
- Place one or more cut pieces on a skewer
- Place a special moistened sponge in the vase
- Stick the fruit
- Decorate at your discretion with tinsel and pine cones. Although bright fruits do not require additional decoration. Cut like this they look very impressive.

 Fruit Ekibana
 - The original composition is made from decoratively decorated orange peel.
You will need several forest cones, spruce branches, and cinnamon stars. The rest is up to your imagination.

 Bright oranges in a New Year's composition
 - Orange tangerines with candles are simple to make, but look very impressive
 Simple Ekibana
 New Year's Ekibana in blue and white
Cool blue and white tones are more suitable for a formal setting.
Create a composition of blue Christmas decorations, pine cones, blue spruce branches, dried oranges, white candles and walnuts.
 Ekibana in a simple style
 Delicate composition in blue and white colors
  Festive Ekibana
 Ekibana New Year's wreath
 Option New Year's wreaths

 Take flexible willow branches as a basis.
 Snow simulation is achieved with a strong saline solution
 Step by step example
 Scheme for making a natural wreath
 New Year's Ekibana made of beads
Such a work of art requires a certain skill and patience. If you have experience, you can use the proposed photos. But a home-made ikebana cannot compare with any ready-made purchased composition.
After all, the energy and love invested in the decoration is unique to you, so no one will have such a copy, even if someone tries to copy your composition.
The main thing is to do everything with taste and grace.
The necessary materials can always be found at hand, and if necessary, you can purchase missing natural preparations in stores.
Video: New Year's composition with candles
On the eve of the New Year, everyone's spirits rise. Regardless of age, everyone is waiting for some miracle. Perhaps we are all becoming a little kinder and smiling, we want to go shopping and choose gifts for family and friends, dreaming of what will be under your Christmas tree for the New Year. Thoughts are spinning in my head about what to cook for New Year's table how to surprise your guests. And, of course, an integral part of the holiday is the beautiful Christmas tree, which gives the house the most important New Year's magic. You also can’t do without New Year's decor For festive table, which everyone can do themselves without much effort and expense. In this master class you will learn how to make a New Year's composition with your own hands, you can even make it for a kindergarten or a matinee, from simple materials, but such a composition will undoubtedly attract the attention of every guest.
So, for work you will need:
— Decorative pot made of pine bark;
— Construction plaster;
— A figurine in the form of an owl;
— Artificial pine branch;
— A twig with white stamens;
— Universal glue;
- Styrofoam;
- Candle;
— Gold-colored ribbon;
— Gold-colored beads;
— Decorative berries and stamens;
— Rain of golden color;
- Cone;
- Acorn.
You don’t have to look for exactly the same materials; you can make one from existing ones at home, or use a snowman or any other ceramic figurine instead of an owl. It will be very symbolic if you take a rooster instead of an owl.
First fill the pot with construction plaster, diluted as indicated in the instructions, and glue the owl onto it in the center.
We decorate the candle with gold ribbon so that the metal walls are not visible.

Cut the foam a little smaller than the candle.

We glue the foam plastic to the place where we want to place the candle.


Glue a candle on top of the foam.

We intertwine an artificial pine branch and a twig with white stamens.

Glue a pine branch to the upper diameter of the pot.

We collect a small bouquet from decorative berries and stamens.

Glue the bouquet near the candle.

To cover the construction plaster, glue a small pine cone onto it.

Similarly, we cover the visible building plaster on the other side with an acorn.

Glue decorative berries in sugar onto a pine branch.

Decorate the branch with golden rain.

Glue gold beads between the berries.

New Year's Eve is completely ready! Imagine! Happy creativity and a great New Year to everyone!
DIY New Year's composition, photo.

Master Class. Craft " Magic house Santa Claus"
Author: Akhmadeeva Raisa Vladimirovna, teacher of State Budgetary Educational Institution Secondary School No. 1 “OTs” urban settlement. Construction ceramics structural division of the Rainbow Kindergarten, Samara region, Volzhsky district.You can make such a craft together with your children for an exhibition-competition at school or in older groups of kindergarten!
For production we will need: cotton pads, cardboard, gouache, cotton wool, brush, ruler, ceiling tiles, PVA glue, colored paper, a white sock, a colored sock, cereal (any kind for stuffing a snowman), a piece of wire, yogurt bottles, beads and tinsel for decoration.

Let's start creating the composition by making a Christmas tree. To do this, fold each cotton pad in half, and in half again, you should get triangles so that they stick, glue them with PVA glue or you can attach them with thread.

We make the cone-base of our Christmas tree from cardboard, and starting from the top we glue our cotton pads.

We paste this over the entire cone and decorate the resulting Christmas tree with multi-colored beads.

To make Santa Claus and Snow Maiden, we take 2 jars of yogurt for the base, and cotton pads for gluing. Cook the paste, dip cotton pads in the paste and cover the jars, out of 4 cotton pads we form cones and also soak them with paste (the future sleeves of Father Frost and the Snow Maiden), and from 2 cotton balls we form heads, coat them with the same paste. Leave for a day until completely dry.

After drying, we cover our Father Frost and Snow Maiden with paint; it is better to use gouache (as it hides unevenness).

Using PVA glue, glue the sleeves and heads, draw eyes, nose and mouth.

Using PVA glue, we glue a cotton fur coat, Santa Claus's beard, and a hat. Father Frost and Snow Maiden are ready!

To make a snowman, fill a white sock with cereal, and when forming balls, tie it with threads; insert a wire through the middle ball (these are the snowman’s hands).

Using beads we make eyes and a nose, cut out a hat and scarf from a multi-colored sock. It turns out to be a nice little snowman!

To make a house, we take a ceiling tile and draw out the details (4 walls, and 2 rectangular parts - the roof). The sizes can be any, depending on what kind of house you ultimately want to get.

We cut them out with a stationery knife and glue them with inside masking tape (it holds the parts from ceiling tiles stronger than regular duct tape).

We glue the outer corners of the house with pieces of colored paper.

Glue the roof with PVA glue; a window and a door cut out of colored paper. We decorate the house with tinsel.

We form our composition on another sheet of ceiling tiles. If desired, you can make a fence from the remains of the tiles, decorating it with tinsel. This is the Magic House of Santa Claus we got!