Paper angels, white (description and stencils). Angel from an openwork napkin DIY angels from an openwork napkin templates
Master class on making an angel from paper napkins.
Making an angel from napkins. Master class with photos
Author: Nina Aleksandrovna Tsyrulnikova, teacherPlace of work: BDOU of Omsk “Kindergarten No. 283 of a combined type.”
DIY Christmas souvenir or Christmas tree decoration.
There is still a little time to prepare decorations for the Christmas tree or a souvenir for a friend for the New Year or Christmas. I suggest making an Angel out of napkins with your own hands.
Angel made from napkins. Master class with step-by-step photos.
Application: The master class is intended for children over 5 years old, as well as for teachers and parents. Angels can be given to friends or family as a souvenir or amulet for Christmas, it can be hung on the Christmas tree.
Target:
acquaintance with a new way of making toys - Angel;
Tasks:
1. Continue teaching children various techniques for working with paper and the ability to follow oral instructions.
2. Develop fine motor skills hands, artistic taste and creativity.
3. Foster a work culture.
Excerpt from the story of G.N. Yudina "Guardian Angel"
The word “Angel” means “messenger” and if God sends an Angel to earth, he cannot be stopped by walls, locks, or doors, and he appears near us when we pray to the Lord for help.
A guardian angel is a being who endlessly loves us. He consoles us in our sorrows, softens our pains, and has compassion on us. He protects us from visible and invisible enemies, in this he is so strong that one can cope with an entire army.
Angels take care of our salvation with readiness and joy. Everything that is good, pure, bright in us, every good thought, every good movement of the heart, good deeds - all this is born and accomplished at the inspiration of the invisible meek Guardian Angel...
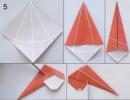
Step-by-step manufacturing process
Materials and tools:scissors
2 white paper napkins,
glue - pencil,
¼ part of a white A4 sheet,
white threads,
narrow ribbon, braid or rain.

1.Make a ball out of white paper.

2. Take two napkins and place them on top of each other.

3. Place a paper ball in the middle of the napkin.

4.Gather the corners and tie the base of the head with white thread. Sorry for the hand, it didn’t work out any other way.


5.Fold the top layer of the napkin up at the back.


6. Apply glue to the middle of the corners of the top napkin. Glue each corner together to create wings.


7.Let's form the angel's skirt by trimming the bottom with scissors and fluffing two layers of napkins.

8. You can tie a bow or scarf around your neck. All we have to do is make a halo from a piece of ribbon and glue it with a glue stick around the angel's head.

The same Christmas angels paper crafts can be quickly and easily made in large quantities and then give them to all relatives and friends.


God's gift.
Little angel on Christmas Eve
God sent to earth:
“How will you go through the spruce forest,
- He said with a smile, -
Cut down the Christmas tree for the little one
The kindest on earth,
The most affectionate and sensitive
Give it as a memory of me" ...
F. Dostoevsky.
Elena Ksenik
Far, far away, high, high is the city of good angels. Everyone has angel has his own ward, whose fate and affairs he always watches. Unfortunately, angels can't talk to people. They can
just dream!
To work for us will be required:
* simple scissors
* curly scissors
* openwork napkins d-21cm(1 piece, d-15cm (1 piece)
* glue stick
* paper napkins
* decorative wire
* toothpick
* color printer paper
Let's get started work:
Big and small openwork napkins cut in half and make them

Glue the small pieces to the big one (dress and sleeves angel)

From color paper, using curly scissors, cut out a semicircle

We make a cone out of it and insert it inside openwork cone(dresses)


For the head we use paper napkins(I have yellow ones, one whole unfolded and 1/4, two pieces. I used two-layer napkins,T. To.
they are smooth (layers separated)

Roll a whole ball into a ball

We wrap this ball in a small 1/4, napkin like lollipop

Cut off the tail

Where you cut off the tail, coat it with glue and form a ball

"Screw in" the toothpick

We make it from decorative wire angel head decoration

From the other half big cut out the wings using an openwork napkin

Glue the wings

Insert the ball (head) into the hole of the dress and our Angel is ready

Good afternoon, in this article I have collected a variety of crafts in the form of Christmas Angels. On the eve of this New Year, I want to do something kind, touching, pure and sincere with my own hands. I would like to let a kind, quiet helper into my life - an angel hovering next to me. Let today you want to make a little home angel with your own hands. And I'll show you the best different ways fulfillment of this desire.
Angels are on magnets.
(craft for children
with your own hands).
From cardboard, gift paper and a magazine page can be made beautiful angel on a magnet. Cut out a face from cardboard (regular beige-brown packaging). On it with a marker we draw black eyes (with drooping eyelashes), a nose and a mouth. We cut out hair from a magazine page - we look for a photo of a girl with hair in an old magazine and in this “hairy place” we cut out the silhouette of an angel’s hair (photo below). In the same magazine you can find photos from jewelry or lace and cut it out - to use an angel head decoration (as in the photo below).
We cut out an angel's dress from white cardboard, and cut out a semicircle from patterned wrapping paper - these will be the angel's wings. We assemble the craft using glue. WITH reverse side attach the magnet (with glue or double-sided tape).
And your DIY New Year's angel refrigerator magnet is ready.

To decorate the angels, you can use lace, remnants of wallpaper with a relief pattern, beautiful covers from old notebooks, old greeting cards, old gift bags, candy boxes, crispy inserts in candy boxes and other shiny and beautiful planes. An old CD cut in half can also become angel wings. Look around and you will find the right dressy material right at home.

It’s also very good to use openwork paper napkins for pastry baking for wings (as in the photo below).

If you want your angels to be not flat, but stood steadily on the table in the form three-dimensional figurine made of thick paper or cardboard. Then you can do something like this configuration of the lower part of the angels(as in the photo below). That is, CONTINUE the bottom cardboard skirt of the angel DOWN and fold it twice - to the back of the angel, and glue it to the back. Then your New Year's angel will stand on the table like a toy.

Paper angels
folding cards with wishes.
Children in kindergarten with their own hands they can make these cute angels from colored paper. those

Below I have drawn a diagram of the assembly of such an angel. So that everyone can understand how simple it is. Hair is cut from a strip of paper, before cutting, bend the upper part of the strip into a fold. And we cut the corners of this fold in a semicircle (we get the same shape as in the diagram below, with a bangs area and a loose hair area). We place a circle of pink paper (the face) under the fold line and bend the fold-bang on top.
The body of the paper angel can be easily folded according to the diagram below. We take a rectangle of paper and bend its upper corners downwards - to the middle of the bottom line of the rectangle (exactly as we do when assembling paper boat). Trim the top and you're done.

Paper napkin angel.
Craft for the New Year.
Here is an interesting proposal for table setting for the New Year. From cardboard we express a simple FULL SHAPE - a head with wings. In the middle of the wings (in the chest part of the angel) we make a triangular slot. And insert the tip of a paper napkin into it, folded in the shape of a sharp cone.

So I drew the outline of a template for this craft in the form of an angel. Now your napkins will sit beautifully on the angel plates - a great table design for Christmas. AND simple craft for children.

Crafts - angels
Based on a PAPER CONE.
We all know how to make paper bags. Cut out a paper circle. In a circle, cut off a sector of any size. We glue (or connect with a stapler) the side of the sector and get a cone.
If we take a narrow sector of a circle, we will get a long, thin cone. If we took a wide sector (half a circle or more), then we will get a fluffy wide cone-skirt for our angel.
Below are some ideas for crafts on the theme of a New Year's angel, where the basis for the angel's shirt is a paper cone.

These angels are glued together from a sector into a quarter circle. That is, we cut a round sheet like a pie into quarters. We glue each quarter-sector into a cone and get four blanks for the angel. Next, according to the diagram below, we make the wings (with a slot in the middle) and the head. We put all this together into a common craft in the form of an angel, folding his hands in front of him in Christmas prayer.

And here are angel crafts where the cone is made of thick gift paper. In the gift wrapping department, we can buy rolls or sheets of gift paper with bright holiday designs. This paper makes angels very elegant. Heads for paper angels can be made from ping pong balls (they can be tinted with beige gouache or beige eye shadow, and the paint can be fixed with hairspray). And you can glue hair from threads onto these balls. Cut the threads into pieces, arrange the pieces in a row in a bunch. Sew this bun with stitches in the middle - like making a part in your hair. And then glue this parted hair onto the angel’s head. Next, create a hairstyle of your choice.

For small crafts of paper angels, you can use a large bead as a head.

You can give your craft in the form of an angel a textured shape. To do this, all the parts connected together can be covered with paper napkins. Spread the cone with PVA glue and cover it with pieces of torn napkin, again apply a layer of glue on top of it and again a layer of napkins - this way we will get a durable papier-mâché craft.

And here is an interesting cutting of a paper angel based on a cone - where the wings are not glued to the angel separately, but are already included in the overall pattern of the craft. Below I give step by step instructions How to draw such a diagram for an angel by hand.

- First, we draw a circle, either with a compass or by tracing a large plate on a piece of paper.
- Then we find the middle line of the circle (draw a line with a pencil).
- Above the line we draw a circle of the head and the outlines of the angel’s wings.
- We take scissors and cut off the excess - the part that is above the drawn head and between the edges of the wings.
- And with scissors we make two cuts on the center line - the first from the right edge of the line, and the second on the left side of the angel - from the base of the head (angel's neck) towards the edge (as in the photo below).
- Next, we assemble the angel with our hands. We bend the skirt part like a cone-bag - and insert the slot into the slot. The fastener-adhesion is obtained due to these cuts. And the wings themselves bend to the sides and the head sticks up.
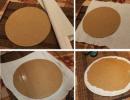
Paper angel
From an openwork napkin.
And here is an example of an angel made from a paper pastry napkin. Here we are making three cones at once - a skirt cone, and two cones for the arms. Inside the sleeves of the cones we see angel hands - they are made from a slightly broken ice cream stick. Under the angel's skirt there is a hidden base (a cork from a wine bottle, or a cut off neck from plastic bottle. The base under the skirt is necessary so that our cone skirt does not sag under the weight of the ball-head and hands.

And here is another angel, made according to the same pattern but with elements of twisted paper (quilling). Here the wings are made from strips of paper rolled and glued using the quilling technique. The hair is also twisted strips of paper, the pens are also quilling modules. But the dress, with sleeves and collar, is just paper elements. Which are decorated with lace made with a simple hole punch. We cut out conical blanks, and before wrapping these blanks into cones, we first make an openwork row of holes along the edge - with a regular office hole punch. It turns out elegant and unusual.

DIY angel
From corn leaves.
Corn stalk, when properly dried, is a very durable material for crafts. Like corrugated paper, you can cut and roll blue crafts from it. And an angel can also appear from a corn leaf. We wrap a round ball with corn cake (we get the head and the trunk of the neck going down into the body of the angel. We attach a fan skirt, wings, etc. to this trunk. You can find many more crafts from corn leaves on this site in the article Crafts from natural material for children.

Craft angel for children
From egg packaging.
The cardboard cassettes in which we buy eggs are a source of cone shapes. Cut out the conical parts of the packaging. Painting from to white and use it as the basis for a New Year's children's angel craft. You can place such angels on festive table, hang them on the Christmas tree as a Christmas decoration or make them part of New Year's composition to decorate the interior.


DIY angels
From popsicle sticks.
Here's an idea for you Christmas decorations in the form of Christmas angels. We paint the ice cream sticks with white gouache and fix the paint with hairspray so that it doesn’t stain your hands. And we assemble the angel using glue. Add elements from cardboard, wooden beads, thread and foil. We receive a Christmas tree pendant-toy for New Year.

Angels for children
Crafts from plates.
From ordinary disposable plates - plastic or paper - you can make an angel for Christmas.
Below we see an example of a children's flat applique. Here we cut out only the skirt segment from the plate, and the rest is from cardboard and fluffy wire made.

But volumetric angels– where the round plate is the basis for twisting the cone. And the angel is created according to the principle of a cone paper craft


Craft angel for kids.
Using print technique.
Children love the handprint graphics. If we place our palm on a sheet of paper three times (clenching our fingers tightly), we will immediately get the entire silhouette of an angel - with a dress and two wings behind its back. All that remains is to complete this craft with a face, threaded hair and a halo over the head.

Salt dough angels.
Salt dough is an interesting craft material. With its help, we can make any images and figures using only pure imagination and sleight of hand. The dough is plastic and holds its shape well after drying. Beautiful crafts, which will delight your loved ones for a long time.


Angels sewn from felt
and crocheted.
If your child has already taken up handicrafts using fabric and thread, then you can organize a feasible craft for children’s hands. Cut out the paired parts of the angel - the front and back parts and give the child the task of connecting these pairs together along the edge using a regular edging seam.


And here is an example of a crocheted angel. For those who know how to knit, this is a simple task. Just move the canvas in a circle, and reduce the number of columns in the row if you want to narrow the canvas, or add more if you want to widen it.

The design of your crochet angel depends on your imagination and the threads that you have available. Angel hair is easy to make by stretching long threads and picking up columns along the edge of the angel's face.

Or you can hook the threads to the angel’s head along the central parting. And then put it into a braid or other hairstyle.

Here is an idea for this New Year on the topic of how to make an angel with your own hands.
And you can also
become Angels yourself…
Angels fly because I feel at ease (someone once correctly noted)
Let's lighten our hearts by helping other hearts (photo below).
To become an angel for a WHOLE YEAR, you need to fill out a small form on the website - thanks to which 1 time per month your bank card will be debited 100 rubles to the Children's Hearts relief fund.

May this New Year be filled with small miracles made with your own hands.
Olga Klishevskaya, especially for the site ""
If you like our site, you can support the enthusiasm of those who work for you.
Happy New Year to the author of this article, Olga Klishevskaya.
Today you will learn how to make simple angels from paper napkins. The technology is so simple that even younger children can handle it school age.
To make angels you need the following materials:
- paper napkins (two white 25x25 cm and two colored three-layer ones, size 33x33 cm);
- silver braid and ribbon;
- a little padding polyester;
- scissors;
- bright ribbons.
First, make a little angel out of white napkins.

Open one of the napkins and place a little padding polyester in the center.

Connect the corners to form a triangle.

Then wrap the napkin around the padding polyester and tie with a bright ribbon. It turns out the head and torso.

Make wings from the second white napkin. Unfold the napkin into a large square.

Fold like an accordion and tie with a red ribbon.

Tie the wings to the first piece.

Shorten the wings a little so that they are proportional to the body.

Tie a silver braid around your head. The miniature light angel is ready.

The second angel will be larger and its manufacturing technology will be more complex.
Open one of the colored napkins.

Place padding polyester balls in the middle (on the wrong side).

Fold the napkin into a triangle.

Tie a silver ribbon around the padding polyester ball. It turns out to be a head.

Make angel arms from the side corners of the napkin. Just tie pieces of ribbon around the edges.

Use the second napkin to form wings. This can be done in two ways.
Unfold the napkin.

Gather with an accordion from the top to the bottom corner. Tie with ribbon.

Tie the blank to the head of the toy. You get fluffy wings.

Second manufacturing option!
You need to fold the napkin into a large triangle.

And pull the corner to the center of the long side. Secure everything with tape.

Then tie it to the first workpiece.

If you think the wings are too big, you can shorten them a little.

Tie a ribbon to the middle of your head. This is such a charming little angel.

The first manufacturing option is much simpler, but only the angel is more fragile. But you can play with the second toy. Let it be a little fairy with wings and a magic wand that will fulfill all your daughter’s wishes.
And if you want to extend the life of these toys, use pieces of thick fabric to make them.